Hello, it's that time of the week again - a Dev Diary -day! This weeks topics are yet again around the after effects project and it seems I'm close to having results that I can live with.
The Long Road of Fiddling
For the past week I have continued to test several ways of bringing more depth to the floor tecture, to make it pop out more and seem a real, 3D icy surface, but it seems to be eluding me still.It might be, that the depth wont come out of it properly until I have finished the 3D text layers, which I will propably start out next later this week, after some tweaks. But, pictures tell more than just words and here is a sample of what I have been fiddling with.
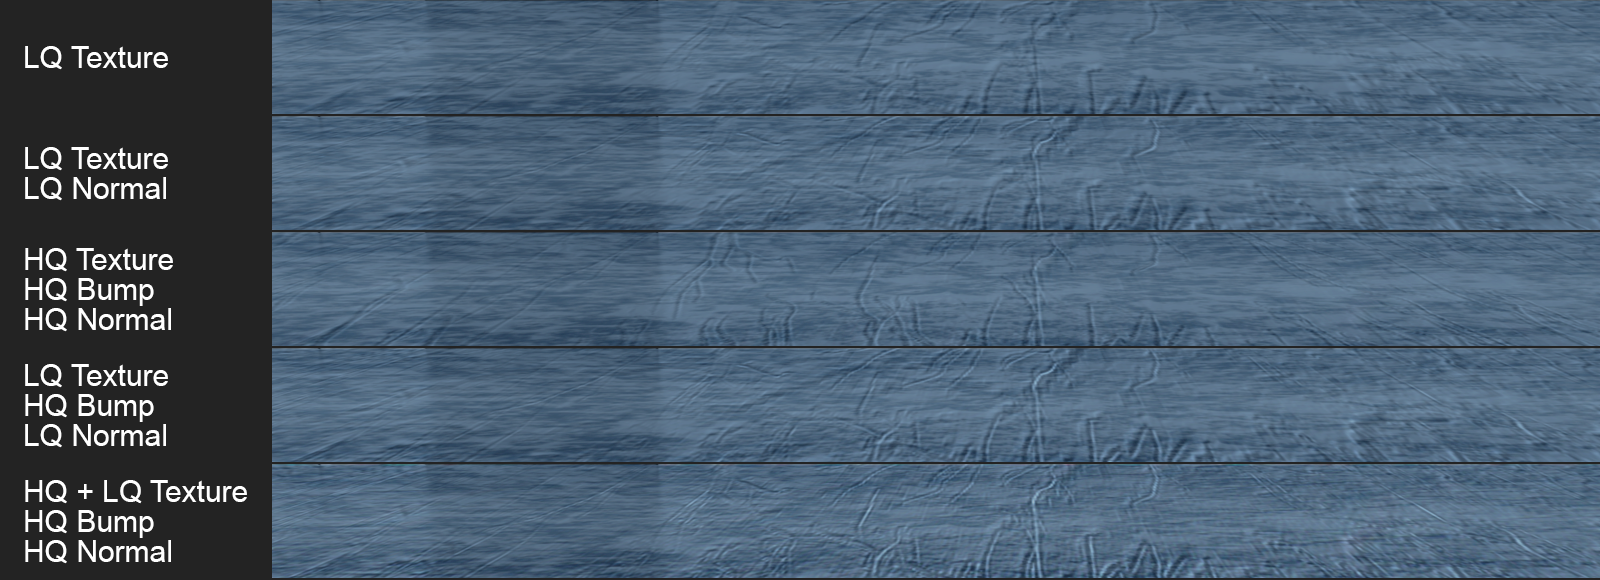
The picture makes it quite self explanatory. I have been comparing results on various different combinations of texturing effects, with tiny but visible differences on the results. I'm not sure if I'm doing something wrong, or was the Normal and Bump maps generated in Photoshop not detailed enough, one would be too low of a resolution (1080p) for example. I will try rezising the original picture to 4k x 4k or 8k x 8k and taking another Normal and bump maps from that, see if that brings better results.
There also seems to be a relatively big difference on how much the bump maps affect the depth of the cracks by it self, compared to when used with a normal map. If I only use the bump maps, it has only half of the effect at best cases (thus far), compared to how much detail the Normal maps produce. It might be also, that I just don't know how to use them properly, which is entirely possible. Currently I use them just like textures and make sure that the texture is the first thing rendered, Normal maps the second and Bump maps the last. I still like to include the bump maps to the finished looks, as that seem to bring out a very slight, but visible change to the end result.
From the results seen above, I took the last one and combined HQ and LQ textures together and added the mapping textures straight to the underlying texture file it self, to make the details pop out the most. On the above picture it has some lighting issues, as by it self, I didn't like it one bit. The problem was remedied simply by changing the lighting options. Since I was nearing the zone state while fiddling with the settings, I didn't take an intermediary picture between that comparison and the next results I came up with, after a full days work of exploring.
The Contender
I'm lucky to have enough patience to enjoy exploring several options. I literally scrolled through the After Effects "Effects and Filters" list and I discovered the "Caustics" effect. Made sense, as I have heard this term used several times in tutorial videos about how material settings work and affect the reflective properties of the object in blender and unity. Here is where I'm at currently;

Granted, there is much more changes to this one than just "Caustics". I also went overkill and copied one more Snow layer and turned it's opacity to 25%. I also added "Bevel Alpha" effect to every layer, in an attempt to bring out as much depth as I could and to some decree, it did help the issue. Now that I put caustic effects on the floor asset, it looks much more realistic in terms of color variation, as every ice has imperfections in it and this brings it to the next level compared to just using the snow layer as shadowing spots. I might need to do something about the brightness though, as the rendered picture is brighter than the one seen in the enlargement - a good reminder to always test render before the final render. The "Bevel Alpha" worked best on the snow layer actually, which made it look more 3D, as waves and/or bumps on the surface of the ice. The background texture melds into the effects more nicely now, as caustics ads several effects to the surface by it self, one of which is more natural looking opacity levels between the texture and surface layers, as it includes lighting, blur and several other effects all in one, which interact in different way than adding those effect separately. At least, this is my experience with fiddling with the settings of "Caustics" -effect.
All in all, the direction seems promising. Now I will try a few more things before I start making the 3D text layers for the "Now Playing" info. First I will try comparing the results to the 4k and 8k versions of the textures and normal maps, which shouldn't bee too much of a hassle and try to fix the lighting settings within the "Caustics" effect. For some reason, the end result gets insanely bright and all the details disappear behind this ultra bright light on the surface. It might be that the caustics effect does not like the "Bevel Alpha" -effect, as if I have understood correctly, lighting properties works in the alpha layer as well.
Now then, back to work! This is it for this weeks Dev Diary and I hope to see you on the next one ![]()
And as always, you can check out every possible mid week announcements about the project on these official channels;
• YouTube • Facebook • Twitter • Discord • Reddit • Pinterest • SoundCloud • LinkedIn •