The Tools
Prequisite As a programmer, before jumping into this tutorial, here are a few things you should know:
- Understand core-programming concepts
- Understand basic input
- Understand basic game loop
Tools used by the author
- FlashDevelop 4.0
- Flash CS 5.5 for graphics
Introduction
Good day reader, today we are going to be building PAC-MAN, an iconic game released in 1980. We will be covering setting up the classic pac-man grid, tossing in the player and ghosts, and by the end of this tutorial we well have a fully working PAC-MAN game.
Please note that the tutorial will not be covering menus. It is purely designed to focus on the game itself, and leaves it up to each individual user to add any menu system.
I will be using Actionscript 3.0 and FlashDevelop to demonstrate building this game. I do this because Flash takes care of input, graphics, and sound. I will attempt to keep the code that is tossed out in this article to be easily translatable into any other programming language. The game, tile, and unit classes are nearly completely self-contained. It will be up to the user to modify their main game loop to process the input, and update functions for the game board. Flash also has built in animation and sprite classes. Other languages will require writing supplimentary classes to support these extra functions. Please note that this is my first article and I apologize if I did not explain everything as clearly as possible.
The Result
Pacman Game This is what you can expect to have after following this tutorial.
The "Click to play" and black background were added after this tutorial, and are the only changes between the above game, and this tutorial. All code and resources were created by the author, and is included as an attachment to this tutorial, all images are also attached the associated .rar file, incase over time those images have broken.
The Grid
The very first thing when building PAC-MAN is to think about how you will represent the game's world. PAC-MAN is a very simple world. The world consists of a series of tiles where most tiles contain a pellet. Once all the pellets are eaten we reset the grid. We will use a 1D array to represent our tiles:
package {
  //Import some librarys from flash that we will need.
  import flash.display.Bitmap;

  //For Images
  import flash.display.Sprite;

  //A sprite is essentially a container object for drawable objects.
  public class Game
  {
    //We will call this class Game, it will be responsible for controlling the entire game.

    public static const TileWidth:Number = 32.0; //Each tile will be 32 pixels wide.
  	public static const TileHeight:Number = 32.0; //Each tile will be 32 pixels high.
  	public var m_Tiles:Array = []; //The array for containing all of our Tiles.
  	public var m_Width:int //How many tiles wide is the grid.
    public var m_Height:int; //How many tiles high is the grid.
  	public var m_Sprite:Sprite = new Sprite(); //We have our own sprite for drawing into, this will also be helpful for translating the camera around the player later.
	}
};
Now, we need to know what type of information that the tile should contain. Since the game class is going to be responsible for the Player, and the Ghosts, this means that the Tile doesn't have to be directly responsible for other objects navigating from tile to tile.
So what we do need to know is: is the tile passable? Does the tile have a pellet? What type of pellet is it? We have two types of pellets, the standard editable one, and the pellets that give us the ability to eat ghosts. So the tile has to not only tell us if it has a pellet, it also has to tell us what type.
To make life easier for us, we will also keep track of where the tile is in the array, by giving it an field for identifying it's index position. The tile should also be responsible for how it's drawn, this isn't strictly neccesary. However by giving it information on how it should be drawn, we allievate the responsibility from the game class.
package
{
  //Import some librarys to allow the tile to control it's own rendering.
  import flash.display.Bitmap;
  import flash.display.Sprite;
  public class Tile
  {
    //We require 4 boolean values, is the tile closed, does it have a pellet, is that pellet big. and when reseting the tile, we need to know if we should give it a pellet.
    //Insead of using 4 variables, we instead use 4 bits from an int variable, and use bit-wise operations to check the flags.
    //So we statically define each flag, and the bit that represents flag.

    public static const CLOSED:int = 1;  //Used to tell if the tile is passable or not.
    public static const HASPELLET:int = 2; //Used to check if the tile currently has a pellet or not.
    public static const HASBIGPELLET:int = 4; //Used to check if the pellet is a normal pellet, or a pellet that allows us to eat the ghosts.
    public static const NOPELLET:int = 8; //An additional flag, that allows the tile to be open, but allows us to not to give it a pellet when we don't have to.
    public var m_Flag:int; //The flag used for representing the tile's current state.
    public var m_Sprite:Sprite = new Sprite(); //The sprite that well be used for rendering the tile.
    public var m_Index:int; //The index of the tile, in the game tile array.
    public function Tile(Flag:int, i:int)
    {
      //The constructor for the tile, we pass the starting flag, and the index position.
      m_Flag = Flag; m_Index = i;
    }
  }
}
So now that we have the tile well defined we can go back to our game class and begin to define some methods to generate the grid. Since the grid does not have to change, we can construct the tile array in the game class constructor:
public class Game
{
  ...
  //The ... represents the code segment from above.

  public function Game(S:Sprite)
	{
      //Defining the constructor for the game object, we also want to pass a sprite that we will use for drawing into.
      //To start off, we are going to generate a 10x10 grid.
      m_Width = 10; m_Height= 10;

      //If you are using another language, this would be where you would define the size of the array.
      for(var i:int = 0; i < m_Width*m_Height; i++) m_Tiles = new Tile(0, i);

      //we define each initial tile as open
      //Let's close a few tiles, so we can demonstrate the rendering capabiltys of tiles which are closed off:
      //To calculate a tile based on an x, and y position, we simply use the following formula:
      Tile = x+y*m_Width;
      m_Tiles[11].m_Flag|=Tile.CLOSED;

      //Let's close the tile at 1,1 on the grid, which is
      Tile = 1+1*10 = 11 m_Tiles[12].m_Flag|=Tile.CLOSED;

      //Let's also close the tile next to 1,1 at 2,1. which is
      Tile = 2+1*10 = 12; m_Tiles[21].m_Flag|=Tile.CLOSED;

      //Let's close a couple tiles undeaneath the above two tiles, 1,2 and 2,2 which is
      Tile = 1+2*10 = 21 m_Tiles[22].m_Flag|=Tile.CLOSED;
      //Tile = 2+2*10 = 22 CalculateSprites();

      //Now let's figure out how to draw the tiles.
      for(int i=0;i.m_Sprite); //Add all the tiles to our sprite.
      	S.addChild(m_Sprite); //then let's add our sprite to the parent sprite.
    }
};
Now you are probably asking, what is CalculateSprites()? Good question. But before we lay it out, we need to define a helper function for figuring out neighbor tiles. If i were to say "Hey, i'm tile #10, what's the tile to my right?" we need to be able to say "Let me check, I see that the tile on your right is #11."
public class Game { ... //We need a couple helper functions for determing the position of the tile in screen coordinates.
 public
 function GetTileX(T: Tile): Number {
  return (T.m_Index % m_Width) * TileWidth;
  //we need to find the x position of the tile in the grid, so we take the index, and mod it against the width of the grid, to get the screen position, we multiply by each tile's size(defined above.)
 }
 public
 function GetTileY(T: Tile): Number {
  return (int)(T.m_Index / m_Width) * TileHeight;
  //we need to find the y position of the tile in the grid, so we take the index, and divide if against the width of the grid, why divide by width, because our formula for calculating an x/y to tile index is:x+y*m_Width, as such, we to get back to a y position, we need to divide by width, not height.
  //we also need to truncate the value to the floored integer value, otherwise we won't get a real number for y. since we want the floored number, simply typecasting to int drops the decimals after division.
 }
 //A few things we pass to the function, the Tile that we want to find the neighbors for. //the x and y distance we want to translate around, for example -1,0 is left, 1,0 is right, 0,-1 is above, and 0,1 is below.
 //Finally, should we wrap the value and get the tile on the other side, or should we say that we are a border tile?
 public
 function GetTileNeighbor(T: Tile, xd: int, yd: int, wrap: Boolean): Tile {
  var TileX: int = T.m_Index % m_Width + xd;
  //Let's calculate the target tile's x position, we take our index and mod it against the total width of the world, finally we add the x distance we want to travel.
  var TileY: int = T.m_Index / m_Width + yd;
  //Let's calculate the target tile's y position, we take our index, and divide it gainst the total width of the world. why the width, because our function for caluclating tiles is: x+y*m_Width, so we natually have to divide by width to get the y position, we also neet to truncate the value to the floored whole integer. finally we add the y distance we want to travel.
  if (wrap) {
   //If we want to wrap to the other side of the grid, then we check this boolean.
   if (TileX < 0) TileX += m_Width;
   //if our target x position is less than 0, we add the width to it, and that well place us on the other side of the grid.
   else if (TileX >= m_Width) TileX -= m_Width;
   //if we are however are greather than, or equal to the width of the world, then we need to subtract to get to the other side of the grid.
   if (TileY < 0) TileY += m_Height; //We do the same as above for y, but instead we use the height instead of width.
   else if (TileY >= m_Height) TileY -= m_Height;
  } else {
   //We don't want to wrap around the world, so if the target tile is outside the grid boundarys, we need to return a null tile.
   if (TileX < 0) return null;
   else if (TileX >= m_Width) return null;
   if (TileY < 0) return null;
   else if (TileY >= m_Height) return null;
  }
  return m_Tiles[TileX + TileY * m_Width];
  //now that we've found a target tile, and it is valid, we can return it.
 } //This function can crash if xd, or yd is >= width/height, and wrap is set to true. however we will never have to supply such large value's, so their's no reason to worry about such a thing.
};
Now that we can figure out the tile that is next to another tile, we now want to figure out how each tile is suppose to draw itself. As such, this is why we define calculateSprite(); This function serves no gameplay purpose. It is only for the asthetics of the game. The game will still enforce boundaries even if we didn't draw them. What about the walls!? It's not really fun to play pac-man and have no idea where the walls are. This is why we need to tell the tile how it's suppose to draw itself. There's a few things that we need to assume: first we assume that every closed tile has at least one neighbor that is also closed. Why do we have to have a closed neighbor? That's how the original pac-man is built. Second of all, by making this assumption we only need 3 images for creating a good looking grid:
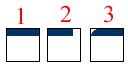
The first one is a solid bar, used for when both the left and right tiles are also closed. The second one is for when the right tile is closed and the left tile is not closed (this is why we need to assume we always have a neighbor). Finally, the third image is for when the left tile is closed and the right tile is open (again we assume we have at least one closed neighbor). The reason we don't create flipped versions of 2+3 is because we place the images clockwise around the tile. Because we are rotating in a defined direction we don't need the other sides. Onto writing the function!
public class Game {
...
//In flash, we need to embed resources as variables, and create a generic class that is the resource(in this instance we create 3 bitmaps).
//If you are using another language, think of these as textures, and make sure to only load them once.
//If you are using flashdevelop, make sure the objects are added to the library correctly, an explanations on how to link resources to the game is outside the scope of this article.
[Embed(source = "../lib/Bar_A.png")]
//#1
private
var Bar_ASprite: Class;
[Embed(source = "../lib/Bar_B.png")]
//#2
private
var Bar_BSprite: Class;
[Embed(source = "../lib/Bar_C.png")]
//#3
private
var Bar_CSprite: Class;
//to make the code look a little bit more fluent, we define a helper function for translating bitmaps when they are attached to the tiles.
public
function ApplyTranslation(B: Bitmap, Rotation: Number, x: Number, y: Number): Bitmap {
B.rotation = Rotation; //Rotations are in degrees.
B.x = x; //apply translations to the bitmap for rendering.
B.y = y;
return B;
//Return this bitmap, using this function, makes writing one liner's in the calculateSprite easier.
}
//This is the heavy duty rendering function:
public
function CalculateSprites(): void {
for (var i: int = 0; i < m_Width * m_Height; i++) {
//Loop through all the tiles.
var T: Tile = m_Tiles; //Create a local variable of the tile, this is purely to write a bit less.
if ((T.m_Flag & Tile.CLOSED) != 0) {
//We check if this tile is closed, if so, then we want to attach some borders to it.
var LeftTile: Tile = GetTileNeighbor(T, -1, 0, false); //Let's get the left tile.
var RightTile: Tile = GetTileNeighbor(T, 1, 0, false); //Right tile
var TopTile: Tile = GetTileNeighbor(T, 0, -1, false); //Above tile
var BtmTile: Tile = GetTileNeighbor(T, 0, 1, false); //Below tile.
//We need to know which side's to add bar's to.
var BarLft: Boolean = (LeftTile != null && (LeftTile.m_Flag & Tile.CLOSED) == 0);
//Check that the tile is not null, then check that it isn't closed.
var BarRgt: Boolean = (RightTile != null && (RightTile.m_Flag & Tile.CLOSED) == 0);
//" "
var BarTop: Boolean = (TopTile != null && (TopTile.m_Flag & Tile.CLOSED) == 0);
//" "
var BarBtm: Boolean = (BtmTile != null && (BtmTile.m_Flag & Tile.CLOSED) == 0);
//" "
//Now we need to select an appropiate bitmap, since we are rendering clockwise.
var TopBar: Bitmap = BarTop ? (BarLft ? new Bar_CSprite() : (BarRgt ? new Bar_BSprite() : new Bar_ASprite())) : null;
//If you are not familar with the ? symbol, here's what the above logic comes out to:
//var TopBar:Bitmap;
//If(BarTop==true){
// if(BarLft==true) TopBar = new Bar_CSprite();
// else if(BarRgt==true) TopBar = new Bar_BSprite();
// else TopBar = new Bar_ASprite();
//}else TopBar = null;
//So, basically what this boils down to is: if we need to draw a bar on the top, then which one to choose?:
//if we are also drawing a bar on the left, then we know that the left bar is going to choose to draw Bar #2
//however, if we are instead drawing a bar on the right, then we know that the bar on the right is going to pick #3
//and finally, if both left and right are not going to be drawn into, then we know both our neighbors are closed, so we select #1
var BtmBar: Bitmap = BarBtm ? (BarRgt ? new Bar_CSprite() : (BarLft ? new Bar_BSprite() : new Bar_ASprite())) : null;
//Repeat the above logic with the rest of the bitmaps.
var LftBar: Bitmap = BarLft ? (BarBtm ? new Bar_CSprite() : (BarTop ? new Bar_BSprite() : new Bar_ASprite())) : null;
var RgtBar: Bitmap = BarRgt ? (BarTop ? new Bar_CSprite() : (BarBtm ? new Bar_BSprite() : new Bar_ASprite())) : null;
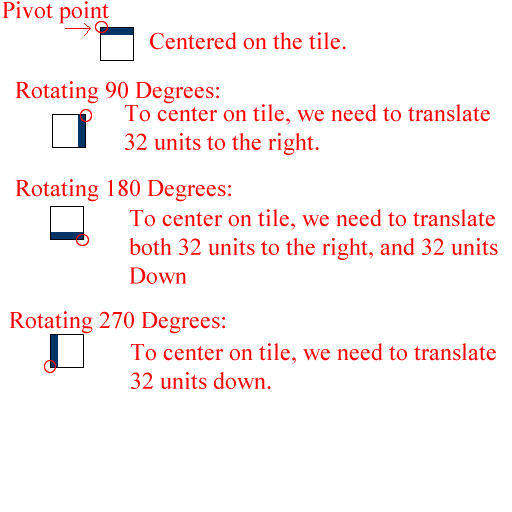
if (TopBar != null) T.m_Sprite.addChild(ApplyTranslation(TopBar, 0.0, 0.0, 0.0));
//If we have a bar to draw, we need to translate it to be placed correctly on the tile, we then add the bitmap to the tile's sprite container.
if (BtmBar != null) T.m_Sprite.addChild(ApplyTranslation(BtmBar, 180.0, 32.0, 32.0));
//See below for an explanation for why we choose our x and y treanslations.
if (LftBar != null) T.m_Sprite.addChild(ApplyTranslation(LftBar, 270.0, 0.0, 32.0));
if (RgtBar != null) T.m_Sprite.addChild(ApplyTranslation(RgtBar, 90.0, 32.0, 0.0));
}
T.m_Sprite.x = GetTileX(T);
//Now we need to position the tile at the correct position for the screen.
T.m_Sprite.y = GetTileY(T); //Do the same for the y.
}
}
};Now you are probably asking, why are we doing such weird translation values for different sides of the bar? Here's an image that hopefully explains it better:
So with that taken care of we need to now setup our Main class to get the entry point for our game, and actually get everything drawing:
package
{
  import flash.display.Sprite;

  public class Main extends Sprite
  {
    public var m_Game:Game = null;

  //Because we are going to be using callbacks later, we make this a public variable.
  //If you are using another language, this is our entry point/
  public function Main():void { m_Game = new Game(this);

                               //Now we create an instance of the game.

                            }
}
};
With that little bit of code, we should now see:

Looks ok, but we need to add a border around the grid. So let's go back to our game constructor:
public class Game{
  ...

  public function Game(S:Sprite)
{
  ...

  //for(var i:int = 0; i < m_Width*m_Height; i++) m_Tiles = new Tile(0, i);
  //change this line into: for(var i:int = 0; i < m_Width*m_Height; i++)
  m_Tiles = new Tile(((i % m_Width) == 0 || (i % m_Width) == (m_Width - 1) || ((int)(i / m_Width)) == 0 || ((int)(i / m_Width)) == (m_Height - 1))?Tile.CLOSED:0, i);

  //The above code sets the entire border around the map to be closed. ...
}
};
With this change, we should now be looking at:

Now we have a basic grid, and things are beginning to come together. So let's move onto adding the pellets
public class Game {
...
public
var m_TotalPellets: int;
//We need to track the total number of pellets.
public
var m_EatenPellets: int;
//We need to track the number of eaten pellets.
...
//We need to embed two new bitmaps, the pellet, and the BigPellet. the BigPellet is our ghost eating pellet.
[Embed(source = "../lib/Pellet.png")]
private
var PelletSprite: Class;
[Embed(source = "../lib/BigPellet.png")]
private
var BigPelletSprite: Class;
//Add a function for building the pellet's for each tile.
public
function ResetPellets(): void {
//Reset both values to 0.
m_TotalPellets = 0;
m_EatenPellets = 0;
for (var i: int = 0; i < m_Width * m_Height; i++) {
//Loop through all the tiles.
var T: Tile = m_Tiles;
//Make a variable to represent the tile.
if ((T.m_Flag & (Tile.CLOSED | Tile.NOPELLET)) == 0) {
//We check that the tile can have a pellet(that their is no NOPELLET flag set), and that it isn't a closed tile.
//Now we add a pellet image to the tile, we also check if we need to add a big pellet, or a regular pellet.
if ((T.m_Flag & Tile.HASPELLET) == 0) {
//Because this function could be called when all the tile's haven't been eaten, we need to check if it's ok to add the sprite onto the tile.
T.m_Sprite.addChild((T.m_Flag & Tile.HASBIGPELLET) == 0 ? new PelletSprite() : new BigPelletSprite());
}
m_TotalPellets++;
//Incrment the total number of pellets.
T.m_Flag |= Tile.HASPELLET;
//Make the tile so that we will know it has a pellet.
}
}
return;
}
public
function Game(S: Sprite) {
...
...CalculateSprites();
//Include after this line:
ResetPellets();
...
}
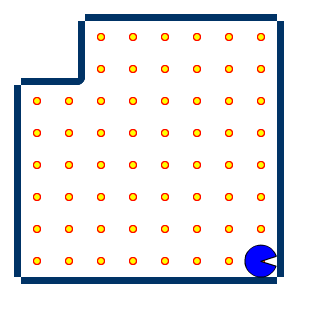
};With the above changes, our grid should now look like:

It's looking pretty good, so now let's add a player to our game!.
The Player
So, now that we have our grid, we want to add a player. The first thing to think about with a player, is that the player should simply be an extension of the ghosts, rather than making a unique class for each. Let's call this new class Unit
package{
  import flash.display.MovieClip;
  import flash.display.Sprite;
  public class Unit
  {
    //Define some constants for directions.
    public static const DIR_LEFT:int = 0;
  public static const DIR_UP:int = 1;
  public static const DIR_RIGHT:int = 2;
  public static const DIR_DOWN:int = 3;
  public var m_Tile:Tile;

  //Get the current tile we are on.
  public var m_Sprite:MovieClip;

  //The animation movie clipe for the sprite(note that if you are using another language, you will have to provide your own animation system.)
  public var m_Direction:int = DIR_LEFT;

  //The direction we are facing.
  //Constructor for a unit, we provide the tile it's on, the Game, and the movieclip representing the object.
  public function Unit(T:Tile, Gm:Game, MC:MovieClip)
  {
    m_Tile = T;
    m_Sprite = MC;
    m_Sprite.x = Gm.GetTileX(m_Tile) + Game.TileWidth * 0.5;

    //We add an offset, because the movieclip is centered at it's orgin, instead of the top left, we need to add half the MC's width to the sprite's position(note that the MC size should be equal to the TileWidth defined in Game.)
    m_Sprite.y = Gm.GetTileY(m_Tile) + Game.TileHeight * 0.5;

    //Again, set the sprite's position, relative to the parent sprite.
  }
}
};
Alright now we have the basic outline of the unit, so let's add them to the game class:
public class Game
{
  ...
  public var m_Units:Array = []; //The array for containing all of our units.

...

public function Game(S:Sprite)
{
  ...
  m_Tiles[22].m_Flag|=Tile.CLOSED;
  m_Units[0] = new Player(m_Tiles[55], this, new Player()); //we select a tile at 5,5 to place our player, and we select the Player MC.

  //Note that Player is a class inside the Player.swc file, when it's included in the flash library, the class is made available for creating
  //Movieclips, this part can be a bit confusing if translating into a language that doesn't have a library system the way flash works.
  //Essentially you would pass a player animation sprite from w/e you are using for your animation system.
  ...

    ...for (i = 0; i < m_Width * m_Height; i++)
  m_Sprite.addChild(m_Tiles.m_Sprite);

  //Add after this line:
  for(i = 0; i < m_Units.length; i++) m_Sprite.addChild(m_Units.m_Sprite);

  //Add all the units to our sprite.
  ...
}
};
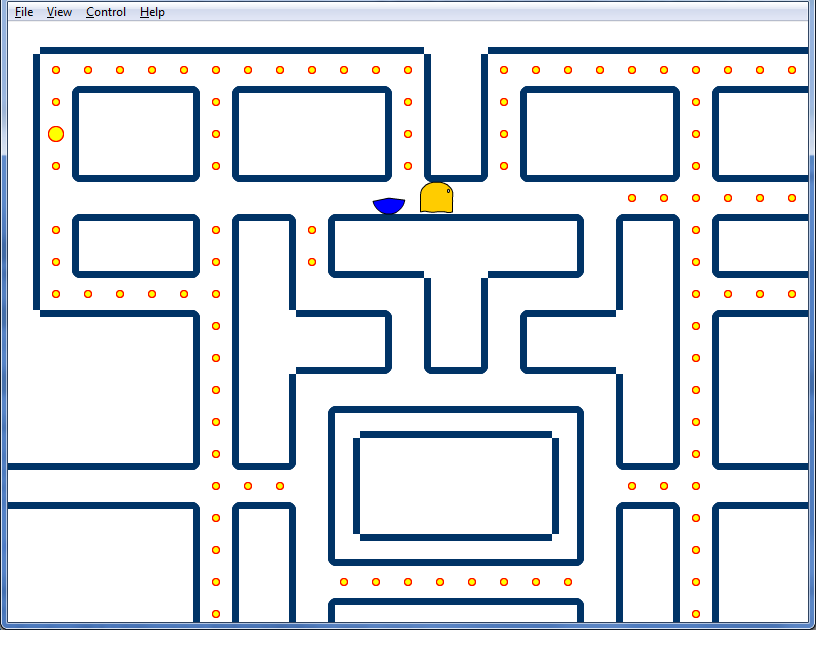
With the above changes, we should now see:
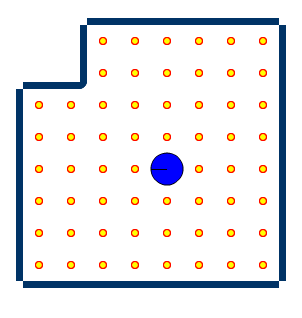
Yipee! Now we have our player, but he's not doing very much. It's time to get into the nitty gritty of what needs to be done:
public class Game
{
  ...
  //The Update function, where our entire game logic is handled:
  public function Update():Boolean
  {
    //We will return a boolean, later we can use this to determine if the game is over.
    var i:int;
    for (i = 0; i < m_Units.length; i++) m_Units.Update(this);

    //We'll get to this function later, but each unit well control updating itself.
    return false;

    //Game is not over yet!
  }
};
So now we have an outline of our Update function in Game. Now we need to make a few changes to our main class:
package
{
  ...
  import flash.events.Event;
  public class Main
  {
    ...
    //Update callback function in flash.

    public function UpdateFunc(E:Event):void
    {
      m_Game.Update() return;
    }

  ...

  public function Main():void
  {
    ...m_Game = new Game(this);

    //Add after this line: stage.addEventListener(Event.ENTER_FRAME, UpdateFunc);

    //Set callback for updating, this function well get called at a rate equal to the number of frames per second the swf is set to play at. //Note that if this is being translated to another language, you can alternativly start your main game loop here, just be sure to call UpdateFunc inside your time-step code.
  }
};
}
We are almost ready to see our little pac-man walking across the screen, but first we need to add an update function to our Unit's. In order for the unit to go anywhere, we are also going to define a few things:
public class Unit
{
  ...

  public static const MaxTicks:int = 10;

//The number of frames(or times that update will be called) that it will take to move to another tile, I short hand this to calling it tick, instead of frames. since we assume the game well run at 60 frames(or ticks) per second. Then that means we move from one tile to another every 1/6th a second.
public static const MaxFrames:int = 30;

//The number of frames that a particular segment of animation length.
public var m_Tick:int = 0;

//The current tick, once we are >= to MaxTicks we will have moved to another tile.
//Unit Update function!
public function Update(Gm:Game):void
{
  //Figure out which way we are heading:
  var TarX:int = (m_Direction == DIR_LEFT? -1:(m_Direction == DIR_RIGHT?1:0));

  //This code boils out to being:
  //public var TarX = 0;
  //if(m_Direction==DIR_LEFT) TarX = -1;
  //else if(m_Direction==DIR_RIGHT) TarX = 1;
  var TarY:int = (m_Direction == DIR_UP ? -1:(m_Direction == DIR_DOWN?1:0));
  var TarTile:Tile = Gm.GetTileNeighbor(m_Tile, TarX, TarY, false);

  //We will deal with wrapping later, for now we get our target tile!
  if (TarTile != null && (TarTile.m_Flag & Tile.CLOSED) == 0)
  {
    //Check that the target is a valid file.
    m_Tick++; //Increment our ticks.

    if (m_Tick >= MaxTicks)
    {
      //We are on, or exceeding the target ticks.
      m_Tick = 0;

      //Reset ticks
      m_Tile = TarTile;

      //Set us on the target tick.
    }
  }
  else m_Tick = 0;

  //If the target is null, or is closed, then we reset the ticks.
  var Percent:Number = m_Tick / MaxTicks;

  //We get a percentage we have moved from the our tile, toward the target.
  var CurrentTileX:Number = Gm.GetTileX(m_Tile);

  //Get our tile x.
  var CurrentTileY:Number = Gm.GetTileY(m_Tile);

  //Get our tile y.
  var TargetTileX:Number = Gm.GetTileX(TarTile);

  //Get target tile x.
  var TargetTileY:Number = Gm.GetTileY(TarTile);

  //Get target tile y.
  m_Sprite.x = CurrentTileX + (TargetTileX - CurrentTileX) * Percent + Game.TileWidth * 0.5;

  //Move our x position as a percentage of distance between the current tile, and the target tile.
  m_Sprite.y = CurrentTileY + (TargetTileY - CurrentTileY) * Percent + Game.TileHeight * 0.5;

  //Move our y position as a percentage of distance between the current tile, and the target tile.
  var FirstFrame:int = m_Direction * 30 + 1;

  //Calculate the first frame.
  var LastFrame:int = (m_Direction + 1) * 30;
  //Calcuate the last frame in the animation segment.

  //Note that the animation in the Player swf is made in diffrent segments of 30 frames, each segment lines up with the Direction variable. (i.e frames 1-30 are for when the player is facing left, 31-60 up, 61-90 right, 91-120 down)
  if (m_Sprite.currentFrame < FirstFrame || m_Sprite.currentFrame >= LastFrame)
  {
    //If our animation frame is outside the segment, set it back to the target segment:
    m_Sprite.gotoAndPlay(FirstFrame);

    //Let's goto and play our first frame.
  }
  return;
}
};
So with these changes, you should now see:
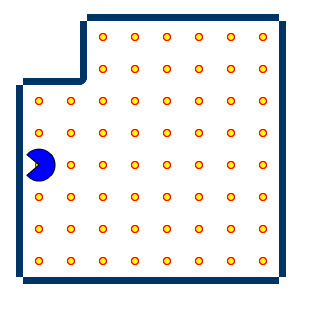
Yea, we are moving...forward. So let's get it so that we can now move around, and change direction:
public class Main
{
  ...

  //Setup several key flags, so we can change direction:
  public static const LeftFlag:int = 1;
public static const UpFlag:int = 2;
public static const RightFlag:int = 4;
public static const DownFlag:int = 8;
public var m_KeyFlag:int = 0;

//Key flag, for representing our target direction.
public function UpdateFunc(E:Event):void{ ...m_Game.Update();

                                         //Add after this line:
                                         //Set our player's direction, we assume that he is Unit 0.

                                         if ((m_KeyFlag & LeftFlag) != 0)
                                           m_Game.m_Units[0].SetDirection(Unit.DIR_LEFT);
                                         else if ((m_KeyFlag & UpFlag) != 0)
                                           m_Game.m_Units[0].SetDirection(Unit.DIR_UP);
                                         else if ((m_KeyFlag & RightFlag) != 0)
                                           m_Game.m_Units[0].SetDirection(Unit.DIR_RIGHT);
                                         else if ((m_KeyFlag & DownFlag) != 0) m_Game.m_Units[0].SetDirection(Unit.DIR_DOWN);
                                        }

//SetKey callback:
public function SetKey(Key:String, Down:Boolean):void
{
  //Evaluate if the key is a valid one, and then modify the appropiate flag.
  if (Key == 'a') m_KeyFlag = Down?(m_KeyFlag | LeftFlag) : (m_KeyFlag & ~LeftFlag);

  //The above boils down to:
  // if(Down) m_KeyFlag |= LeftFlag;
  // else m_KeyFlag &= ~LeftFlag;
  else if (Key == 'w') m_KeyFlag = Down?(m_KeyFlag | UpFlag) : (m_KeyFlag & ~UpFlag);
  else if (Key == 'd') m_KeyFlag = Down?(m_KeyFlag | RightFlag) : (m_KeyFlag & ~RightFlag);
  else if (Key == 's') m_KeyFlag = Down?(m_KeyFlag | DownFlag) : (m_KeyFlag & ~DownFlag);
}

  //KeyUp callback:
  public function KeyUp(KeyEvent:KeyboardEvent)
{
  //We need to set the key appropiate key flag, for when changing directions.
  SetKey(String.fromCharCode(KeyEvent.charCode), false);
  return;
}

//KeyDown callback:
public function KeyDown(KeyEvent:KeyboardEvent)
{
  SetKey(String.fromCharCode(KeyEvent.charCode), true);
  return;
}

...
public function Main():void
{
  ...

  stage.addEventListener(Event.ENTER_FRAME, UpdateFunc); //add afterL

  //Add Keyboard callbacks
  stage.addEventListener(KeyboardEvent.KEY_UP, KeyUp);
  tage.addEventListener(KeyboardEvent.KEY_DOWN, KeyDown);
}
}
You might be wondering why we don't change directions right in the keyUp/Down functions, but i'll get to that after we modify the unit class so that the unit can change directions:
public class Unit
{
...
public var m_TarDirection:int = DIR_LEFT; //The target direction for changing.
public function Update(Gm:Game):void
{
...
m_Tile = TarTile
//Add after this line: ChangeDirection(Gm);
//Change our direction if we can/have to. ...modify the }else m_Tick = 0; To: }else{ m_Tick = 0;
ChangeDirection(Gm); //Change our direction.
}
}
//Change the direction if we can.
public function ChangeDirection(Gm:Game):void
{
if (m_TarDirection == m_Direction) return; //If we are already facing our target direction, then return.
var TarX:int = (m_TarDirection == DIR_LEFT? -1:(m_TarDirection == DIR_RIGHT?1:0)); //Get the target x distance.
var TarY:int = (m_TarDirection == DIR_UP? -1:(m_TarDirection == DIR_DOWN?1:0)); //Get the target y distance.
var TarTile:Tile = Gm.GetTileNeighbor(m_Tile, TarX, TarY, false); //Get the target tile, we'll handle wrapping later.
if (TarTile != null && (TarTile.m_Flag & Tile.CLOSED) == 0) m_Direction = m_TarDirection; //Valid direction, so let's head that way.
m_TarDirection = m_Direction; //Reset the target direction.
return;
}
//Set the target direction.
public function SetDirection(Dir:int):void { m_TarDirection = Dir; return; }
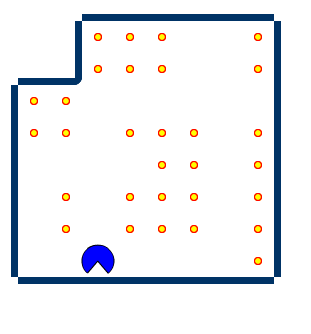
}; With these changes, you should now be able to move around:
So, why didn't we change the direction in the keyDown/Up callback? this is because we only want to change our direction when our player is at 0 ticks. Otherwise what would happen if it's 9/10th the way to the next tile, and the user changes directions. Suddently their's a radical shift in the players position. Ok, you might be saying. Then why not only allow changing when say we have moved less than two ticks? Good question. But now that means their are 8/10 ticks where input is meaninless, so instead we just capture the state of the key. We then keep trying to change directions. This creates smooth and responsive input, and doesn't allow for any jittering to occur. So, now we want to eat those pesky pellets, let's get back in there:
public class Unit
{
  ...

  public function Update(Gm:Game):void
  {
    ...
    m_Tile = TarTile; //Add after this line: Gm.EatPellet(m_Tile);

    //Let's eat the pellet on our current tile.
  }
}
Look at that, now we are eating pellets! Whats that? "What's the EatPellet" method? Ok, i suppose we could check it out:
public class Game
{
  ...
  public function EatPellet(T:Tile):void
  {
    if ((T.m_Flag & Tile.HASPELLET) != 0)
    {
      //Check that we have a pellet.
      T.m_Sprite.removeChildAt(T.m_Sprite.numChildren - 1);

      //Since the pellet is the last child, then we need to remove it from being drawn.
      T.m_Flag ^= Tile.HASPELLET;

      //Remove the pellet flag, so we can't eat this tile's pellet.
      m_EatenPellets++;

      //Increment our eaten pellets.
    }
    return;
  }
};
Finally those pesky pellets are now edible!
Alright so what happens when we eat all those pellets? we should restart then.
public class Game
{
  ...
  public static const PlayerSpawnTile:Number = 55; //Constant of where to player the player on spawn.

public var m_Finished:Boolean; //Used for re-setting the player.

public function Update():Boolean
{
  ...

  for (i = 0; i < m_Units.length; i++) m_Units.Update(this); //add after this line: if (m_Finished) ResetPlayer();
  return false;
}

public function EatPellet(T:Tile):void
{
  ...

  m_EatenPellets++;

  //add after this line if (m_EatenPellets == m_TotalPellets) {
  m_Finished = true;
  ResetPellets();
}
return;
}

//Reset Player function:
public function ResetPlayer():void
{
  for (var i:int = 0; i < m_Units.length; i++)
  {
    //Reset units.
    m_Units.m_Tile = m_Tiles[PlayerSpawnTile];

    //Set tile to player position.
    m_Units.m_Tick = 0;

    //Reset ticks
    m_Units.m_Direction = m_Units.m_TarDirection = Unit.DIR_LEFT;

    //Reset direction
  }

  m_Finished = false;
  //Reset finished flag.
  return;
}

public function Game(Gm:Game)
{
  ...
  ResetPellets(); //Add after this line ResetPlayer();
  //Setup the player.
}
};
So now we can go around, and eat all the pellets, and then get some more pellets to eat when we've eaten all the existing pellets! Alright now let's make this look like a real pac-man board:
public class Unit {
 //Ranged rectangle tile flag setting, helps with creating the grid alot easier.
 public
 function SetTileFlagRange(x: int, y: int, w: int, h: int, flag: int): void {
  for (var ix: int = x; ix < x + w; ix++) {
   for (var iy: int = y; iy < y + h; iy++) m_Tiles[ix + iy * m_Width].m_Flag = flag;
  }
  return;
 }
 public
 function Game(S: Sprite) { ...m_Width = 28;
  //The pac-man board is 28x31 tiles.
  m_Height = 31;

  ...Remove the following lines:

   m_Tiles[11].m_Flag |= Tile.CLOSED;

  //Let's close the tile at 1,1 on the grid, which is
  Tile = 1 + 1 * 10 = 11 m_Tiles[12].m_Flag |= Tile.CLOSED;

  //Let's also close the tile next to 1,1 at 2,1. which is
  Tile = 2 + 1 * 10 = 12;m_Tiles[21].m_Flag |= Tile.CLOSED;

  //Let's close a couple tiles undeaneath the above two tiles, 1,2 and 2,2 which is
  Tile = 1 + 2 * 10 = 21 m_Tiles[22].m_Flag |= Tile.CLOSED;

  //Tile = 2*2*10 = 22 ...And add in it's place:
  //Setup the entire grid to look like a pac-man board:
  SetTileFlagRange(2, 2, 4, 3, Tile.CLOSED);SetTileFlagRange(7, 2, 5, 3, Tile.CLOSED);SetTileFlagRange(13, 1, 2, 4, Tile.CLOSED);SetTileFlagRange(16, 2, 5, 3, Tile.CLOSED);SetTileFlagRange(22, 2, 4, 3, Tile.CLOSED);SetTileFlagRange(2, 6, 4, 2, Tile.CLOSED);SetTileFlagRange(7, 6, 2, 8, Tile.CLOSED);SetTileFlagRange(0, 9, 6, 5, Tile.CLOSED);SetTileFlagRange(10, 6, 8, 2, Tile.CLOSED);SetTileFlagRange(19, 6, 2, 8, Tile.CLOSED);SetTileFlagRange(22, 6, 4, 2, Tile.CLOSED);SetTileFlagRange(22, 9, 6, 5, Tile.CLOSED);SetTileFlagRange(9, 9, 3, 2, Tile.CLOSED);SetTileFlagRange(13, 8, 2, 3, Tile.CLOSED);SetTileFlagRange(16, 9, 3, 2, Tile.CLOSED);SetTileFlagRange(10, 12, 8, 5, Tile.CLOSED);SetTileFlagRange(11, 13, 6, 3, Tile.NOPELLET);SetTileFlagRange(0, 14, 6, 1, Tile.NOPELLET);SetTileFlagRange(22, 14, 6, 1, Tile.NOPELLET);SetTileFlagRange(0, 15, 6, 5, Tile.CLOSED);SetTileFlagRange(22, 15, 6, 5, Tile.CLOSED);SetTileFlagRange(7, 15, 2, 5, Tile.CLOSED);SetTileFlagRange(19, 15, 2, 5, Tile.CLOSED);SetTileFlagRange(10, 18, 8, 2, Tile.CLOSED);SetTileFlagRange(2, 21, 4, 2, Tile.CLOSED);SetTileFlagRange(7, 21, 5, 2, Tile.CLOSED);SetTileFlagRange(13, 19, 2, 4, Tile.CLOSED);SetTileFlagRange(16, 21, 5, 2, Tile.CLOSED);SetTileFlagRange(22, 21, 4, 2, Tile.CLOSED);SetTileFlagRange(4, 23, 2, 3, Tile.CLOSED);SetTileFlagRange(22, 23, 2, 3, Tile.CLOSED);SetTileFlagRange(0, 24, 3, 2, Tile.CLOSED);SetTileFlagRange(25, 24, 3, 2, Tile.CLOSED);SetTileFlagRange(2, 27, 10, 2, Tile.CLOSED);SetTileFlagRange(16, 27, 10, 2, Tile.CLOSED);SetTileFlagRange(7, 24, 2, 3, Tile.CLOSED);SetTileFlagRange(10, 24, 8, 2, Tile.CLOSED);SetTileFlagRange(19, 24, 2, 3, Tile.CLOSED);SetTileFlagRange(13, 26, 2, 3, Tile.CLOSED);SetTileFlagRange(1, 3, 1, 1, Tile.HASBIGPELLET);SetTileFlagRange(26, 3, 1, 1, Tile.HASBIGPELLET);SetTileFlagRange(1, 23, 1, 1, Tile.HASBIGPELLET);SetTileFlagRange(26, 23, 1, 1, Tile.HASBIGPELLET);...
 }
};
Now we have an entire grid to play with, unfortuantly the scene doesn't try and center the camera on the player, so you can only see so much. Let's fix that by focusing the camera on the player:
public class Game {
 //We need to pass the stage to the function for the camera.
 public
 function Update(s: Stage): Boolean {
  //We will return a boolean, later we can use this to determine if the game is over.
  ...
  for (i = 0; i < m_Units.length; i++) m_Units.Update(this);
  //Add After:
  //Camera controls:
  m_Sprite.x = -m_Units[0].m_Sprite.x + s.stageWidth * 0.5;

  //because the camera is actually the sprite itself, we are working along the negative x/y axis.
  m_Sprite.y = -m_Units[0].m_Sprite.y + s.stageHeight * 0.5;

  //set the sprite to our player's position plus half the stages width.
  if (m_Sprite.x > 0.0) m_Sprite.x = 0.0;
  //Check if the sprite is to far right,
  else if (m_Sprite.x - s.stageWidth < -m_Width * TileWidth)
   m_Sprite.x = -m_Width * TileWidth + s.stageWidth;

  //Check that it isn't too far left.
  if (m_Sprite.y > 0.0) m_Sprite.y = 0.0;
  //Repeat with 'y's.
  else if (m_Sprite.y - s.stageHeight < -m_Height * TileHeight) m_Sprite.y = -m_Height * TileHeight + s.stageHeight;
  ...
 }
};
Because we don't control the stage camera, and are instead controling the sprite, we are applying the translations a camera would normally apply to an object. Which is why we work with negative values instead of positive values. In order for this to work, we need to modify the main class:
public class Game
{
...
public function UpdateFunc(E:Event):void
{
m_Game.Update(stage);
}
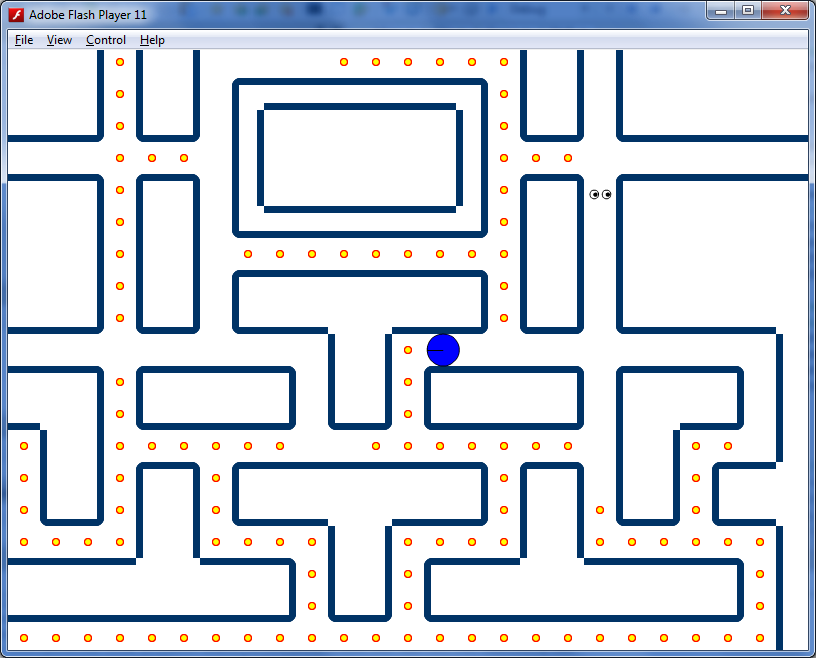
}; With that, we should now have:
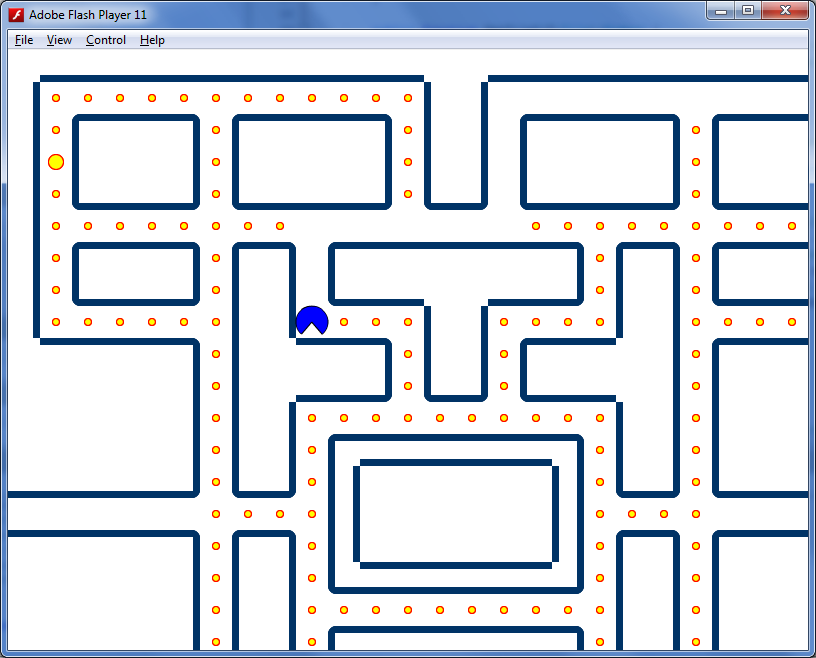
So now that we have a camera following the player around, let's fix where the player spawns:
 public class Game
 {
   ...
   public static const PlayerSpawnTile:Number = 658;
//Constant of where to player the player on spawn.
};
Now we spawn at the right place! However you may notice that going down the halls that wrap you around the map causes the game to crash. Let's fix that:
public class Unit {
 ...

 public
 function Update(Gm: Game): void {
  ...

  var TarTile: Tile = Gm.GetTileNeighbor(m_Tile, TarX, TarY, false); //Modify this line into: var TarTile = Gm.GetTileNeighbor(m_Tile, TarX, TarY, true);

  ...

  var TargetTileY: Number = Gm.GetTileY(TarTile); //Add after this line:

  //If the target position is greater than half the width of the game grid, then we know that we need to offset the target because we are wrapping around the grid.
  if (TargetTileX < CurrentTileX - Gm.m_Width * Game.TileWidth * 0.5) TargetTileX += Gm.m_Width * Game.TileWidth;
  else if (TargetTileX > CurrentTileX + Gm.m_Width * Game.TileWidth * 0.5) TargetTileX -= Gm.m_Width * Game.TileWidth;
  if (TargetTileY < CurrentTileY - Gm.m_Height * Game.TileHeight * 0.5) TargetTileY += Gm.m_Height * Game.TileHeight;
  else if (TargetTileY > CurrentTileY + Gm.m_Height * Game.TileHeight * 0.5) TargetTileY -= Gm.m_Height * Game.TileHeight;
 }

 public
 function ChangeDirection(Gm: Game): void {
  ...
  var TarTile: Tile = Gm.GetTileNeighbor(m_Tile, TarX, TarY, false); //Modify into: var TarTile:Tile = Gm.GetTileNeighbor(m_Tile, TarX, TarY, true);
 }

 ...
}
}
Alright no more crashes, and now we wrap around the grid without any problems! So, now we have full player controls, it's time to get to ghosts:
The Computer
Let's start by adding our first ghost:
public class Game{
  ...

  public static const GhostSpawnTile:Number = 322; //Constraint of where to place the ghost on spawn.
public static const GhostPreSpawnTile:Number = 374; //Constrint of where to place the ghosts before they spawn. ...

public function ResetPlayer():void
{ ...

 m_units.m_Tile = m_Tiles[(i==0)?PlayerSpawnTile:GhostPreSpawnTile];
 ...

}

 public function Game(S:Sprite):void
 {
   ...
   m_Units[0] = new Unit(m_Tiles[PlayerSpawnTile], this, new Player());
   //Add Line after:
   m_Units[1] = new Unit(m_Tiles[GhostPreSpawnTile], this, new Ghost_Orange());

   //Add a ghost.
 }
So, now we have a ghost sitting in it's little box. Waiting to be spawned, but before we do that we need to add a bit of AI for him to move around the map. We do this by first adding a boolean to pass to the update function that speceify's if the unit should handle directional changes. With this information, when we land on a new tile, we select a random direction to head. This isn't the best practice for AI, but for a game like pac-man it give's us a good enough effect. Also to be noted, we don't want to select the opposite direction we are heading, so we add an additional check when we are checking to head in a new direction that makes sure we don't pick the opposite direction. However we ignore this check when our target tile is blocked.
 public class Unit
 {
   public function Update(Gm:Game, AI:Boolean):void
   {
     //Adding an ai flag to update the unit, and to allow it to make deceisions:
     ...
     m_Tile = TarTile;
     //Add after this line
     if(AI){
       //Check the ai flag.
       m_TarDirection = (int) (Math.random() * 4);

       //Randomly select a new direction.
       //We don't want to turn around each time we step on another tile, so:
       if ((m_TarDirection == DIR_LEFT && m_Direction == DIR_RIGHT) || (m_TarDirection == DIR_UP && m_Direction == DIR_DOWN) || (m_TarDirection == DIR_RIGHT && m_Direction == DIR_LEFT) || (m_TarDirection == DIR_DOWN && m_Direction == DIR_UP)) m_TarDirection = m_Direction; }else Gm.EatPellet(m_Tile);
     //only eat pellets if we are not an computer player.
     ...
     m_Tick=0 //Add after line:
     //since this logic occurs when we are walking into a wall, it doesn't matter if we want to turn around, or not.
     if (AI) m_TarDirection = (int) (Math.random() * 4);
     //Randomly selects a new direction.
   }
};
Now, we need to update the game class's update to support the new AI feature:
public class Game
{
  public function Update(s:Stage):Boolean
  {
    ...

    for (i = 0; i < m_Units.length; i++)
    m_Units.Update(this); //Modify line to: for (i = 0; i < m_Units.length; i++) m_Units.Update(this, i>0);

    //Since the first object is the player, when i is greater than 0, it's an ghost.
  }
};
Running the game now, should have a great little ghost running around in his box:

This is great, but let's start making this feel like a real ghost, it's time to get them to spawn:
public class Game
{
  public static const GhostSpawnTicks:int = 60 * 5; //60 ticks per second, so every 5 seconds a ghost will spawn if possible.

...

public var m_NextGhostTick:int; //When to spawn the ghost
public var m_Tick:int; //Number of ticks that have gone by.

public function Update(s:Stage):Boolean
{
  ...

  else if (m_Sprite.y - s.stageHeight < -m_Height * TileHeight) m_Sprite.y = -m_Height * TileHeight + s.stageHeight;

  //Add after this line: if (m_Tick >= m_NextGhostTick && m_NextGhostTick < m_Units.length * GhostSpawnTicks)
  {
    //Check if the number of ticks is greater then the spawn ticks, and that the number of ticks is less than the number of units times the ghsot spawn constant.
    m_Units[(int)(m_NextGhostTick / GhostSpawnTicks)].m_Tile = m_Tiles[GhostSpawnTile];

    //Set the tile for the ghost to spawn on.
    m_NextGhostTick += GhostSpawnTicks;

    //Increment the ghost ticks.
  }
  m_Tick++;

  //Increment ticks.
  ...
}

  public function ResetPlayer():void
  {
    ...
    m_Finished = false;
    //add after this line: m_Tick = 0;
    //Reset ticks
    m_NextGhostTick = GhostSpawnTicks;
    //Reset ghost ticks.
    ...
  }
Alright, now the ghost spawns, and runs around the map! But nothing happens when he gets us, so let's fix this:
 public class Game { ...public static
  const UnitDiameter: Number = 32.0;...public
  function Update(s: Stage): Boolean { ...
   for (i = 0; i < m_Units.length; i++) m_Units.Update(this, i > 0);
   //add after this line:
   //since we are only checking if the ghosts touch the player, we can start at 1:
   for (i = 1; i < m_Units.length; i++) {
    var DistanceX: Number = (m_Units.m_Sprite.x - m_Units[0].m_Sprite.x);
    //Get the x distance between the player, and the ghost.
    var DistanceY: Number = (m_Units.m_Sprite.y - m_Units[0].m_Sprite.y);
    //Get the y distance between the player, and the ghost.
    if (DistanceX * DistanceX + DistanceY * DistanceY <= UnitDiameter * UnitDiameter) {
     //Check that the distance squared between the player and the ghost, is less than the squared distance of the radius of the ghost, and the player then we are colliding. Since both ghost and player have the same radius, we can use the diameter squared.
     m_Units[0].m_State |= Unit.UNIT_DEAD; //Mark the player as dead.
    }
   }
  }

  public
  function ResetPlayer(): void { ...m_Units.m_Direction = m_Units.m_TarDirection = Unit.DIR_LEFT;
   //add after: m_Units.m_State = 0;
   //Reset state.
  }
 };
And the subsequent changes to the unit class:
public class Unit
{
  ...
  public static const UNIT_DEAD:int = 1; //Constant for the state where the player is dead.

...
public var m_State:int = 0; //The state of the unit.

...

public function Update(Gm:Game, AI:Boolean):void
{
  ...
  m_Tick++; //Modify into: if((m_State&UNIT_DEAD)==) m_Tick++;
  //So long as the unit is not dead, we can keep moving.

  ...
  ChangeDirection(Gm);

  //Modify both of these lines into:
  //check to ensure the unit isn't dead.
  if((m_State&UNIT_DEAD)==0) ChangeDirection(Gm);

  //Change our direction if we can to.
  ...

  var LastFrame:int = (m_Direction + 1) * 30;

  //Add after this line:
  if ((m_State & UNIT_DEAD) != 0)
  {
    //If we are dead, set the first and last frame.
    FirstFrame = 121;

    //We have a segment of animation between frames 121 and 150.
    LastFrame = 150;
  }

  ...

  if (m_Sprite.currentFrame < FirstFrame || m_Sprite.currentFrame >= LastFrame)

  //Modify this line into:
  if(m_Sprite.currentFrame < FirstFrame || m_Sprite.currentFrame >= LastFrame)
  {
    if (m_Sprite.currentFrame >= LastFrame && (m_State & UNIT_DEAD) != 0)
      Gm.m_Finished = true;

    //If the unit is dead, and we've finished the animation, mark the game as finished.
    m_Sprite.gotoAndPlay(FirstFrame);

    //Let's goto and play our first frame.
  }
  ...
}
};
And now when we get hit by a ghost, we die!
Now we have a good bit of AI. We die when a ghost hits us, now let's make it so the player can kill those nasty ghosts:
public class Game {
 public static
 const GhostKillTicks: int = 60 * 5;
 //60 ticks per second, so ghosts are killable for up to 5 seconds. ...

 public
 var m_KillTick: int; //Number of ticks until we can reset the ghosts.
 public
 function Update(s: stage): Boolean { ...m_Units[0].m_State |= Unit.UNIT_DEAD; //Modify the line into:
  if ((m_Units.m_State & Unit.GHOST_BLINK) != 0) m_Units.m_State ^= (Unit.GHOST_BLINK | Unit.GHOST_DEAD);
  else if ((m_Units.m_State & Unit.GHOST_DEAD) == 0) m_Units[0],
  m_State |= Unit.UNIT_DEAD;......m_Tick++;
  //Add after this line:
  if (m_KillTick > 0) {
   //If the ghosts are blinking
   ...
   m_KillTick--; //Subtract kill ticks
   ...
   if (m_KillTick == 0) {
    //If kill ticks is equal to 0
    for (i = 1; i < m_Units.length; i++) m_Units.m_State &= ~Unit.GHOST_BLINK;
    //Remove the blink flag from the ghosts.
   }
  }
 }
 public
 function EatPellet(T: Tile): void { ...T.m_Flag ^= Tile.HASPELLET;
  //Add after this line
  if ((T.m_Flag & Tile.HASBIGPELLET) != 0) {
   //If we've eaten a big pellet, time to turn the ghosts:
   for (var i: int = 1; i < m_Units.length; i++) m_Units.m_State |= Unit.GHOST_BLINK;
   m_KillTick = GhostKillTicks;
  }...
 }
}
Next we need to modify our Unit class to reflect the above changes:
public class Unit { ...public static
const GHOST_DEAD: int = 2; //Constraint for the state, where the ghost is dead.
public static
const GHOST_BLINK: int = 4; //Constraint for the state, where the ghost is blinking. ...
public
function Update(Gm: Game, AI: Boolean): void { ...m_Tile = TarTile; //Add after this line:
if ((m_State & GHOST_DEAD) != 0 && m_Tile == Gm.m_Tiles[Game.GhostSpawnTile]) m_State ^= GHOST_DEAD;...
if (AI) { //Modify both lines that start here:
if (AI) { //if we are dead, we want to get back to our spawn tile as quickly as possible:
if ((m_State & GHOST_DEAD) != 0) m_TarDirection = CalculateBestDirection(Game.GhostSpawnTile, m_Tile, Gm, m_Direction);
else m_TarDirection = (int)(Math.random() * 4); //Randomly select a new direction if we are ...
if ((m_State & UNIT_DEAD) != 0) { //Modify into:
if ((m_State & GHOST_BLINK) != 0) { //if the ghost is blinking, override frames:
FirstFrame += 120; //The ghosts have a second set of blinking animation, exactly 120 frames from their normal counterparts
LastFrame += 120;
} else if ((m_State & GHOST_DEAD) != 0) {
//if the ghost is dead, then we need to reset it.
FirstFrame = 241; //The death animation segment.
LastFrame = 270;
} else if ((m_State & UNIT_DEAD) != 0) { //If we are dead, set the first and last frame.
}
//This function is for determing the heuristic(or value) of a tile toward it's target, we use the manhattan distance(add the x and y distance), to give a value to a tile relative to a target.
public
function CalculateHeuristic(TargetX: int, TargetY: int, Gm: Game, T: Tile): int {
var CurrentX: int = T.m_Index % Gm.m_Width; //Get the current x/y
var CurrentY: int = (int)(T.m_Index / Gm.m_Width);
return Math.abs(TargetX - CurrentX) + Math.abs(TargetY - CurrentY); //Return the combined distance from the current tile, and target.
}
//We want to choose the best direction to getting to a target tile.
//But we don't want to do any real pathfinding, instead, we come to a comprimise of evalutating each available direction we can choose, and see which one get's us closer to our target.
//We also try to make sure we don't choose the opposite direction we are heading now.
public
function CalculateBestDirection(TargetTile: int, CurrentTile: Tile, Gm: Game, Direction: int): int {
var TargetX: int = TargetTile % Gm.m_Width;
var TargetY: int = (int)(TargetTile / Gm.m_Width);
//Caluclate the target's x and y. //Let's get all our neightbor tiles.
var LeftTile: Tile = Gm.GetTileNeighbor(CurrentTile, -1, 0, true);
var RightTile: Tile = Gm.GetTileNeighbor(CurrentTile, 1, 0, true);
var TopTile: Tile = Gm.GetTileNeighbor(CurrentTile, 0, -1, true);
var BtmTile: Tile = Gm.GetTileNeighbor(CurrentTile, 0, 1, true); //Check if the tile is valid, then calculate the heuristic toard our destination, if it's invalid, then we set a null value(in this case it's int.MAX_VALUE)
var LeftH: int = (LeftTile != null && (LeftTile.m_Flag & Tile.CLOSED) == 0) ? CalculateHeuristic(TargetX, TargetY, Gm, LeftTile) : int.MAX_VALUE;
var RightH: int = (RightTile != null && (RightTile.m_Flag & Tile.CLOSED) == 0) ? CalculateHeuristic(TargetX, TargetY, Gm, RightTile) : int.MAX_VALUE;
var TopH: int = (TopTile != null && (TopTile.m_Flag & Tile.CLOSED) == 0) ? CalculateHeuristic(TargetX, TargetY, Gm, TopTile) : int.MAX_VALUE;
var BtmH: int = (BtmTile != null && (BtmTile.m_Flag & Tile.CLOSED) == 0) ? CalculateHeuristic(TargetX, TargetY, Gm, BtmTile) : int.MAX_VALUE; //Now we select a new direction, and try to not select the direction we came from: //We systimatically choose the lowest cost direction, since any invalid tile has the value of int.MAX_VALUE we are able to find out the best direction by always doing a < comparison.
if (Direction == DIR_LEFT) return (LeftH < TopH ? (LeftH < BtmH ? DIR_LEFT : DIR_DOWN) : (TopH < BtmH) ? DIR_UP : (BtmH != int.MAX_VALUE ? DIR_DOWN : DIR_RIGHT));
else if (Direction == DIR_UP) return (TopH < RightH ? (TopH < LeftH ? DIR_UP : DIR_LEFT) : (RightH < LeftH) ? DIR_RIGHT : (LeftH != int.MAX_VALUE ? DIR_LEFT : DIR_DOWN));
else if (Direction == DIR_RIGHT) return (RightH < BtmH ? (RightH < TopH ? DIR_RIGHT : DIR_UP) : (BtmH < TopH) ? DIR_DOWN : (TopH != int.MAX_VALUE ? DIR_UP : DIR_LEFT));
else return (BtmH < LeftH ? (BtmH < RightH ? DIR_DOWN : DIR_RIGHT) : (LeftH < RightH) ? DIR_LEFT : (RightH != int.MAX_VALUE ? DIR_RIGHT : DIR_UP));
}
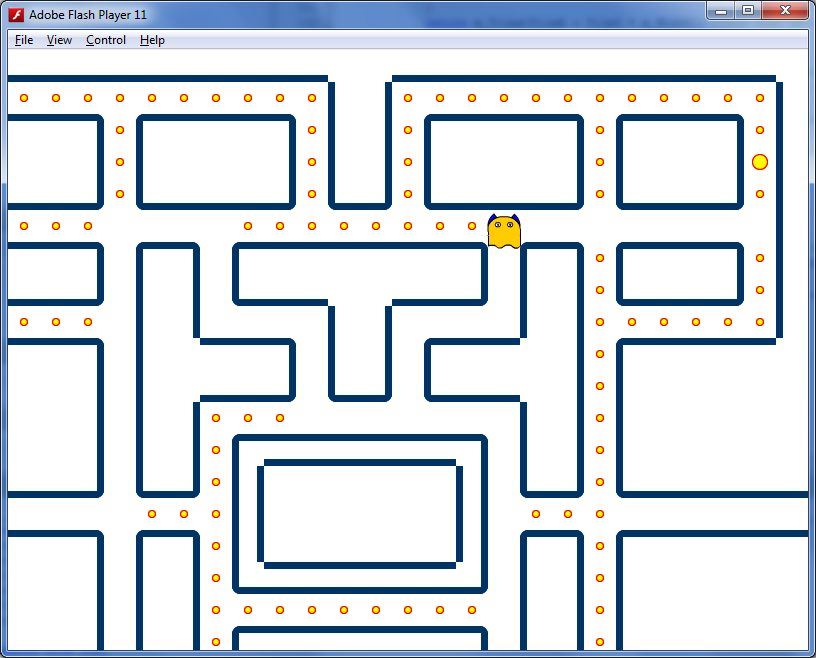
}The above code is pretty hefty, however it does a decent job for calcuating a general direction to head when the ghost is dead. And with that, we get:
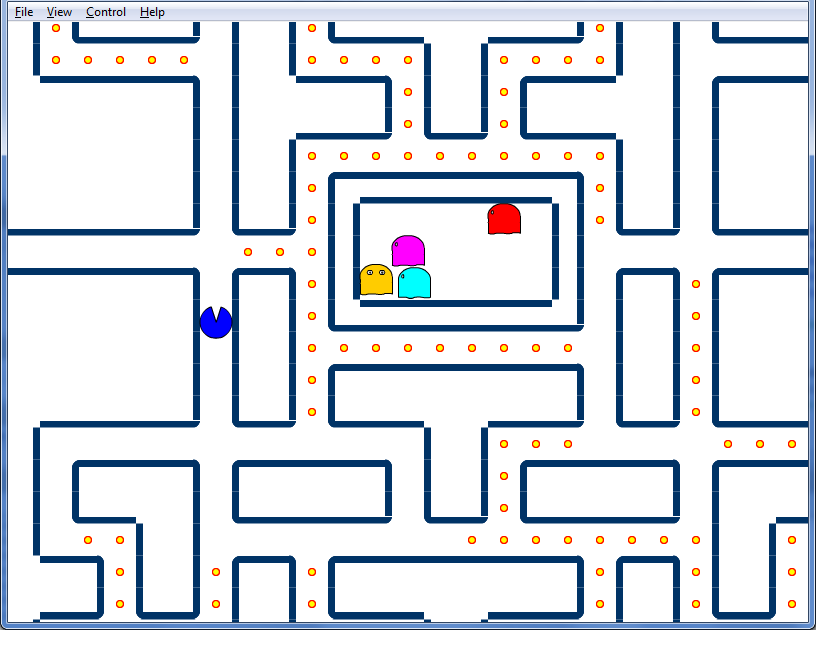
This nearly completes our computer players. Now let's add a life counter, and add the other 3 ghosts:
public class Game { ...public static
 const InitialLives: int = 3; //The initial lives available for the player. ...
 public
 var m_LifeCounter: int; //Lives available.
 public
 function Update(s: stage): Boolean { ...
  else if ((m_Units.m_State & Unit.GHOST_DEAD) == 0) m_Units[0].m_State |= Unit.UNIT_DEAD; //Modify into:
  else if ((m_Units.m_State & Unit.GHOST_DEAD) == 0) {
   if ((m_Units[0].m_State & Unit.UNIT_DEAD) == 0) m_LifeCounter--; //Remove life if the player has yet to be considered dead.
   m_Units[0].m_State |= Unit.UNIT_DEAD;
  }...
  if (m_Finished) ResetPlayer(); //Modify into:
  if (m_Finished) {
   if (m_LifeCounter == 0) return true; //If no more lives to give, we're dead.
   ResetPlayer();
  }
 }
 //Reset the game.
 public
 function ResetGame(): void {
  ResetPellets(); //Reset Pellets.
  ResetPlayer(); //Reset Player
  m_LifeCounter = InitialLives; //Set life counter.
  return;
 }

 public
 function Game(s: Sprite): void { ...m_Units[1] = new Unit(m_Tiles[GhostPreSpawnTile], this, new Ghost_Orange()); //Add after this line:
  m_Units[2] = new Unit(m_Tiles[GhostPreSpawnTile], this, new Ghost_Red());m_Units[3] = new Unit(m_Tiles[GhostPreSpawnTile], this, new Ghost_Cyan());m_Units[4] = new Unit(m_Tiles[GhostPreSpawnTile], this, new Ghost_Purple());...Remove the following: ResetPellets(); //Setup pellets!

  ResetPlayer(); //Setup the player. ...In their place, place:
  ResetGame();
 }
}
This adds lives, and all 4 ghosts. only one last thing to do:
public class Main
{
  public function UpdateFunc(E:Event):void
  {
    ...

    if (m_Game.Update(stage)) m_Game.ResetGame();
  }
};
Now if all our lives are exhausted the game auto resets.
Congratulations, you have just completed the pac-man tutorial. It is up to you to add menus, scoring, and even cherries!