Autodesk Maya 2016 is now out and available. Although I'm not too happy about the main interface changes, other changes like the overhauled Hypergraph interface are welcomed and long overdue.
Improvements in the Modeling toolkit and more effects in Bifrost are good to see and the new Profiler tool makes me wonder how I lived without it all these years. Integrating the Mudbox Sculpting tools into Maya is a great improvement and other small improvements like the Delta Mush deformer are huge time savers.
Interface Changes
Maya 2016 has gone over to the dark side. The main background interface color is now a dark gray. There have been studies that most CG users work in low-light environments and that darker colors cause less eye strain when burning the midnight oil. I personally feel it is more of a user preference and I like the lighter colors. The good news is that you can easily switch color schemes if you want.
There have been lots of subtle changes to the Maya interface in this release and I found myself hunting for commands at times. There is a helpful Find Menu option in the Help menu that will help you locate any commands you can't find. The most annoying change was that the menu set hotkeys changed, but you can switch them back if you want.
The Shelf interface also changed quite a bit with the Curves shelf rolled into the Surfaces shelf and the new Rigging, Sculpting and FX shelves. Several other shelves including PaintEffects, Toon, Muscle, Hair and Fur are hidden by default. All the Shelf icons have also changed. This change made it easier to scale the interface for different displays and resolutions including support for touch screens, but as an experience user, I find it frustrating to have to learn the new icons. These icons are also used in the main menus and in the marking menus. To help in learning the new icons, the development team has color coded them based on function, so all the polygon oriented commands are orange and the surface and curve commands are blue.
The Hotkey Editor also changed, but this is a great change. It includes a keyboard visual and shows automatically which keys are used when the Shift, Ctrl, Alt or Command key are pressed. This lets you quickly see which hotkeys are still available to be assigned. There is also a search command for finding specific commands.
Another nice new addition is that the Text tool can now use all OpenType, TrueType and Postscript fonts that are available on the system.
Improving Animation Playback
Within the Animation section of the Preferences dialog box are two new evaluation modes that you can enable. The Parallel evaluation mode increases overall animation playback by using all the cores in parallel. The Serial evaluation mode uses only a single core for playback. There is also a GPU Override option lets you take advantage of any GPU processors on your installed graphics card.
You can also display any evaluation data in the heads-up display and there is also a new Profile tool, shown in Figure 1, lets you see a graph how much time each process takes to display the scene. Using this tool, you can quickly identify those objects in the scene that take too long to render compared to the other scene elements. For game developers, this provides a quick and easy way to compare all the elements in a scene.
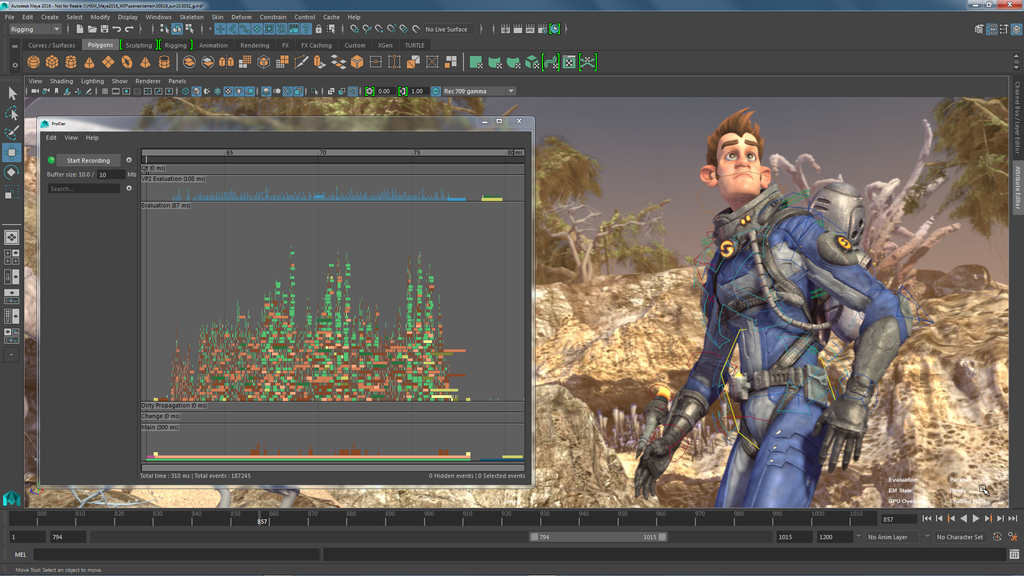
Figure 1: The Profiler tool shows in a graph how much time each animation process takes. Image courtesy of Autodesk.
Using the New Sculpting Toolset
Maya 2016 includes a full set of sculpting tools taken from Autodesk's own Mudbox package. Selecting the new Sculpting Shelf opens an array of different sculpting tools. The Visor also includes several sculpting presets that you can practice on, like the T-Rex in Figure 2. The Sculpting Shelf includes tools for Sculpt, Smooth, Relax, Grab, Pinch, Flatten, Foamy, Spray, Repeat, etc. Each tool has its own settings that you can access in the Tools Settings dialog box. There is also a symmetry setting for mirroring any changes to the opposite side of the model simultaneously.
For more control over the sculpting tools, you can use a graphics tablet. To prevent unwanted changes, you can select a region of vertices and freeze them. The Sculpting tools are also integrated with the Blend Shape Editor, allowing you to create animated morphs of objects.

Figure 2: The Sculpting toolkit includes a variety of different sculpting tools that are used directly within the viewport.
Overhauled Hypershade
Maya's Hypershade interface for creating shaders has been completely redesigned. You can access the new Hypershade interface using a button on the Status Line. The new interface includes a node editing interface that you can use to attach node inputs and outputs. Also, each node only displays by default the most commonly used attributes to help keep the panel small and simple or you can open the full Attribute Editor to see all the properties. The new interface, shown in Figure 3, also lets you dock several panels anywhere you choose and you can open several different shader trees within their own tab to work on several shaders at once.
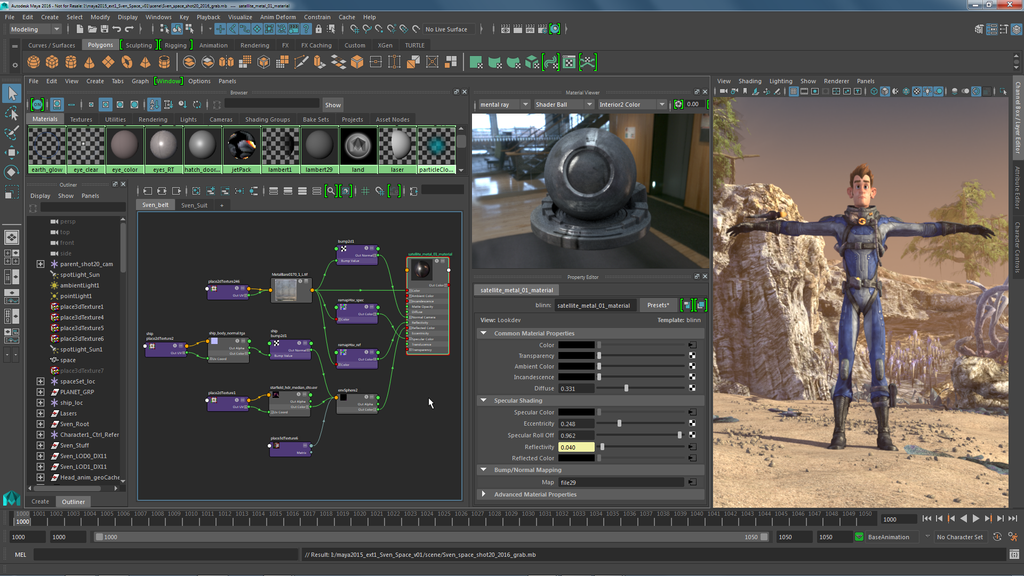
Figure 3: The Hypershade interface has been completely overhauled for Maya 2016. Image courtesy of Autodesk.
There is also a new Soloing feature that you can use to isolate the display of any single node independent of the others. The new Material Viewer panel lets you see the render results of any shader including bump maps and textures in real-time. You can also select from several different preview objects include spheres, planes, cloth and teapot and also from several unique interior and exterior HDR environments.
Bifrost Improvements
Maya 2016 has added some new features to the Bifrost simulation engine including the ability to simulate fire, smoke, cloud and fog effects. This new set of effects is called Bifrost Aero.
Foam effects, like those shown in Figure 4, have also been added to the water simulation tools including bubbles and spray effects. The foam particles can be set to appear based on the distance from the camera so that those areas close to the camera are rendered at the highest resolution.
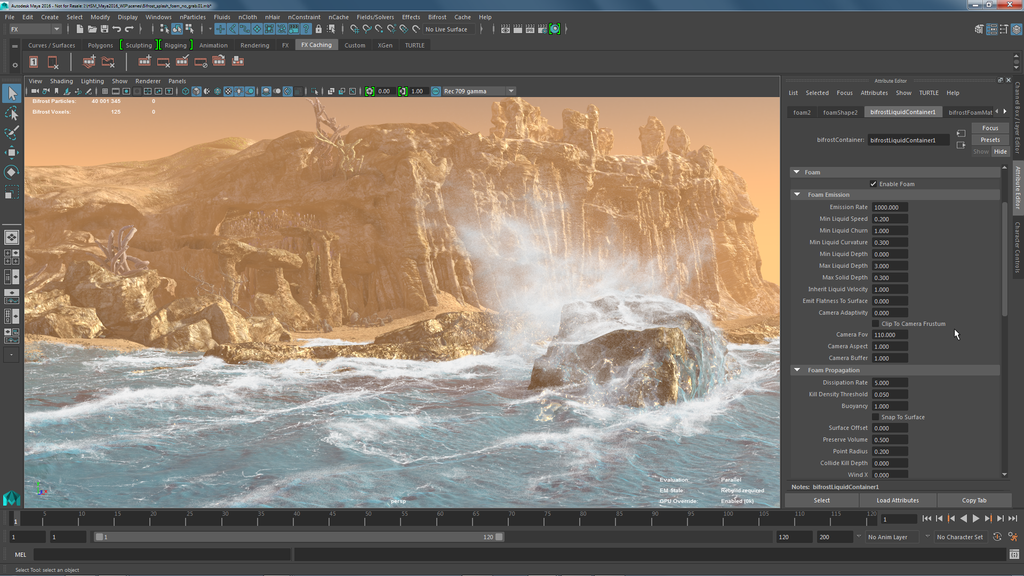
Figure 4: Foam and water spray effects have been added to the Bifrost simulation engine. Image courtesy of Autodesk
Bifrost now includes new attributes for defining Surface Tension and Viscosity, so you can now create a simulation where the oceans are filled with honey or molasses.
XGen Shading
XGen has been updated with several new nodes including a node that lets you change the color of XGen hair. New nodes can use a texture to color the hair or a ramp to change the hair color from root to tip.
There are now also a new set of XGen hair presets and instanced geometries that you can choose from. You can also save existing setups as presets to be used later.
Color Management
Maya 2016 has a new Color Management system based on Autodesk Color Management. This technology is included in multiple Autodesk products providing a consistent look across their products. You can also define a set of rules for all imported images that are used in the rendering pipeline.
Game Exporter
Maya 2016 includes an improved Game Exporter dialog box for exporting models and animation clips. You can select to export all objects in a single FBX file or to export each object as a separate FBX file. You can also save out FBX setting presets to insure that all exported elements use the same settings.
The File menu also includes options to Send to Unity and to Send to Unreal built-in.
Delta Mush Deformer
Getting a skin mesh to work with a rig can be a real challenge, but Maya 2016 has a new deformer that helps automatically correct many of the common problems that happen when animating a rig. The new Delta Mush deformer is used to smooth out the motion of an animated skin. The default application of this deformer does a great job in fixing skin problems where the skin weights are out of line.
Other Improvements
Maya 2016 also includes a large number of small improvements scattered across the existing features. The UV Editor now includes several brushes for working with UVs including Unfold, Optimize, Cut, Sew and Pin tools. You can also select and work with edge loops and rings in the UV Editor.
The Multi-Cut tool has been updated allowing better snapping and the ability to make 90-degree cuts. There is also a new pivot editing workflow that makes it easier to align objects and to snap pivots to specific locations.
If you hold down the Ctrl key while moving a component with the Move tool, the component moves along its normal. This is a nice new feature and a real time-saver.
For polygons, the Hard Edge display mode lets you see any edges marked as hard edges without all the wireframe edges.
When animated objects move about the scene, you can now set their Motion Trails to fade after a given number of frames. You can also use the new Anchor Transforms option to see the motion of a single object relative to the other objects.
Summary
Although I get really nervous anytime a software team messes with the user interface, there aren't any changes here that can't be undone and with time the new interface will become familiar. For the Hypershade interface, however, I'm thrilled to see the new changes. The old Hypershade was clunky and difficult to use, but the new one makes sense and lets me see the changes as they are made.
The new Sculpting interface is also refreshing and I love to see the new Bifrost and XGen features. It is also nice to see support for game engines built into the package. Finally, the Profile tool is a great new enhancement giving users the ability to see where potential problems are in their animations. This also works great in preparing animations for a game engine.
Maya 2016 is available for Windows, Linux, and Macintosh OS X. For more information on any of these products, visit the Autodesk web site located at www.autodesk.com. A free trial version is also available at www.autodesk.com/freetrials.


Shameless self plug: Please consider using my plug-in for intuitive first-person camera controls inside Maya (WASD + mouse), which is essential for using Maya as a level editor. It's called MayaFPS