This weekly summary of daily progress would normally be very short, as I fell ill and had to sit out a few days of development as a result. I'm writing this from bed at the moment, though I'm already feeling a lot better. In any case, this week I "finished" the tundra tileset that I'd been frustrated over for a long time now. You can see it in the header.
Then, partly because I couldn't settle on what else to do, and partly because it seemed like an interesting, quick project to do, I wrote a particle system. This is what I'll talk about in a bit more detail. The system that's implemented in Trial -- the custom game engine used for Leaf -- allows for completely custom particle attributes and behaviour. Before I get into how that's handled, I'll talk about how the drawing of the particles is done.
For the drawing we consider two separate parts -- the geometry used for each particle, and the data used to distinguish one particle from another. We pack both of these two parts into a singular vertex array, using instancing for the vertex attributes of the latter part. This allows us to use instanced drawing and draw all of the particles in one draw call. In the particle shader we then need to make sure to add the particle's location offset, and to do whatever is necessary to render the geometry appropriately as usual. This can be done easily enough in any game engine, though it would be much more challenging to create a generic system that can easily work with any particle geometry and any rendering logic. In Trial this is almost free.
There's two parts in Trial that allow me to do this: first, the ability to inherit and combine opaque shader parts along the class hierarchy, and second, the ability to create structures that are backed by an opaque memory region, while retaining the type information. The latter part is not that surprising for languages where you can cast memory and control the memory layout precisely, but nonetheless in Trial you can combine these structures through inheritance, something not typically possible without significant hassle. Trial also allows you to describe the memory layout precisely. For instance, this same system is used to represent uniform buffer objects, as well as what we're using here, which is attributes in a vertex buffer.
If you'll excuse the code dump, we'll now take a look at the actual particle system implementation:
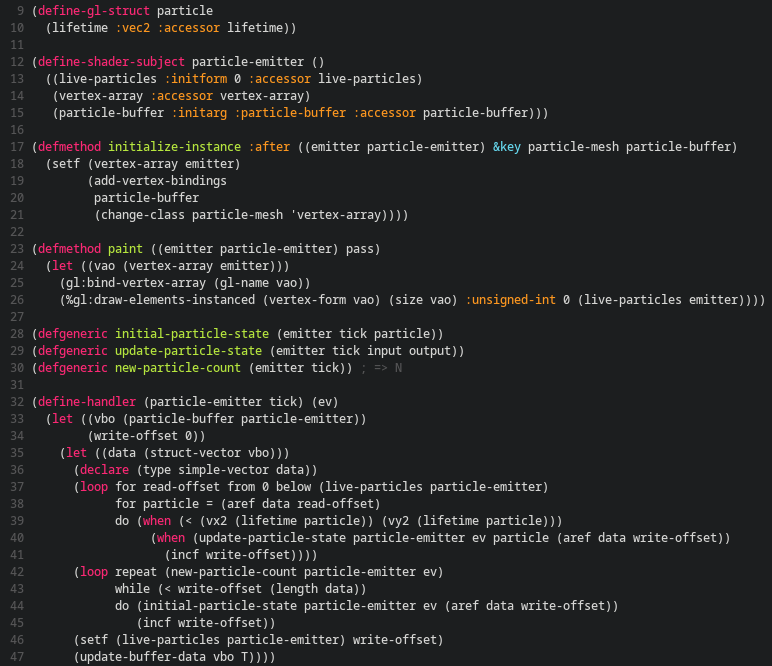
I had to use a screenshot, as GameDev does not have Lisp source highlighting, and reading it without is a pain. In any case, let's go over this real quick. We first define a base class for all particles. This only mandates the lifetime field, which is a vector composed of the current age and the max age. This is used by the emitter to check liveness. Any other attribute of a particle is specific to the use-case, so we leave that up to the user.
Next we define our main particle-emitter class. It's called a "shader subject" in Trial, which means that it has shader code attached to the class, and can react to events in separate handler functions. Anyway, all we need for this class is to keep track of the number of live particles, the vertex array for all the particles, and the buffer we use to keep the per-particle data. In our constructor we construct the vertex array be combining the vertex attribute bindings of the particle buffer and the particle mesh.
The painting logic is very light, as we just need to bind the vertex array and do an instanced draw call, using the live-particles count for our current number of instances.
The three functions defined afterwards specify the protocol users need to follow to actually create and update the particles throughout their lifetime. The first function fills the initial state into the passed particle instance, the second uses the info from the input particle instance to fill the update into the output particle info, and the final function determines the number of new particles per update. These particle instances are instances of the particle class the user specifies through the particle-buffer, but their fields are backed by a common byte array. This allows us to make manipulation of the particles feel native and remain extensible, without requiring complex and expensive marshalling.
Finally we come to the bulk of the code, which is the tick update handler. This does not do too much in terms of logic, however. We simply iterate over the particle vector, checking the current lifetime. If the particle is still alive, we call the update-particle-state function. If this succeeds, we increase the write-offset into the particle vector. If it does not succeed, or the particle is dead, the write-offset remains the same, and the particle at that position will be overwritten by the next live, successful update. This in effect means that live particles are always at the beginning of the vector, allowing us to cut off the dead ones with the live-particles count. Then, we simply construct as many new particles as we should without overrunning the array, and finally we upload the buffer data from RAM to the GPU by using update-buffer-data, which in effect translates to a glBufferSubData call.
Now that we have this base protocol in place we can define a simple standard emitter, which should provide a much easier interface.
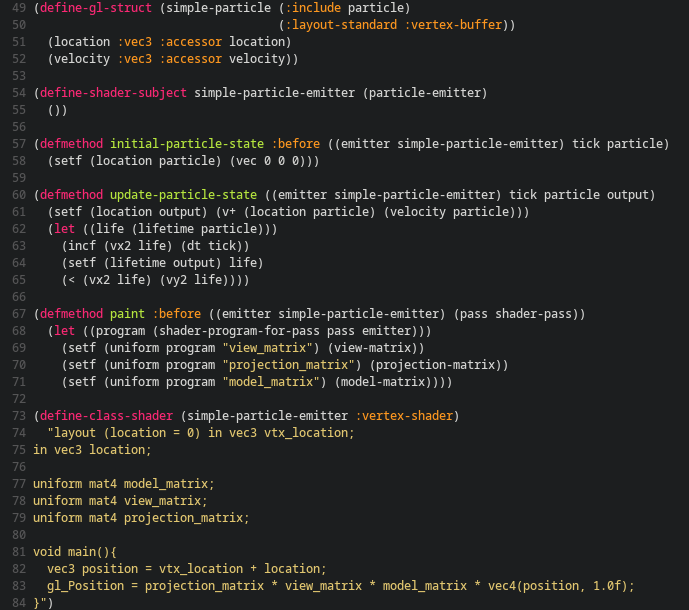
Okey! Again we define a new structure, this time including the base particle so that we get the lifetime field as well. We add a location and velocity on to this, which we'll provide for basic movement. Then we define a subclass of our emitter, to provide the additional defaults. Using this subclass we can provide some basic updates that most particle systems based on it will expect: an initial location at the origin, updating the location by the velocity, increasing the lifetime by the delta time of the tick, and returning whether the particle is still live after that.
On the painting side we provide the default handling of the position. To do so, we first pass the three standard transform matrices used in Trial as uniforms, and then define a vertex shader snippet that handles the vertex transformation. You might notice here that the second vertex input, the one for the per-particle location, does not have a location assigned. This is because we cannot know where this binding lies ahead of time. The user might have additional vertex attributes for their per-particle mesh that we don't know about. The user must later provide an additional vertex-shader snippet that does define this.
So, finally, let's look at an actual use-case of this system.
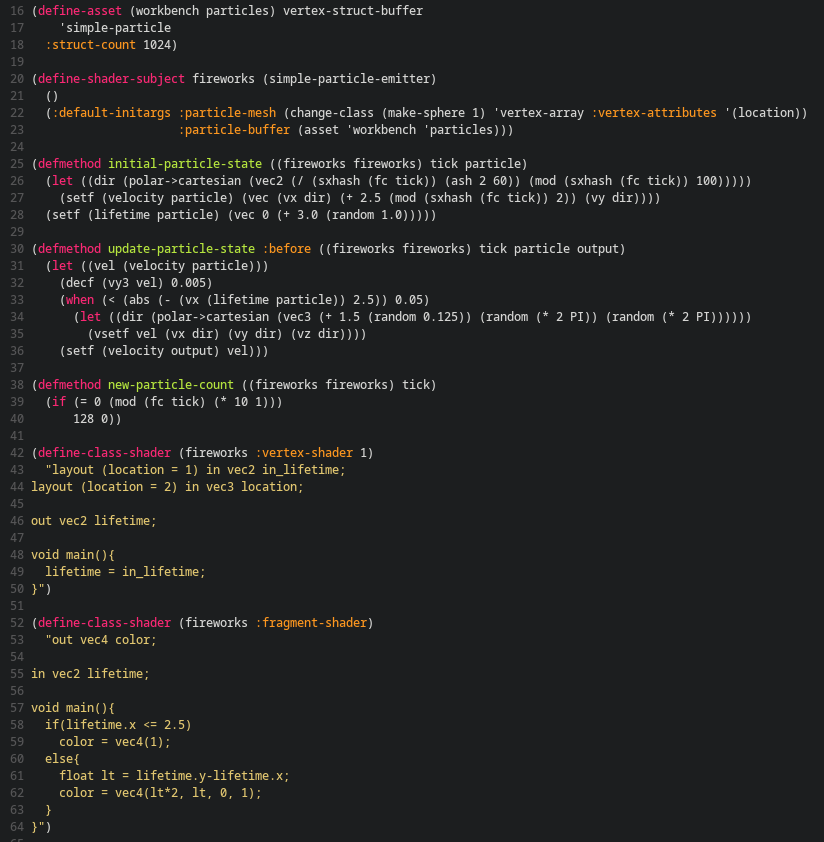
First we define an asset that holds our per-particle buffer data. To do this we simply pass along the name of the particle class we want to use, as well as the number of such instances to allocate in the buffer. We then use this, as well as a simple sphere mesh, to initialize our own particle emitter. Then come the particle update methods. For the initial state we calculate a random velocity within a cone region, using polar coordinates. This will cause the particles to shoot out at various angles. We use a hash on the current frame counter here to ensure that particles generated in the same frame get bunched together with the same initial values. We also set the lifetime to be between three and four seconds, randomly for each particle.
In the update, we only take care of the velocity change, as the rest of the work is already done for us. For this we apply some weak gravity, and then check the lifetime of the particle. If it is within a certain range, we radically change the velocity of the particle in a random, spherical direction. In effect this will cause the particles, which were bunched together until now, to spread out randomly.
For our generator, we simply create a fixed number of particles every 10 frames or so. In a fixed frame-rate, this should look mean a steady generation of particle batches.
Finally, in the two shader code snippets we provide the aforementioned vertex attribute binding location, and some simple colouring logic to make the particles look more like fireworks. The final result of this exercise is this:
Quite nice, I would say. With this we have a system that allows us to create very different particle effects, with relatively little code. For Leaf, I intend on using this to create 2D sprite-based particle effects, such as sparks, dust clouds, and so forth. I'm sure I'll revisit this at a later date to explore these different application possibilities.
For next week though, I feel like I really should return to working on the UI toolkit. I have made some progress in thinking about it, so I feel better equipped to tackle it now.