
Multiscene CUTSCENES workflow in Unity - RotM DevLog #7

Woah! Nevo, you've used the same title twice there?? what gives?
Well, weary stranger with a fascination with this middle-aged imposter, I shall tell you. While it has now been a good 12 months or so since my last post I have slowly been building, destroying and rebuilding this dream I call a game. Couple that with currently studying, full time job and being a dad - things do tend to slow down a little.
Anyway - I'm known to ramble so I'll get straight to the point - why, oh why have I copied a title from my previous log, its all relative, you see one thing that I'm going to need and no doubt many of you will need is cutscenes and if you are working in a multi-scene workflow you might be pulling your hair out trying to get it working, unless you've filled every scene with its own cinemachine brain. Oh yea, I'm using Cinemachine! There is probably one decent post on the Unity forums that gets you to look at the SetGenericBinding method but even implementing that had me a little lost - I am not the best afterall. So here a three scripts I have cobbled together to get the thing working.
Across two scenes I can now statically or dynamically assign the CineMachine Brain in one scene to a playable asset/director in a newly loaded scene.
- LevelDirector - this script is placed on the playable asset object.
- MainCineBrain - this script is placed on the main camera.
- StartCinematic - trigger script to kick things off!
Hopefully You can follow the 30 second video there on what is happening, have a good few run throughs to see what's going on and check out the scripts below for implementation.
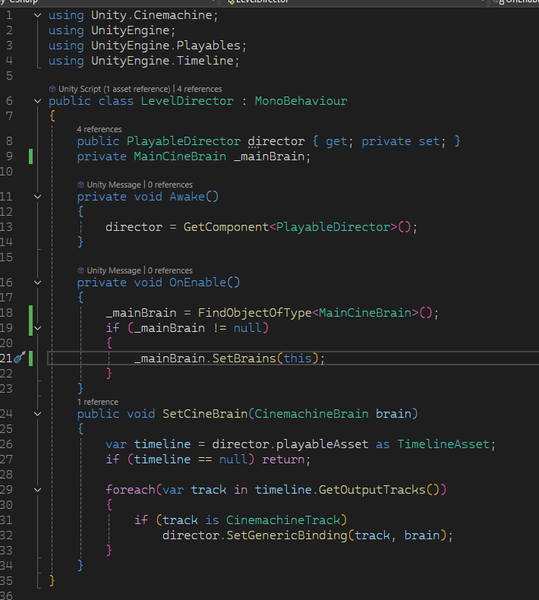
The level director - this script sits on the same game object as the playable Director for that level. OnEnable will search for the MainCineBrain object, this could easily be modified to sit within the singleton pattern, but for now we're doing it this way! If the _mainBrain is not null it will call the method SetBrains(this)
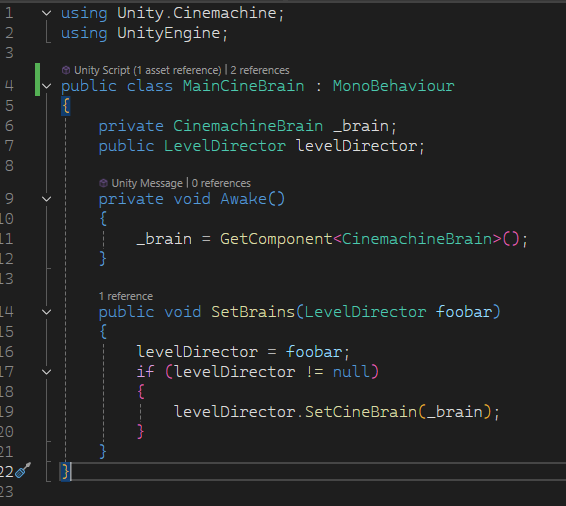
The SetBrains method, sitting on the MainCamera/Cinemachine Brain component will assign the levelDirector and if that is not null, it'll fire off the SetCineBrain method back on the levelDirector telling it that a brain has been found and you can assign it! whoop whoop, our second scene playable director now has a brain to reference its Cinemachine track in the Timeline.

All we need to do now is fire it… that's where the StartCinematic comes in, a trigger volume and onTriggerEnter check that is attached to the director as a child object.
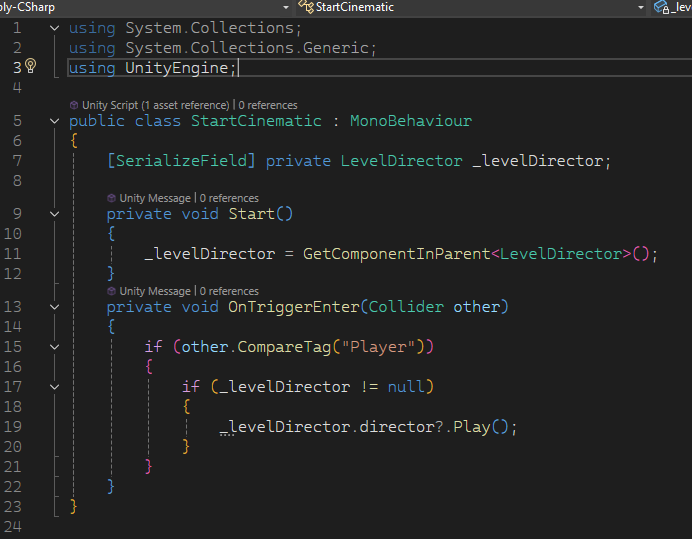
And voila, I have used the brain in the main scene to view a cutscene built in a second scene.
I hope that is of great use to anyone and everyone. If you have your own interpretations please share them, or even improvements on this - I'll be looking at multiple playable directors in the future so no doubt I'll be re-engineering it all again, but for now - here you go. and PS - ignore the block out scene, I had an issue with the starter assets when I updated to 2022.3.50 which corrupted my entire player input so had to create the player again! rest assured the level you have seen in previous videos will still be developed.
TTFN.
Discussion