GameDev.net gamedev.net
🔒 Locked

The impossible mission of 1 pixel thick lines GL_LINES

Started by Aybe One Aug 30, 2024 at 9:45 PM 35 replies 15.5k views
Original Post
Aybe One
Aybe One

Basically, I wanted to draw a waveform like Sound Forge or Wavelab does, 1 pixel thick:
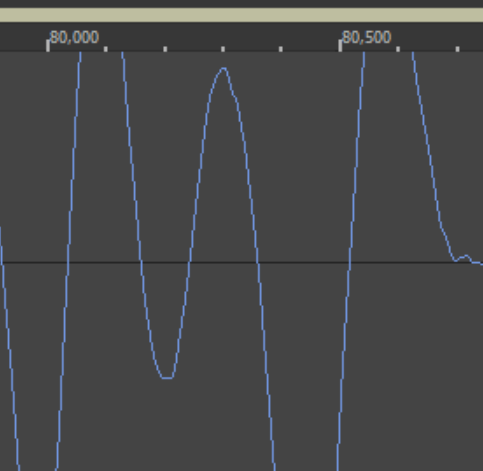
You can't get this with Bresenham, instead, you only draw vertical lines with this logic:

if (max < next.Min)
{
max = next.Min;
}

if (min > next.Max)
{
min = next.Max;
}

So far, this work on a good old 2D surface, but with OpenGL it ended up being an impossible mission…

Wrote a small program to try understand this insanity and inferred the following:

// Lines EXACTLY 1 pixel thick, with or without MSAA:
//
// 1x1 square:
//
// X1 = 10.0
// Y1 = 10.0
// X2 = 11.0
// Y2 = 11.0
//
// 2x1 horizontal:
//
// X1 = 20.0
// Y1 = 20.5
// X2 = 22.0
// Y2 = 20.5
//
// 1x2 vertical:
//
// X1 = 30.5
// Y1 = 30.0
// X2 = 30.5
// Y2 = 32.0
//
// 2x2 diagonal:
//
// X1 = 40.0
// Y1 = 40.0
// X2 = 42.0
// Y2 = 42.0

This works but that's theory, reality is different. Turns out it's impossible to get 1 pixel thick lines working all the time.

Wrote another test program:
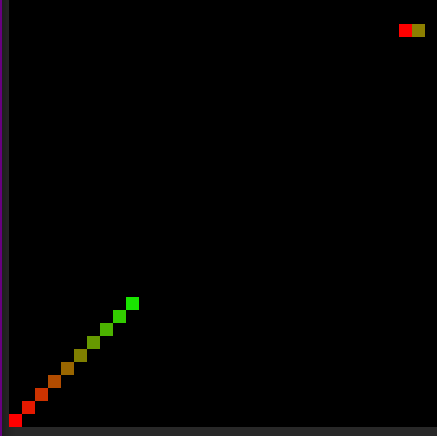
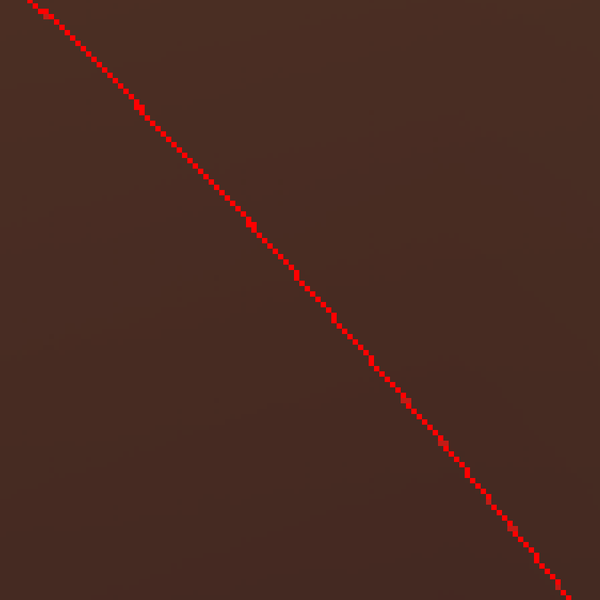
Notice how the 2nd line end pixel isn't green…

If you make the line 1.1 pixel wide!, you get green although it's not the end color…
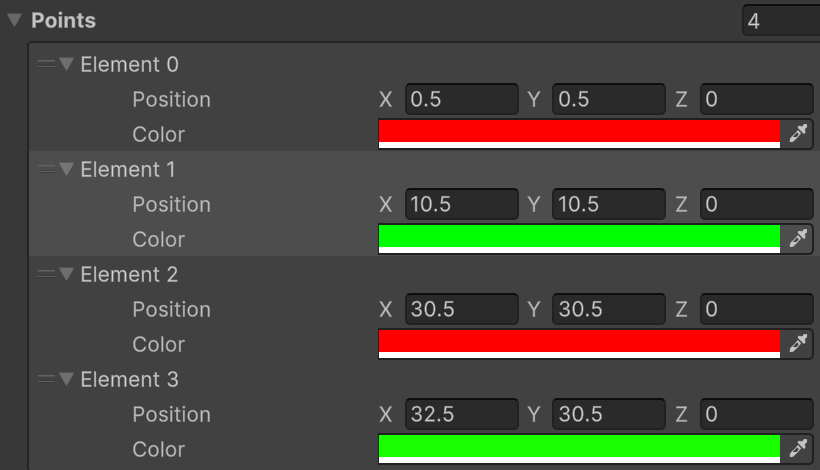
Also, you simply cannot use GL_LINES, you must use GL_LINESTRIP else you have empty lines:
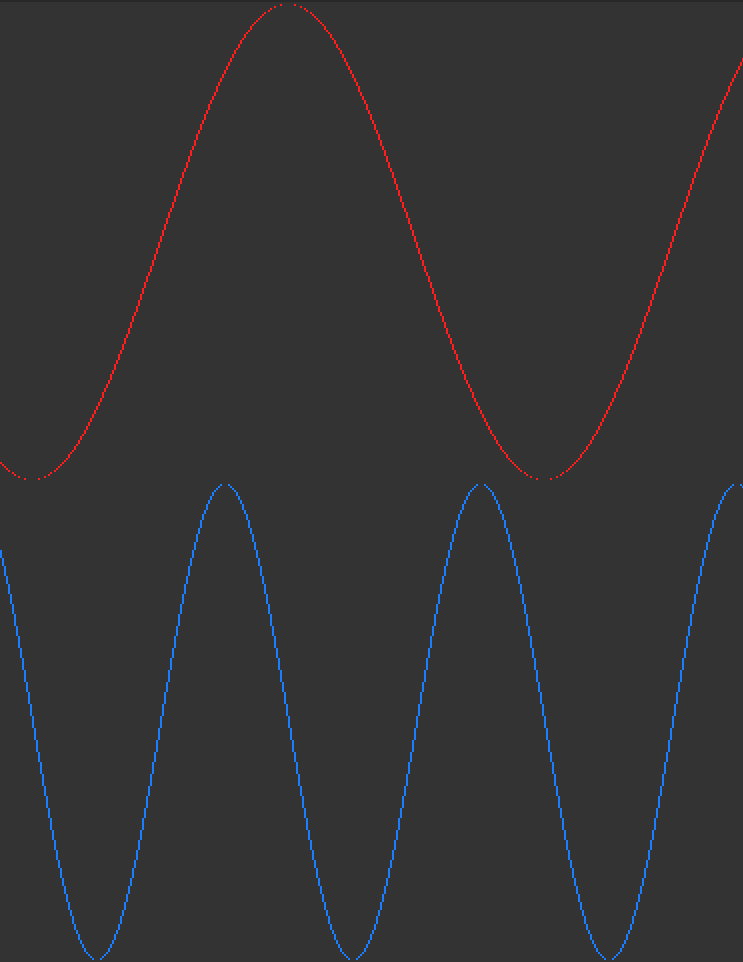
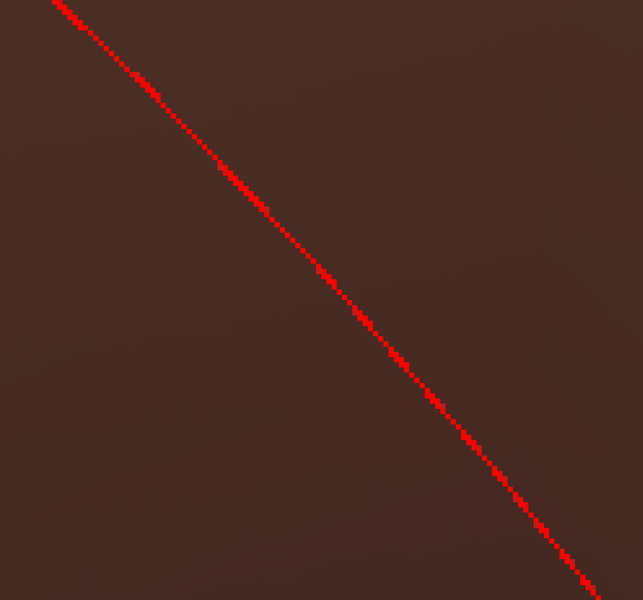
But then GL_LINESTRIP thickness isn't even, unless one goes 4K it's noticeable:
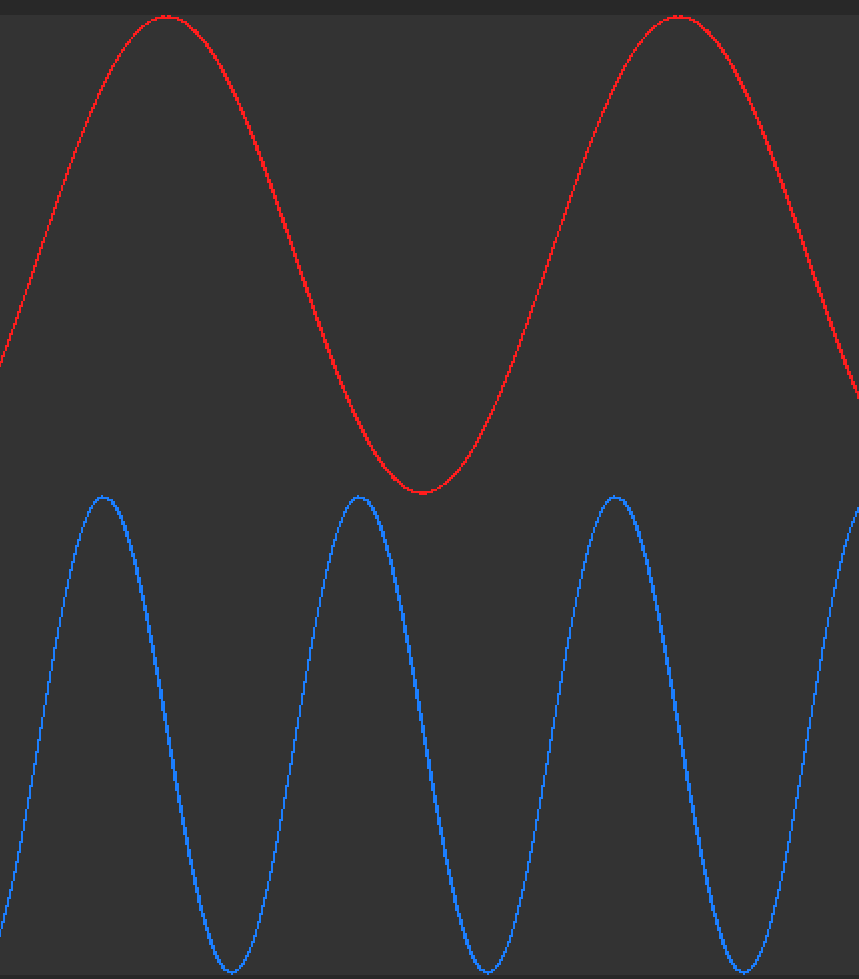
Trying to enable MSAA simply moves the problem somewhere else + free artifacts.

Tried tons of things:

  • adding +/-0.5 offsets, turns out for Y axis it's a no go
  • ensuring a Y1 ≠ Y2 so that lines are always visible, not good overall
  • wrote a shader that ‘undo’ MSAA pixels, it works but to some extent only
  • wrote a 2D surface that does Bresenham with Burst, works, is fast but chokes on 4K…
  • looked at rasterization rules GL and DX (hey I just wanted to draw lines)

What have we become? We have RTX 4050 my ass but can't instruct it to draw precise 2D lines!!??

Can do that in QBASIC in like 30 seconds, it just works...

I am not crazy, right? Or am I?

Any clues are welcome, thanks!

Aybe One
Aybe One

Sorry, I screwed the title and can't change it…

The site too drove me crazy, it wouldn't let me type, had to copy paste, cleared cookies, it finally worked…

frob
frob

Two things, or maybe just one and a consequence.

OpenGL follows a “diamond exit” rule for line rasterizing. The pixel area is considered with an internal diamond and the line must leave it to be drawn. This helps with smooth transitions between line segments.

The second or follow up is that the last pixel is not drawn. It never leaves the diamond.

Drawing lots of short lines can all stay inside the pixel area and never be drawn. Drawing line strips are treated as a longer, continuous line and the pieces do exit the diamonds.

Another “read the specifications carefully” note is that line width other than one is not guaranteed to be implemented, and the implementation details have similar subtle details like handling of line end caps and miters at joints. For thick lines your own quads may be better, as well as shapes for end caps and miters.

Enjoy the learning.

JoeJ
JoeJ

Aybe One said:
But then GL_LINESTRIP thickness isn't even, unless one goes 4K it's noticeable:

You could render at higher resolution and sample it down for higher quality.
You could keep resolution but use TAA.
Double resolution + MSAA + downsampling should give high quality.

Or you could use a compute shader to do whatever you want, including analytical anti aliasing.

Or you could try a library like OpenVG which would care about it all, but idk about widespread GPU support.

Aybe One said:
Bresenham

Afaik Bresenham does not support subpixel accuracy. Use DDA instead.

JoeJ
JoeJ

Assuming you don't need a depth test, you could do the AA cheaply with alpha blending. But then you need to generate a ‘thick’ mesh, turning each line segment into a quad (which is tricky on high curvature due to self intersections):

I've drawn the alpha texture in one quad. Grey means opaque and white means transparent. I guess a width of 2 or 3 texels would give a good compromise between smoothness and sharpness.

dpadam450
dpadam450

I ran a small test on my PC. So understand that if glLineWidth = 1.0, then you have a line that could be intersecting up to two pixels to the left and right. Imagine a vertical line between pixel 0 and pixel 1, and the lines x value is 0.5, that means the width of rasterization is 2, while the line is 1 pixel thick.

Anyway I looked into this a bit and determined that glLineWidth = .75 or so may help get closer to what you want. I made a program where you press a key (pause for 1 second so you can see exactly one iteration). Each iteration subtract 0.05 value from line width and see how it looks. Not certain you will still be happy. Anything under .7 for me starts to drop pixels because the line isn't thick enough at certain locations to be encroaching close enough to a pixel center.

NBA2K, Madden, Maneater, Killing Floor, Sims 
dpadam450
dpadam450

I think top here was about 0.8 and bottom was 1.0.


NBA2K, Madden, Maneater, Killing Floor, Sims 
dpadam450
dpadam450

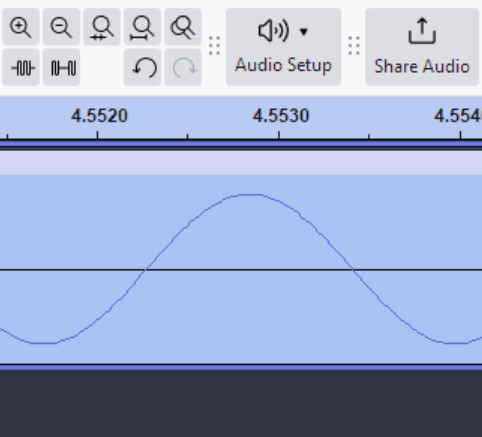
Also, this is how Audacity looks. This is the most zoomed in you can get. This looks pretty weird with many dimples.

NBA2K, Madden, Maneater, Killing Floor, Sims 
Aybe One
Aybe One

Thanks guys, you gave me motivation to tackle it, hopefully for good this time! 🥳

I think I've finally been able to reverse line-strip effects (shotgun debugging 😁):

No tinting so it's easy to compare:

Showing the region processed, would be stipples or nothing before:

If you look closely, it even fills holes that line-strip simply ignores.

The code:

using System;
using System.Linq;
using UnityEngine;

namespace Tests.WaveformGL
{
    public sealed class GLTest : MonoBehaviour
    {
        public Camera Camera;

        public bool CameraMSAA;

        [HideInInspector]
        public float[] Data = Array.Empty<float>();

        [HideInInspector]
        public Material Material;

        public Color Color1 = Color.gray;

        public Color Color2 = Color.red;

        public bool LineStrip;

        public bool SubPixelEnabled;

        [Min(0.0f)]
        public float SubPixelThreshold = 1.0f;

        public bool SubPixelTinting;

        private void Update()
        {
            Camera.allowMSAA = CameraMSAA;
        }

        private void OnEnable()
        {
            InitializeMaterial();

            InitializeListener();

            InitializeCamera();

            return;

            void InitializeMaterial()
            {
                if (Material == null)
                {
                    Material = new Material(Shader.Find("Hidden/Internal-Colored"))
                    {
                        hideFlags = HideFlags.HideAndDontSave
                    };
                }
            }

            void InitializeListener() // goes off on assembly reload
            {
                var listener = GetComponent<AudioListener>();

                listener.enabled = false;

                // ReSharper disable once Unity.InefficientPropertyAccess
                listener.enabled = true;
            }

            void InitializeCamera()
            {
                if (Camera != null)
                {
                    return;
                }

                var main = Camera.main;

                if (main == null)
                {
                    throw new InvalidOperationException();
                }

                Camera = main;
            }
        }

        private void OnDestroy()
        {
            CleanupMaterial();

            return;

            void CleanupMaterial()
            {
                if (Material == null)
                {
                    return;
                }

                Destroy(Material);

                Material = null!;
            }
        }

        private void OnGUI()
        {

            GUILayout.Label(LineStrip ? "Line Strip" : "Custom");
        }

        private void OnAudioFilterRead(float[] data, int channels)
        {
            if (Data.Length != data.Length)
            {
                Data = data.ToArray();
            }

            data.CopyTo(Data, 0);
        }

        private void OnRenderObject()
        {
            Material.SetPass(0);

            GL.PushMatrix();

            GL.LoadPixelMatrix();

            GL.Begin(LineStrip ? GL.LINE_STRIP : GL.LINES);

            var length = Mathf.Min(Data.Length, Screen.width);

            for (var i = 0; i < length; i++)
            {
                var x = i + 0.5f;

                var yThis = GetY(Data[i]);

                var yNext = i < length - 1 ? GetY(Data[i + 1]) : yThis;

                var sub = Mathf.Abs(yNext - yThis) < SubPixelThreshold;

                GL.Color(sub && SubPixelTinting && !LineStrip ? Color2 : Color1);

                if (LineStrip)
                {
                    GL.Vertex3(x, yThis, 0);
                }
                else
                {
                    if (sub && SubPixelEnabled)
                    {
                        yThis = Snapping.Snap(yThis, 1.0f);

                        var less = yThis < yNext;

                        yThis = Mathf.Floor(yThis);

                        yNext = yThis + (less ? +1.0f : -1.0f);

                        if (yNext < 0.0f)
                        {
                            yNext += 1.0f;
                            yThis += 1.0f;
                        }
                    }

                    GL.Vertex3(x, yThis, 0.0f);
                    GL.Vertex3(x, yNext, 0.0f);
                }
            }

            GL.End();

            GL.PopMatrix();

            return;

            float GetY(float f)
            {
                return (0.5f + 0.5f * f) * Screen.height;
            }
        }
    }
}

Basically, very simple math even I can afford.

I still have to test ratio > 1:1 but this particular 1:1 case now works while it didn't so it's quite promising.

If you can spot anything wrong, that'd be much appreciated! 🙂

Thanks! 🙂

Aybe One
Aybe One

Just noticed there have been more replies… Sorry, I should have refreshed page before posting!

Forgot to mention:

As it's under Unity, it's the most basic GL implementation one can think of:

https://docs.unity3d.com/ScriptReference/GL.html

So, no line width, no points, etc…

And obviously, no extensions either, like this VK one that apparently solves the problem:

https://registry.khronos.org/vulkan/specs/1.3-extensions/man/html/VK_EXT_line_rasterization.html

Aybe One
Aybe One

frob said:

Two things, or maybe just one and a consequence.

OpenGL follows a “diamond exit” rule for line rasterizing. The pixel area is considered with an internal diamond and the line must leave it to be drawn. This helps with smooth transitions between line segments.

The second or follow up is that the last pixel is not drawn. It never leaves the diamond.

Drawing lots of short lines can all stay inside the pixel area and never be drawn. Drawing line strips are treated as a longer, continuous line and the pieces do exit the diamonds.

Another “read the specifications carefully” note is that line width other than one is not guaranteed to be implemented, and the implementation details have similar subtle details like handling of line end caps and miters at joints. For thick lines your own quads may be better, as well as shapes for end caps and miters.

Enjoy the learning.

I did read the specs and effectively noticed this, but that left me with more questions than answers…

Also found out this: https://github.com/badlogic/line-rasterization Nice but it couldn't help figure it out.

JoeJ said:

Aybe One said:
But then GL_LINESTRIP thickness isn't even, unless one goes 4K it's noticeable:

You could render at higher resolution and sample it down for higher quality.
You could keep resolution but use TAA.
Double resolution + MSAA + downsampling should give high quality.

Or you could use a compute shader to do whatever you want, including analytical anti aliasing.

Or you could try a library like OpenVG which would care about it all, but idk about widespread GPU support.

Aybe One said:
Bresenham

Afaik Bresenham does not support subpixel accuracy. Use DDA instead.

Yes, #1 would likely tackle the problem, #2/#3 are out of reach for me.

I too tried DDA… until I realized I needed neither of these, just vertical lines.

JoeJ said:

Assuming you don't need a depth test, you could do the AA cheaply with alpha blending. But then you need to generate a ‘thick’ mesh, turning each line segment into a quad (which is tricky on high curvature due to self intersections):

I've drawn the alpha texture in one quad. Grey means opaque and white means transparent. I guess a width of 2 or 3 texels would give a good compromise between smoothness and sharpness.

Forgot to mention, basically I want aliased lines 😁.

dpadam450 said:

I ran a small test on my PC. So understand that if glLineWidth = 1.0, then you have a line that could be intersecting up to two pixels to the left and right. Imagine a vertical line between pixel 0 and pixel 1, and the lines x value is 0.5, that means the width of rasterization is 2, while the line is 1 pixel thick.

Anyway I looked into this a bit and determined that glLineWidth = .75 or so may help get closer to what you want. I made a program where you press a key (pause for 1 second so you can see exactly one iteration). Each iteration subtract 0.05 value from line width and see how it looks. Not certain you will still be happy. Anything under .7 for me starts to drop pixels because the line isn't thick enough at certain locations to be encroaching close enough to a pixel center.

If I was using vanilla OpenGL, I would have tried this, but Unity's is the most basic GL you can think of.

dpadam450 said:

Also, this is how Audacity looks. This is the most zoomed in you can get. This looks pretty weird with many dimples.

Looked at it before, yes it's bad, Audacity is quite inaccurate/simplistic, e.g. not even a zoom factor label…

Aybe One
Aybe One

@JoeJ

Following your suggestions, I took another look at the shader approach but well, couldn't get it up.
Either it trims too much or not enough, it's miles behind the code I posted…
Beside that trailing error effect (which is barely noticeable), I don't think I can get any better.

Funny how when one has something working but don't like it much, one would consider scrapping it. 🤣

Fallback plan would be thick 2 pixels lines with MSAA which looks solid but, thing is, with 1 pixel aliased lines, I don't get that anisotropy effect while scrolling, whereas with line strip + optional MSAA it's there.

Anyway, thanks for pushing me in the right direction! 😁

Aybe One
Aybe One

Been talking about something, yet forgot to post the relevant picture…

The only thing I'm not happy with happens at peaks, it's offset by 1 on both axes.

It's really not much but now I've seen it, I cannot unsee it! 🤣

frob
frob

Looks like the diamond exit rendering again. It shows up in many rendering scenarios, so it is worth understanding in depth.

Just because you sent something to render there doesn't necessarily mean a pixel gets filled. Pixels represent an area and the renderer looks at if enough area was covered to justify filling the pixel.

taby
taby

Have you tried making your own lines?

Vertex shader:

#version 430
layout (location = 0) in vec3 position;

void main()
{
    gl_Position = vec4(position, 1.0);
}

Geometry shader:

#version 430
layout (lines) in;                              // now we can access 2 vertices
layout (triangle_strip, max_vertices = 4) out;  // always (for now) producing 2 triangles (so 4 vertices)


uniform int img_width;
uniform int img_height;
uniform float line_thickness;
uniform int num_vertices;

vec2  u_viewportSize = vec2(img_width, img_height);
float u_thickness = line_thickness;

void main()
{
        vec4 p1 = gl_in[0].gl_Position;
        vec4 p2 = gl_in[1].gl_Position;
        vec2 dir = normalize((p2.xy / p2.w - p1.xy / p1.w) * u_viewportSize);
        vec2 offset = vec2(-dir.y, dir.x) * u_thickness / u_viewportSize;
        gl_Position = p1 + vec4(offset.xy * p1.w, 0.0, 0.0);
        EmitVertex();
        gl_Position = p1 - vec4(offset.xy * p1.w, 0.0, 0.0);
        EmitVertex();
        gl_Position = p2 + vec4(offset.xy * p2.w, 0.0, 0.0);
        EmitVertex();
        gl_Position = p2 - vec4(offset.xy * p2.w, 0.0, 0.0);
        EmitVertex();
        EndPrimitive();
}

Fragment shader:

#version 430
out vec4 fragColor;

uniform vec4 colour;

void main()
{
    fragColor = vec4(colour);
}
Aybe One
Aybe One

frob said:

Looks like the diamond exit rendering again. It shows up in many rendering scenarios, so it is worth understanding in depth.

Just because you sent something to render there doesn't necessarily mean a pixel gets filled. Pixels represent an area and the renderer looks at if enough area was covered to justify filling the pixel.

Yes, I did but got a headache doing so, kept it in my bookmarks and plan to read it again!

taby said:

Have you tried making your own lines?

Vertex shader:

#version 430
layout (location = 0) in vec3 position;

void main()
{
    gl_Position = vec4(position, 1.0);
}

Geometry shader:

#version 430
layout (lines) in;                              // now we can access 2 vertices
layout (triangle_strip, max_vertices = 4) out;  // always (for now) producing 2 triangles (so 4 vertices)


uniform int img_width;
uniform int img_height;
uniform float line_thickness;
uniform int num_vertices;

vec2  u_viewportSize = vec2(img_width, img_height);
float u_thickness = line_thickness;

void main()
{
        vec4 p1 = gl_in[0].gl_Position;
        vec4 p2 = gl_in[1].gl_Position;
        vec2 dir = normalize((p2.xy / p2.w - p1.xy / p1.w) * u_viewportSize);
        vec2 offset = vec2(-dir.y, dir.x) * u_thickness / u_viewportSize;
        gl_Position = p1 + vec4(offset.xy * p1.w, 0.0, 0.0);
        EmitVertex();
        gl_Position = p1 - vec4(offset.xy * p1.w, 0.0, 0.0);
        EmitVertex();
        gl_Position = p2 + vec4(offset.xy * p2.w, 0.0, 0.0);
        EmitVertex();
        gl_Position = p2 - vec4(offset.xy * p2.w, 0.0, 0.0);
        EmitVertex();
        EndPrimitive();
}

Fragment shader:

#version 430
out vec4 fragColor;

uniform vec4 colour;

void main()
{
    fragColor = vec4(colour);
}

Yes! Your idea led me to try compute shader and that worked! 🥳

No more need to fiddle with half pixels and so on, just ints:

#pragma kernel CSMain

struct Line
{
	int X1;
	int Y1;
	int Y2;
	float4 Color;
};

float4 Clear;

StructuredBuffer<Line> Lines;

int LinesCount;

RWTexture2D<float4> Result;

[numthreads(8, 8, 1)]
void CSMain(uint3 id : SV_DispatchThreadID)
{
	int2 xy = id.xy;

	Result[xy] = Clear;

	for (int i = 0; i < LinesCount; i++)
	{
		const Line data = Lines[i];

		if (xy.x == data.X1)
		{
			const int y1 = data.Y1;
			const int y2 = data.Y2;

			if (xy.y >= min(y1, y2) && xy.y <= max(y1, y2))
			{
				Result[xy] = data.Color;
			}
		}
	}
}

Feeding the shader is now much simpler:

for (var x = 0; x < width; x++)
{
    var peak = peaks[(channel.PeaksIndex + x + 0) % channel.PeaksCount];
    var next = peaks[(channel.PeaksIndex + x + 1) % channel.PeaksCount];

    var min = peak.Min;
    var max = peak.Max;

    if (max < next.Min)
    {
        max = next.Min;
    }

    if (min > next.Max)
    {
        min = next.Max;
    }

    var y1 = (int)((0.5f + 0.5f * min) * height);
    var y2 = (int)((0.5f + 0.5f * max) * height);

    if (y2 - y1 > Adjust)
    {
        y2--;
    }

    Lines[x] = new Line
    {
        X1 = x,
        Y1 = y1,
        Y2 = y2,
        Color = Color.red
    };
}

Still need to tune that adjustment hack to get the tiny peaks right but it's already very good! 🙂

I also stumbled upon https://twistedwave.com/, code has cryptic logic but the rendering is excellent.

taby
taby

Good to hear.

taby
taby

P.S. What language is your compute shader in?

Aybe One
Aybe One

Thanks!

The compute shader is from Unity, it has a .compute extension.

According to the documentation: They are written in DirectX 11 style HLSL language…

When you press F1 for help in Visual Studio, it opens the HLSL documentation.

taby
taby

Ok, thanks for the clarification. Looks great!

Topic Locked

This topic has been locked by a moderator. New replies are not allowed.

Sign in to reply to this topic.