
Game Programming Genesis Part I : Beginning Windows Programming
This ongoing series will cover creating an RPG in Windows and DirectX. The first installment gets you started writing Win32 applications in Visual C++.
Introduction
The purpose of this article is to introduce the very basics of Windows programming. By its end, you should be able to put together a working, albeit simple Windows program. All that is required is a basic knowledge of C. I rarely use C++ extensions in my code. However, since Windows itself is object-oriented, a little knowledge about classes never hurt anyone. If you're not familiar with it, don't worry, you won't need anything complicated, so you should be able to pick up what you need as you go. All of the code examples included have been tested using the Microsoft Visual C++ 6.0 compiler. If you don't have a Win32 C/C++ compiler, this is the one to get. That said, let's get started!Setting Up
The two header files that contain most of the Windows functions you'll need are [font="Courier New"][color="#000080"]windows.h[/color][/font] and [font="Courier New"][color="#000080"]windowsx.h[/color][/font]. Make sure you include both in your programs. Aside from that, you'll just be using the standard C headers, like [font="Courier New"][color="#000080"]stdio.h[/color][/font], [font="Courier New"][color="#000080"]conio.h[/color][/font], and so on. Aside from that, there's one line of code you'll see at the beginning of many Windows programs:#define WIN32_LEAN_AND_MEAN Besides having a cool sound to it, this line excludes some MFC stuff from the Windows header files, to speed up your build time a little bit. Since you're not likely to be using MFC for games programming, it's probably a good idea to use this most of the time. If you've never seen this type of statement before -- a [font="Courier New"][color="#000080"]#define[/color][/font] directive followed by only a name -- it has to do with something called conditional compilation. Take a look at this example: #ifdef DEBUG_MODE printf("Debug mode is active!"); #endif If the program containing this code has a line in the beginning that reads [font="Courier New"][color="#000080"]#define DEBUG_MODE[/color][/font], then the [font="Courier New"][color="#000080"]printf()[/color][/font] statement will be compiled. Otherwise, it will be left out. This is a useful way to enable or disable code within your program that helps you track down any logic errors you might have. In the case of [font="Courier New"][color="#000080"]WIN32_LEAN_AND_MEAN[/color][/font], its definition is used to remove rarely-used components of the Windows header files. Got it? Good. On to the code... The WinMain() function
Just as all DOS-based C programs begin execution with the [font="Courier New"][color="#000080"]main()[/color][/font] function, Windows programs begin with the [font="Courier New"][color="#000080"]WinMain()[/color][/font] function. A basic, empty [font="Courier New"][color="#000080"]WinMain()[/color][/font] function looks something like this:int WINAPI WinMain(HINSTANCE hinstance, HINSTANCE hPrevInstance, LPSTR lpCmdLine, int nCmdShow) { return(0); } For a function that does nothing but return a value, it's sure got a lot of unfamiliar stuff in it! First things first; what's the deal with the [font="Courier New"][color="#000080"]WINAPI[/color][/font] declarator? This is an example of what's known as a calling convention. It affects such things as the way parameters are passed to the function, which function performs stack cleanup, and a few other things that you never really see. A function with the [font="Courier New"][color="#000080"]WINAPI[/color][/font] calling convention passes parameters left-to-right, as opposed to the default right-to-left order. Unless you're going to be using assembly language with your programs, you don't need to know all the details of how calling conventions work, only that [font="Courier New"][color="#000080"]WinMain()[/color][/font] must have the [font="Courier New"][color="#000080"]WINAPI[/color][/font] convention specified. Next, let's take a look at the four parameters that the function receives: [font="Courier New"][color="#000080"]HINSTANCE hinstance[/color][/font]: This is a handle to the instance of your application. Basically, these are like pointers that are used to keep track of all the applications that are running at any given time. Many Windows functions take the instance of your application as a parameter, so it knows which application to apply the action to. [font="Courier New"][color="#000080"]HINSTANCE hPrevInstance[/color][/font]: You don't need to worry about this parameter, as it's now obsolete. In older versions of Windows, this would be a handle to the instance of the application that called your application. The only reason it's included anymore is for backwards compatibility. You'll see a few more things like that as you go on with Windows programming. [font="Courier New"][color="#000080"]LPSTR lpCmdLine[/color][/font]: This is a pointer to a string containing the command-line parameters used when the program was invoked. Note that there is no parameter specifying the number of command-line parameters, so you'll need to determine that yourself. [font="Courier New"][color="#000080"]int nCmdShow[/color][/font]: This integer indicates how the main window should be opened. You don't need to do anything with this if you don't want to. It takes values given by constants beginning with [font="Courier New"][color="#000080"]SW_[/color][/font]. Some examples are [font="Courier New"][color="#000080"]SW_SHOWNORMAL[/color][/font] for the default method, [font="Arial"][color="#000080"][font="Courier New"]SW_MAXIMIZE[/font] [/color][/font]or [font="Courier New"][color="#000080"]SW_MINIMIZE[/color][/font] for maximizing or minimizing windows, etc. That's about it for [font="Courier New"][color="#000080"]WinMain()[/color][/font]'s parameters. Often, the only one that will be of any consequence is hinstance. Before we go on to actually displaying a window, something needs to be said about the way Microsoft names variables. Hungarian Notation
Microsoft uses a standardized way of naming variables, functions, constants, and classes that is known as Hungarian notation. You've already seen an example of this in the [font="Courier New"][color="#000080"]WinMain()[/color][/font] function. The Hungarian notation for variable names consists of several prefixes which reveal the variable's data type. These are the prefixes used: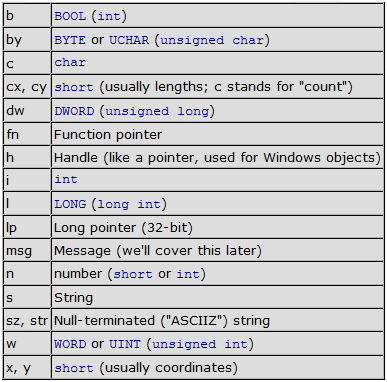
Messages
When you were programming in DOS, you didn't need to worry about other programs that might be running, because DOS is not a multitasking OS. When programming in Windows, however, you must take this into consideration. For this and other reasons, Windows uses what are called messages to communicate with applications and tell them what's going on. Messages serve a variety of purposes. They tell an application when its window is being resized, moved, or closed. They signal to a program that it is about to be closed. They inform a program when part of its window must be refreshed. They can be used to track mouse movement and button presses. The list goes on. In any case, your Windows program must be able to handle these messages. The way this is done is through the use of a special type of function called a callback function. Callback functions are functions which you don't actually call from your code; rather, certain events cause them to be called. You create such a function by using the [font="Courier New"][color="#000080"]CALLBACK[/color][/font] calling convention, much like the [font="Courier New"][color="#000080"]WINAPI[/color][/font] convention is used for [font="Courier New"][color="#000080"]WinMain()[/color][/font]. I'm going to leave this topic for a minute, though, because before you can process messages for your window, you have to be able to create the window in the first place.Window Classes
Here's where it helps to know a little about C++, because the first thing you must do to create a window is to create a window class. The class contains all the information about the window such as what icon it uses, the menu attached to it (if any), etc. In just about every Windows program you create, you'll need to create a window class to meet your needs. In order to do this, you need to fill out a [font="Courier New"][color="#000080"]WNDCLASSEX[/color][/font] structure. The "EX" part of the name stands for "extended," as there is an older version of this structure called [font="Courier New"][color="#000080"]WNDCLASS[/color][/font]. We'll be using the extended version. Here's what it looks like:typedef struct _WNDCLASSEX { UINT cbSize; UINT style; WNDPROC lpfnWndProc; int cbClsExtra; int cbWndExtra; HANDLE hInstance; HICON hIcon; HCURSOR hCursor; HBRUSH hbrBackground; LPCTSTR lpszMenuName; LPCTSTR lpszClassName; HICON hIconSm; } WNDCLASSEX; This structure has quite a few members to it, and you must set them all in order to create your window class. It's not so bad, though. Let's run through a brief description of all the fields. [font="Courier New"][color="#000080"]UINT cbSize[/color][/font]: This is the size of the structure, in bytes. You'll see this a lot, especially if you get into DirectX. It's included so that if a structure of this type (or rather, a pointer to that structure) is passed as a parameter to a function, the structure size can simply be looked up rather than having to be computed. Always set it to [font="Courier New"][color="#000080"]sizeof(WNDCLASSEX)[/color][/font]. [font="Courier New"][color="#000080"]UINT style[/color][/font]: This is the window style, which takes constants prefixed by [font="Courier New"][color="#000080"]CS_[/color][/font]. Furthermore, you can combine several of these constants by using the | (bitwise OR) operator. Most times there are only four you'll use. For the sake of keeping the length of this article down, I'll show you those four. You can always look up the rest on your MSDN Help. You did remember to get Visual C++, didn't you? 
WNDCLASSEX sampleClass; // declare structure variable sampleClass.cbSize = sizeof(WNDCLASSEX); // always use this! sampleClass.style = CS_DBLCLKS | CS_OWNDC | CS_HREDRAW | CS_VREDRAW; // standard settings sampleClass.lpfnWndProc = MsgHandler; // we need to write this! sampleClass.cbClsExtra = 0; // extra class info, not used sampleClass.cbWndExtra = 0; // extra window info, not used sampleClass.hInstance = hinstance; // parameter passed to WinMain() sampleClass.hIcon = LoadIcon(NULL, IDI_WINLOGO); // Windows logo sampleClass.hCursor = LoadCursor(NULL, IDC_ARROW); // standard cursor sampleClass.hbrBackground = (HBRUSH)GetStockObject(BLACK_BRUSH); // a simple black brush sampleClass.lpszMenuName = NULL; // no menu sampleClass.lpszClassName = "Sample Class" // class name sampleClass.hIconSm = LoadIcon(NULL, IDI_WINLOGO); // Windows logo again And you're all set. There is one thing I should mention, though. Notice the typecast to [font="Courier New"][color="#000080"]HBRUSH[/color][/font] on the result of the [font="Courier New"][color="#000080"]GetStockObject()[/color][/font] function. This is because [font="Courier New"][color="#000080"]GetStockObject()[/color][/font] can be used to load many objects, not just brushes, and so it returns a variable of type [font="Courier New"][color="#000080"]HGDIOBJ[/color][/font], which is a bit more general. In older versions of Visual C++, you wouldn't need the typecast, but VC++ 6.0 is more picky about typecasting, so you'll get an error if you try to compile without it. The last thing you need to do is register the new class with Windows so you can use it to create new windows. This is accomplished with a simple function call to [font="Courier New"][color="#000080"]RegisterClassEx()[/color][/font]. It only takes one parameter: the address of your structure. So in the example listed above, you would register the class like this: RegisterClassEx(&sampleClass); Now that Windows is familiar with the new class you've created, you can use it to create a window. It's about time, hey? Creating Windows
The good news is that all you need to create a window is a call to [font="Courier New"][color="#000080"]CreateWindowEx()[/color][/font]. The bad news is that this function takes a lot of parameters. You're probably getting sick of these long lists by now, but this one isn't too bad. Here's the function prototype:HWND CreateWindowEx( DWORD dwExStyle, // extended window style LPCTSTR lpClassName, // pointer to registered class name LPCTSTR lpWindowName, // pointer to window name DWORD dwStyle, // window style int x, // horizontal position of window int y, // vertical position of window int nWidth, // window width int nHeight, // window height HWND hWndParent, // handle to parent or owner window HMENU hMenu, // handle to menu, or child-window identifier HINSTANCE hInstance, // handle to application instance LPVOID lpParam // pointer to window-creation data ); First things first: the return value. By now, all these crazy data types that Windows uses are probably starting to look familiar. If not, don't worry, you'll get used to it sooner than you think. The return type is [font="Courier New"][color="#000080"]HWND[/color][/font], which is a handle to a window. You'll want to store the value returned by [font="Courier New"][color="#000080"]CreateWindowEx()[/color][/font], as you'll need it as a parameter for several Windows functions. Now, let's tackle that parameter list. Many are self-explanatory. [font="Courier New"][color="#000080"]DWORD dwExStyle[/color][/font]: Extended window style is something you'll rarely use, so you can set this to [font="Courier New"][color="#000080"]NULL[/color][/font] most of the time. If you're interested, the Help files for your compiler list a ton of constants beginning with [font="Courier New"][color="#000080"]WS_EX_[/color][/font] that can be used here. [font="Courier New"][color="#000080"]LPCTSTR lpClassName[/color][/font]: Remember when you named the class you created? Just pass that name here. [font="Courier New"][color="#000080"]LPCTSTR lpWindowName[/color][/font]: This is simply the text that will appear on the window's title bar. [font="Courier New"][color="#000080"]DWORD dwStyle[/color][/font]: The window style parameter allows you to specify what type of window you want to create. There are a lot of constants that can be used here, beginning with [font="Courier New"][color="#000080"]WS_[/color][/font], and they can be combined with the | operator. I'll list just a few of the common ones: 
HWND hwnd; if (!(hwnd = CreateWindowEx(NULL, // extended style, not needed "Sample Class", // class identifier "Sample Window", // window title WS_POPUP | WS_VISIBLE, // parameters 0, 0, 320, 240, // initial position, size NULL, // handle to parent (the desktop) NULL, // handle to menu (none) hinstance, // application instance handle NULL))) // who needs it? return(0); This might be something you'd use for a game, because it's a popup window. Notice that I've enclosed the [font="Courier New"][color="#000080"]CreateWindowEx()[/color][/font] call inside an if statement. This is because if [font="Courier New"][color="#000080"]CreateWindowEx()[/color][/font] fails, it returns [font="Courier New"][color="#000080"]NULL[/color][/font]. The way this statement is set up, if the window can't be created for some reason, [font="Courier New"][color="#000080"]WinMain()[/color][/font] simply returns and the program ends. Now you've almost got enough to make a Windows program that creates a functional window. Almost. Remember when we created "Sample Class," and had to provide a pointer to a message handler function? We need to write that function before Windows will let us create anything. Handling Messages
I've already explained some of the things messages are used for in Windows. Now I'll go over how to make use of them. The prototype for a message handling function looks like this:LRESULT CALLBACK MsgHandler( HWND hwnd, // window handle UINT msg, // the message identifier WPARAM wparam, // message parameters LPARAM lparam // more message parameters }; The [font="Courier New"][color="#000080"]LRESULT[/color][/font] type of the return value is used specfically for message processing functions like the one we're going to write. I talked about the [font="Courier New"][color="#000080"]CALLBACK[/color][/font] convention a little bit earlier. The parameters are very simple: [font="Courier New"][color="#000080"]HWND hwnd[/color][/font]: This is the handle of the window that sent the message currently being processed. [font="Courier New"][color="#000080"]UINT msg[/color][/font]: This is a message identifier. The values for this parameter are constants beginning with [font="Courier New"][color="#000080"]WM_[/color][/font] (for "Windows message"). The number of different messages that can be sent is ridiculously high, but here are some important ones: 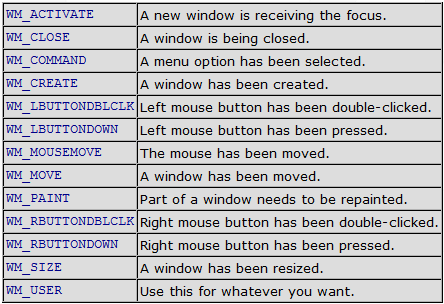
LRESULT CALLBACK MsgHandler(HWND hwnd, UINT msg, WPARAM wparam, LPARAM lparam) { return(DefWindowProc(hwnd, msg, wparam, lparam)); } Simple, hey? Usually you'll want to handle some of these messages yourself. In that case, you can write your own code, and return 0 to tell the program that you've dealt with the message. Here's an example of a message handler that calls an initialization function when the window is created, and calls the default handler for anything else. LRESULT CALLBACK MsgHandler(HWND hwnd, UINT msg, WPARAM wparam, LPARAM lparam) { if (msg == WM_CREATE) { Initialize_Game(); return(0); } return(DefWindowProc(hwnd, msg, wparam, lparam)); } Your message handler will probably end up being a big [font="Courier New"][color="#000080"]switch[/color][/font] statement to accommodate the messages you want to handle manually, followed by a call to the default handler for everything else. Now there's just one more thing I need to show you before everything is working smoothly, and that's how to make sure your message handler is getting called when it has work to do. Reading the Message Queue
Near the beginning of your program's main loop, you need to see if the message queue -- where all pending messages are stored -- has anything waiting for you. If so, there are a few things you need to do in order for your handler to do its job correctly. The function you need here is [font="Courier New"][color="#000080"]PeekMessage()[/color][/font]. Here is its prototype:BOOL PeekMessage( LPMSG lpMsg, // pointer to structure for message HWND hWnd, // handle to window UINT wMsgFilterMin, // first message UINT wMsgFilterMax, // last message UINT wRemoveMsg // removal flags ); The return type, [font="Courier New"][color="#000080"]BOOL[/color][/font], is really just an int, but it takes only two values: [font="Courier New"][color="#000080"]TRUE[/color][/font] or [font="Courier New"][color="#000080"]FALSE[/color][/font]. If a message is waiting on the queue, the function returns [font="Courier New"][color="#000080"]TRUE[/color][/font]. Otherwise, it returns [font="Courier New"][color="#000080"]FALSE[/color][/font]. The parameters are pretty straightforward: [font="Courier New"][color="#000080"]LPMSG lpMsg[/color][/font]: This is a pointer to a variable of type [font="Courier New"][color="#000080"]MSG[/color][/font]. If a message is waiting, this variable will be filled with the message information. [font="Courier New"][color="#000080"]HWND hWnd[/color][/font]: The handle of the window whose queue you want to check. [font="Courier New"][color="#000080"]UINT wMsgFilterMin, wMsgFilterMax[/color][/font]: The indices of the first and last messages in the queue to check. Most of the time, you'll only be interested in the first message on the queue, so you would set both of these parameters to 0. [font="Courier New"][color="#000080"]UINT wRemoveMsg[/color][/font]: Generally this takes only two values, [font="Courier New"][color="#000080"]PM_REMOVE[/color][/font] or [font="Courier New"][color="#000080"]PM_NOREMOVE[/color][/font]. Use the former if you want to remove the message from the queue after reading it, and the latter if you want to leave the message on the queue. Usually, if a message is waiting, you'll prepare it to be handled right away, in which case you should use [font="Courier New"][color="#000080"]PM_REMOVE[/color][/font]. If a message is waiting, you need to do a few things to get your handler to kick in. Don't worry, it's only two simple calls: one to [font="Courier New"][color="#000080"]TranslateMessage()[/color][/font] and one to [font="Courier New"][color="#000080"]DispatchMessage()[/color][/font]. Their prototypes are very similar: BOOL TranslateMessage(CONST MSG *lpmsg); LONG DispatchMessage(CONST MSG *lpmsg); The first call performs a bit of translation on the message, as you may have guessed, and the second call invokes your message handler and sends it the appropriate information from the [font="Courier New"][color="#000080"]MSG[/color][/font] structure. That's all you need to know! With every iteration of your main loop, if a message is waiting, you call these two functions and your [font="Courier New"][color="#000080"]MsgHandler()[/color][/font] function takes care of the rest. Here's a code example: if (PeekMessage(&msg, NULL, 0, 0, PM_REMOVE)) { TranslateMessage(&msg); DispatchMessage(&msg); } No problem! Now you can write a Windows program that creates and registers a window class, and creates a window with a valid message handler. That wasn't so bad, was it? There are just a few more things I'd like to mention before I wrap this article up. While we're on the topic of messages, there will come a time when you want to send messages manually. Here's how. Sending Messages
There are actually two ways to go about doing this. You can either call [font="Courier New"][color="#000080"]PostMessage()[/color][/font] or [font="Courier New"][color="#000080"]SendMessage()[/color][/font]. Their prototypes are very similar:BOOL PostMessage( HWND hWnd, // handle of destination window UINT Msg, // message to post WPARAM wParam, // first message parameter LPARAM lParam // second message parameter ); LRESULT SendMessage( HWND hWnd, // handle of destination window UINT Msg, // message to post WPARAM wParam, // first message parameter LPARAM lParam // second message parameter ); The parameters are the same as those taken by the MsgHandler() function we wrote, so I won't go over them again. The only thing you need to know is the difference between the two functions, so I'll go over each one briefly. [font="Courier New"][color="#000080"]PostMessage()[/color][/font] is used when you simply want to add a message to the queue and let your program logic take care of it. The function returns a nonzero value ([font="Courier New"][color="#000080"]TRUE[/color][/font]) if it succeeds, or zero ([font="Courier New"][color="#000080"]FALSE[/color][/font]) if it fails. It simply adds the message you specify to the queue, and returns immediately. In most cases, a call to [font="Courier New"][color="#000080"]PostMessage()[/color][/font] will get the job done. [font="Courier New"][color="#000080"]SendMessage()[/color][/font] is a bit different. Notice that it returns an [font="Courier New"][color="#000080"]LRESULT[/color][/font], which is used for message processing functions. That's because [font="Courier New"][color="#000080"]SendMessage()[/color][/font] doesn't post a message to the queue -- it translates the message and invokes the message handler immediately, and doesn't return until the message handler has finished processing the message. [font="Courier New"][color="#000080"]SendMessage()[/color][/font] is used rather than [font="Courier New"][color="#000080"]PostMessage()[/color][/font] for events of higher priority that need to occur quickly. Use it when you want something done immediately. Now that you know that, the topic of messages leads into the last topic I need to mention for now, and that is a major difference between Windows programming and DOS programming. Program Flow
In DOS, you don't need to worry about any of this message stuff. You don't need to concern yourself with multiple programs running simultaneously. But when you're programming in Windows, these are very important matters. As a result, your programs need to work a bit differently than they do in DOS. Consider this bit of pseudo-code:// main game loop do { // handle messages here // ... // update screen if necessary if (new_screen) { FadeOut(); LoadNewMap(); FadeIn(); } // perform game logic WaitForInput(); UpdateCharacters(); RenderMap(); } while (game_active); Suppose [font="Courier New"][color="#000080"]FadeOut()[/color][/font] works like this: when the function is called, it dims the image on the screen over a period of about a second. When the screen is totally black, the function returns. [font="Courier New"][color="#000080"]FadeIn()[/color][/font] works in a similar fashion. [font="Courier New"][color="#000080"]WaitForInput()[/color][/font] simply waits until a key is pressed. Perhaps it stores the input in a global variable somewhere. Now, in a DOS-based game, this is a perfectly acceptable way to do things. In a Windows game, it is certainly not! Why not? Well, what happens when new_screen becomes true? It fades the screen out, loads a map, and fades back in. Altogether this takes about two seconds. That's two seconds during which no messages are being processed, so the user could do something such as minimize the window, but the program will keep running like it hasn't happened yet. This sort of thing can cause erroneous output, general protection faults, etc. Needless to say, this is unacceptable. The [font="Courier New"][color="#000080"]WaitForInput()[/color][/font] function is even worse, because it suspends the flow of the program until a key is pressed during every frame. Whereas the previous example has the potential to cause trouble, this one is a near-certainty. The bottom line is that if your game runs at 30 FPS, you need to make sure the entire main loop executes 30 times a second. Each iteration of the main loop should show only one frame, not many frames as in the theoretical [font="Courier New"][color="#000080"]FadeOut()[/color][/font] function in the example. When first learning Windows programming, this can be a bit of an obstacle, because it's a different way of thinking. However, once you figure out how to set up your program to run this way, I think you'll find it makes for a much more organized and flexible program. Closing
That's about it for basic Windows programming. While the example we developed over the course of the article doesn't do much except display a window, it contains the entire framework for a functional Windows application. Next time I'll get into handling resources, which allows you to incorporate custom icons, cursors, sounds, menus, and more -- right into your [font="Courier New"][color="#000080"].EXE[/color][/font]! If you have any questions or comments about this article or anything else, feel free to contact me via E-mail at [email="ironblayde@aeon-software.com"]ironblayde@aeon-software.com[/email], or via ICQ. My UIN is 53210499. Until next time, farewell!Related Tutorials
Balancing Game Development and Creative Direction in Indie Production
A practical look at how indie developers can balance creative direction with hands-on game development. This article co…
 huseyin_onur
My Unreal Engine Development Process: From Core Idea to Playable Build
A practical overview of my Unreal Engine development process, covering how I move from a core game idea to a playable b…
huseyin_onur

Introducing LaneGraph: The Ultimate Road Network Solution for Unity
Discover the power of LaneGraph, a lightweight and flexible lane-based navigation system for Unity. LaneGraph makes it…
Retargeting Mixamo Characters with Root Motion In Unreal Engine 5.4.
I have always found Retargeting Mixamo Characters To have Root Motion is a serious lengthy Tast, Recently I stumbled up…

How To Make A SIMPLE Main Menu In Unity
In this tutorial for unity, i go over how to make a simple main menu for unity, it's an unlisted video because i do not…
 FlipThaSwitzh

Guide to Gameplay Balance
A perspective on competitive gameplay balance, from a background of "shooter" sandbox design.
 Tucker933
Discussion
More from Joseph Farrell
Comparing Shadow Mapping Techniques with Shadow Explorer
New Incentives and a Whole New Platform From The Intel AppUp developer program
The final installment in this series on Intel's AppUp program details additional incentives and opportunities for devel…
The Game Maker
This book excerpt contains the first chapter of the book that introduces beginning game developers to the Game Maker pr…
Discussion