
Creating a Very Simple GUI System for Small Games - Part III
If you are writing your own game, sooner or later you will need some sort of user interface (or graphic user interface = GUI). There are some existing libraries lying around and there are a lot of discussion threads that deals with eternal problem
Basic rendering
To keep things as easy as possible we start with the simple approach where each element is rendered separately. This is not a very performance-friendly way if you have a lot of elements, but it will do for now. Plus, in a static GUI used in a main menu and not in an actual game, it can also be a sufficient solution. You may notice warnings in performance utilities that you are rendering too many small primitives. If your framerate is high enough and you don't care about things like power consumption, you can leave things as they are. Power consumption is more likely to be a problem for mobile devices, where a battery lifetime is important. Fewer draw calls can be cheaper and put less strain on your battery; plus your device won't be hot as hell. In modern APIs, the best way to render things is to use shaders. They offer great user control - you can blend textures with colors, use mask textures to do patterns, etc. We use one shader that can handle every type of element. The following shader samples are written in GLSL. They use an old version of notation because of a compatibility with OpenGL ES 2.0 (almost every device on the market is using this API). This vertex shader assumes that you have already converted your geometry into the screen space (see first part of the tutorial where [-1, 1] coordinates were mentioned). attribute vec3 POSITION; attribute vec2 TEXCOORD0; varying vec2 vTexCoord; void main() { gl_Position = vec4(POSITION.xyz, 1.0); vTexCoord = TEXCOORD0; } In a pixel (fragment) shader, I am sampling a texture and combining it with color using a simple blending equation. This way, you can create differently colored elements and use some grayscaled texture as a pattern mask. uniform sampler2D guiElementTexture; uniform vec4 guiElementColor; varying vec2 vTexCoord; void main() { vec4 texColor = texture2D(guiElementTexture, vTexCoord); vec4 finalColor = (vec4(guiElementColor.rgb, 1) * guiElementColor.a); finalColor += (vec4(texColor.rgb, 1) * (1.0 - guiElementColor.a)); finalColor.a = texColor.a; gl_FragColor = finalColor; } That is all you need for rendering basic elements of your GUI. Font rendering For fonts I have chosen to use this basic renderer instead of an advanced one. If your texts are dynamic (changing very often - score, time), this solution may be faster. The speed of rendering also depends on the text length. For small captions, like "New Game", "Continue", "Score: 0" this will be enough. Problems may (and probably will) occur with long texts like tutorials, credits etc. If you will have more than 100 draw-calls in every frame, your frame rate will probably drop down significantly. This is something that can not be told explicitly, it depends on your hardware, driver optimization and other factors. Best way is to try :-) From my experience, there is a major frame drop with rendering 80+ letters, but on the other hand, the screen could be static and the user probably won't notice the difference between 60 and 20 fps. For classic GUI elements, you have used textures that are changed for every element. For fonts, it would be an overkill and a major slowdown of your application. Of course, in some cases (debug), it may be good to use this brute-force way. We will use something called a texture atlas instead. That is nothing more then a single texture that holds all possible textures (in our case letters). Look at the picture below if you don't know what I mean :-) Of course, to have only this texture is useless without knowing where each letter is located. This information is usually stored in a separate file that contains coordinate locations for each letter. Second problem is the resolution. Fonts provided and generated by FreeType are created with respect to the font size from vector representations, so they are sharp every time. By using a font texture you may end up with good looking fonts on a small resolutions and blurry ones for a high resolution. You need to find a trade-off between a texture size and your font size. Plus, you must take in mind that most of the GPUs (especially the mobile ones), have a max texture size of 4096x4096. On the other hand, using this resolution for fonts is an overkill. Most of the time I have used 512x512 or 256x256 for rendering fonts with a size 20. It looks good even on Retina iPad. 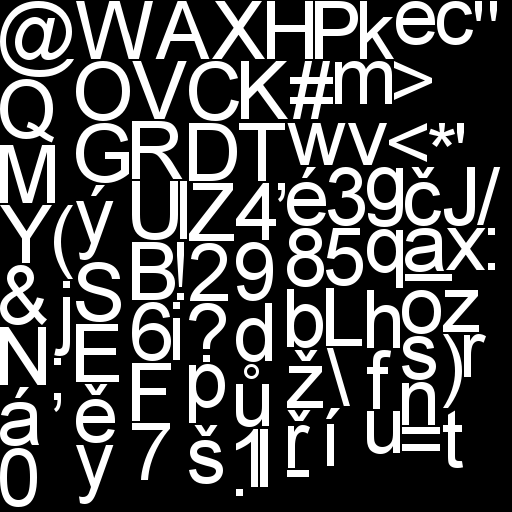 Example of font texture atlas
 //calculate "scaling" float sx = 2.0f / screen_width; float sy = 2.0f / screen_height; //Map texture coordinates from [0, 1] to screen space [-1, 1] x = MyMathUtils::MapRange(0, 1, -1, 1, x); y = -MyMathUtils::MapRange(0, 1, -1, 1, y); //-1 is to put origin to bottom left corner of the letter //wText is UTF-8 since FreeType expect this for (int i = 0; i < wText.GetLength(); i++) { unsigned long c = FT_Get_Char_Index(this->fontFace, wText); FT_Error error = FT_Load_Glyph(this->fontFace, c, FT_LOAD_RENDER); if(error) { Logger::LogWarning("Character %c not found.", wText.GetCharAt(i)); continue; } FT_GlyphSlot glyph = this->fontFace->glyph; //build texture name according to letter MyStringAnsi textureName = "Font_Renderer_Texture_"; textureName += this->fontFace; textureName += "_"; textureName += znak; if (!MyGraphics::G_TexturePool::GetInstance()->ExistTexture(textureName)) { //upload new letter only if it doesnt exist yet //some kind of cache to improve performance :-) MyGraphics::G_TexturePool::GetInstance()->AddTexture2D(textureName, //name o texture within pool glyph->bitmap.buffer, //buffer with raw texture data glyph->bitmap.width * glyph->bitmap.rows, //buffer byte size MyGraphics::A8, //only grayscaled texture glyph->bitmap.width, glyph->bitmap.rows); //width / height of texture } //calculate letter position within screen float x2 = x + glyph->bitmap_left * sx; float y2 = -y - glyph->bitmap_top * sy; //calculate letter size within screen float w = glyph->bitmap.width * sx; float h = glyph->bitmap.rows * sy; this->fontQuad->GetEffect()->SetVector4("cornersData", Vector4(x2, y2, w, h)); this->fontQuad->GetEffect()->SetVector4("fontColor", fontColor); this->fontQuad->GetEffect()->SetTexture("fontTexture", textureName); this->fontQuad->Render(); //advance start position to the next letter x += (glyph->advance.x >> 6) * sx; y += (glyph->advance.y >> 6) * sy; } To change this code to be able work with a texture atlas is quite easy. What you need to do is use an additional file with coordinates of letters within the atlas. For each letter, those coordinates will be passed along with letter position and size. The texture will be set only once and stay the same until you change the font type. The rest of the code, hovewer, remains the same. As you can see from code, texture bitmap (glyph->bitmap.buffer) is a part of the glyph provided by FreeType. Even if you don't use it, it is still generated and it takes some time. If your texts are static, you can "cache" them and store everything generated by FreeType during first run (or in some Init step) and then, in runtime, just use precreated variables and don't call any FreeType functions at all. I use this most of the time and there are no performance impacts and problems with font rendering. Advanced rendering
So far only basic rendering has been presented. Many of you probably knew that, and there was nothing surprising. Well, there will probably be no surprises in this section too. If you have more elements and want to have them rendered as fast as possible, rendering each of them separately may not be enough. For this reason I have used a "baked" solution. I have created a single geometry buffer, that holds geometry from all elements on the screen and I can draw them with a single draw-call. The problem is that you need to have single shader and elements may be different. For this purpose, I have used a single shader that can handle "everything" and each element has a unified graphics representation. It means that for some elements, you will have unused parts. You may fill those with anything you like, usually zeros. Having this representation with unused parts will end up with a "larger" geometry data. If I have used the word "larger", think about it. It won't be such a massive overhead and your GUI should still be cheap on memory with a faster drawing. That is the trade-off. What we need to pass as geometry for every element:- POSITION - this will be divided into two parts. XYZ coordinates and W for element index.
- TEXCOORD0 - two sets of texture coordinates
- TEXCOORD1 - two sets of texture coordinates
- TEXCOORD2 - color
- TEXCOORD3 - additional set of texture coordinates and reserved space to kept padding to vec4
//Vertex buffer content attribute vec4 POSITION; //pos (xyz), index (w) attribute vec4 TEXCOORD0; //T0 (xy), T1 (zw) attribute vec4 TEXCOORD1; //T2 (xy), T3 (zw) attribute vec4 TEXCOORD2; //color attribute vec4 TEXCOORD3; //T4 (xy), unused (zw) //User provided input uniform int stateIndex[64]; //64 = max number of elements baked in one buffer //Output varying vec2 vTexCoord; varying vec4 vColor; void main() { gl_Position = vec4(POSITION.xyz, 1.0); int index = stateIndex[int(POSITION.w)]; if (index == -1) //not visible { gl_Position = vec4(0,0,0,0); index = 0; } if (index == 0) vTexCoord = TEXCOORD0.xy; if (index == 1) vTexCoord = TEXCOORD0.zw; if (index == 2) vTexCoord = TEXCOORD1.xy; if (index == 3) vTexCoord = TEXCOORD1.zw; if (index == 4) vTexCoord = TEXCOORD3.xy; vColor = TEXCOORD2; } Note: In vertex shader, you can spot the "ugly" if sequence. If I replaced this code with an if-else, or even a switch, GLSL optimizer for ES version stripped my code somehow and it stopped working. This was the only solution, that worked for me. varying vec2 vTexCoord; varying vec4 vColor; uniform sampler2D guiBakedTexture; void main() { vec4 texColor = texture2D(guiBakedTexture, vTexCoord); vec4 finalColor = (vec4(vColor.rgb, 1) * vColor.a) + (vec4(texColor.rgb, 1) * (1.0 - vColor.a)); finalColor.a = texColor.a; gl_FragColor = finalColor; } Conclusion
Rendering GUI is not a complicated thing to do. If you are familiar with basic concepts of rendering and you know how an API works, you will have no problem rendering everything. You need to be careful with text rendering, since there could be significant bottlnecks if you choose the wrong approach. Next time, in part IV, some tips & tricks will be presented. There will be a simple texture atlas creation, example of user-friendly GUI layout with XML, details regarding touch controls and maybe more :-). The glitch is, that I don't have currently much time, so there could be a longer delay before part IV will see the light of day :-)Article Update Log
19 May 2014: Initial releaseRelated Tutorials
Balancing Game Development and Creative Direction in Indie Production
A practical look at how indie developers can balance creative direction with hands-on game development. This article co…
 huseyin_onur
My Unreal Engine Development Process: From Core Idea to Playable Build
A practical overview of my Unreal Engine development process, covering how I move from a core game idea to a playable b…
huseyin_onur

Introducing LaneGraph: The Ultimate Road Network Solution for Unity
Discover the power of LaneGraph, a lightweight and flexible lane-based navigation system for Unity. LaneGraph makes it…
Retargeting Mixamo Characters with Root Motion In Unreal Engine 5.4.
I have always found Retargeting Mixamo Characters To have Root Motion is a serious lengthy Tast, Recently I stumbled up…

How To Make A SIMPLE Main Menu In Unity
In this tutorial for unity, i go over how to make a simple main menu for unity, it's an unlisted video because i do not…
 FlipThaSwitzh

Guide to Gameplay Balance
A perspective on competitive gameplay balance, from a background of "shooter" sandbox design.
 Tucker933
Discussion
More from Martin Prantl
Basic OpenAL sound manager for your project
Adding sound to your project can be a terrifying experience. You have to find the right library, right sound format and…
Creating a Very Simple GUI System for Small Games - Part II
If you are writing your own game, sooner or later you will need some sort of user interface (or graphic user interface …
Creating a Very Simple GUI System for Small Games - Part I
If you are writing your own game, sooner or later you will need some sort of user interface (or graphic user interface …
Discussion