
Building a First-Person Shooter Part 1.1: Visual Studio Setup
This is the second lesson in a set of tutorials that demonstrate how to build a complete first-person shooter game, from start to finish. In this lesson we will use Visual Studios C++ along with Leadwerks 3 to setup our code base.

Setting up the VS 2010 project
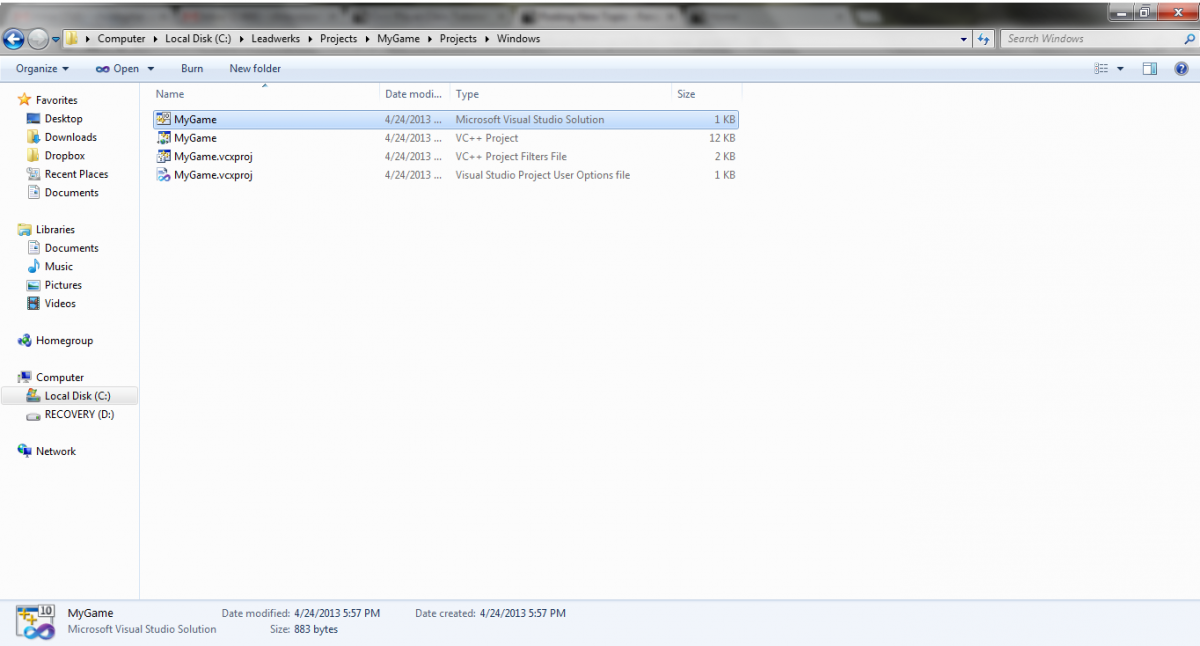
Now that we've finished building our level it is now time to begin the coding side of the project. For this lesson, we will be using Visual Studio 2010 on Windows, but you can follow the equivalent steps for Xcode on Mac. Right-click on the project name in the project list and select the Open Folder menu item from the context menu that pops up. This will open the project folder in Windows Explorer (or Finder on Mac). Navigate to the Projects/Windows folder and open the file MyGame.sln. At this point in time we are going to create a few blank C++ and Header files that we will be fleshing out throughout the tutorial.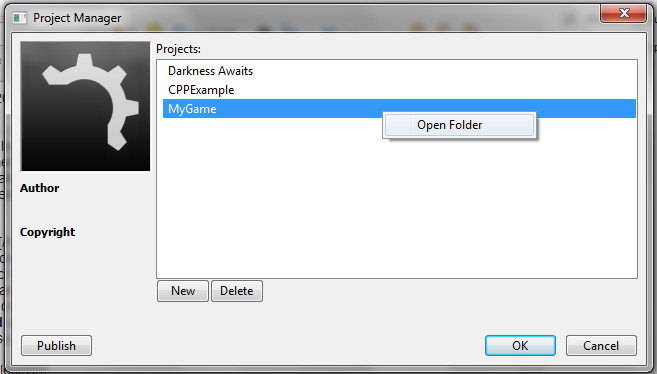
Creating C++ Files
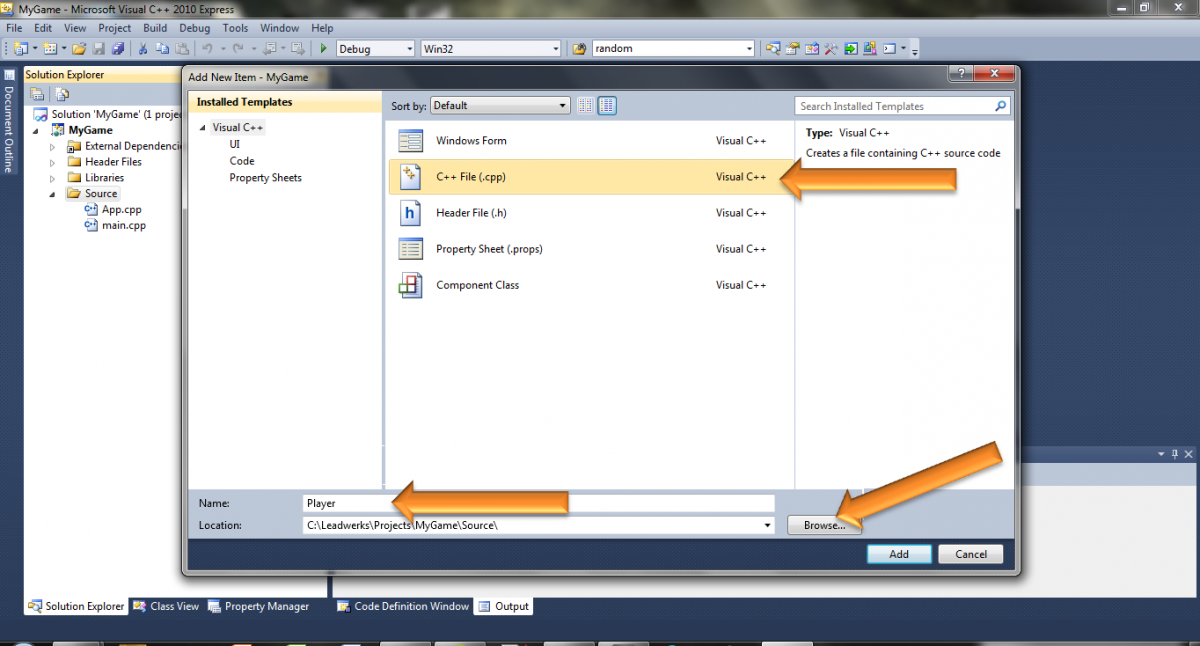
In the Visual Studio's Solution Explorer (normally located on the left side of the screen) right click on the Source folder and select Add->New Item, A new item window will pop up and we are going to select "C++ File (.cpp)" and name the file "Player" we also want to change the location of this file so on the right side of "Location" click the browse button and navigate to "MyGame/Source" and click "Select Folder" finally click Add and our new Player.cpp file will appear in the Solution Explorer. We will also want a "Node.cpp" file so repeat the process again but this time name the file "Node".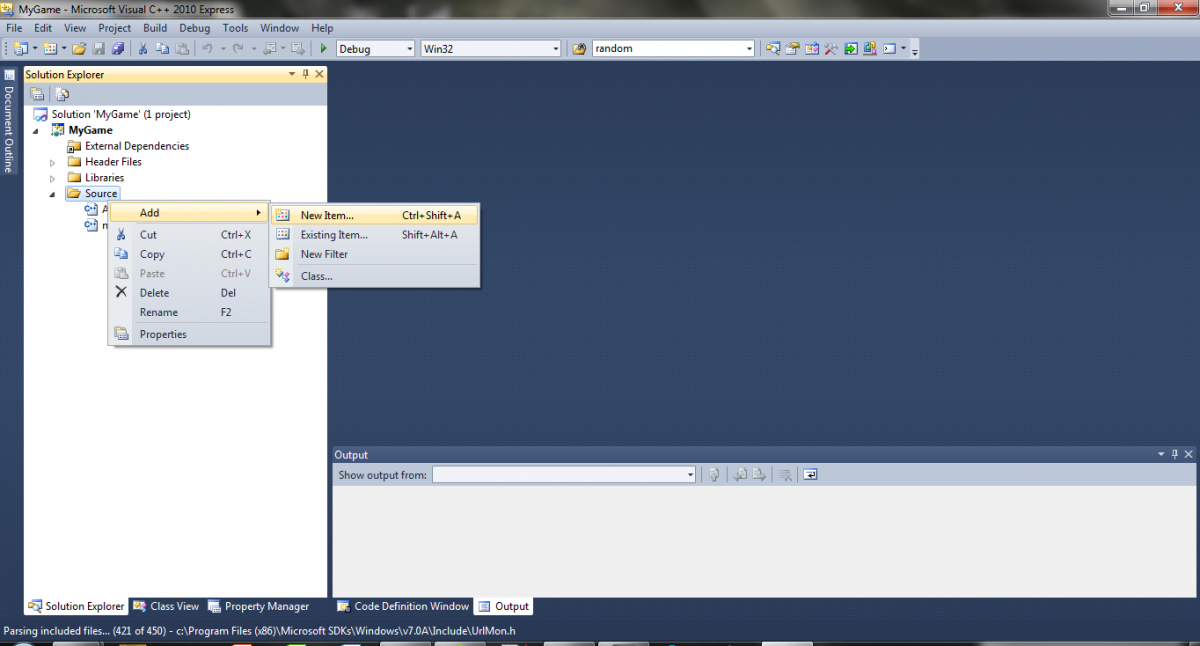
Creating Header Files
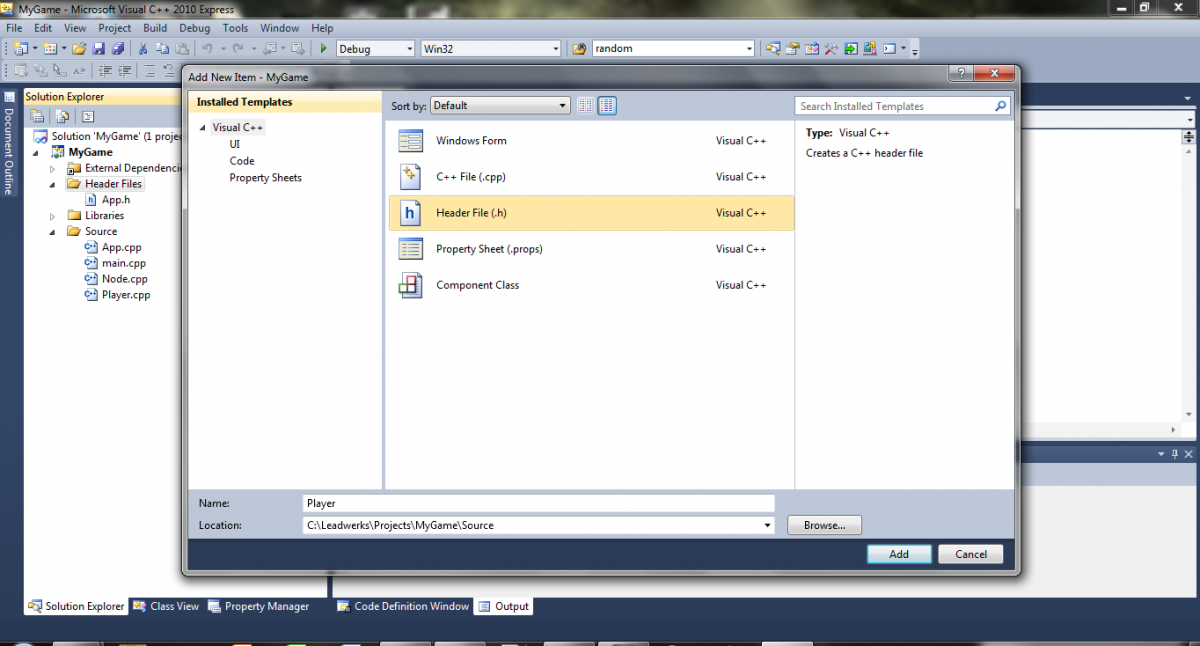
Adding header files into Visual Studios 2010 is essentially the same process as adding in a cpp file. This time we will click on the "Header Files" folder in the solution explorer, right click and select Add->New Item. The window from before will pop up, but now we select "Header File (.h)" instead. Once again we will want these files saved in the "MyGame/Source" folder so remember to save to the correct folder. We are going to make three headers for this tutorial so repeat the steps of adding a new file for Player.h, Node.h, and MyGame.h.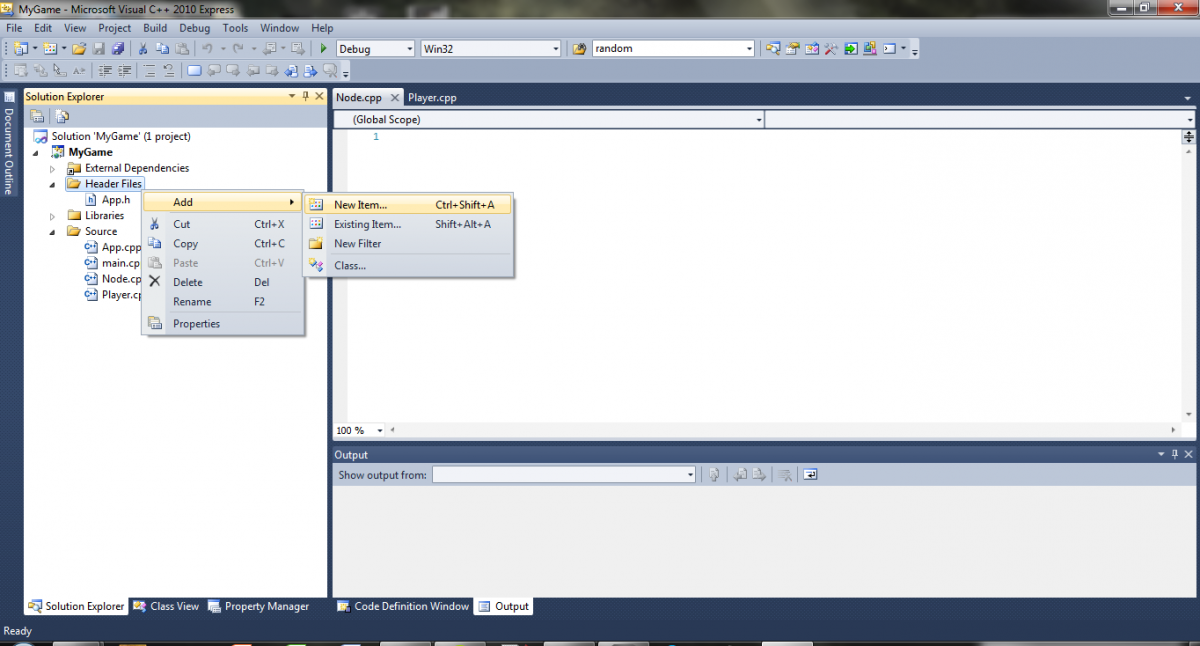
 Now we're ready to start coding.
 MyGame.h
Inside MyGame.h we are going to set a series of #define statements that will allow other files to just make a single #define call. You will notice a call to #pragma once, this is a preprocessor directive that says "only include the following files if they're not already included". After this call we insert #define calls to leadwerks.h, node.h, and player.h: #pragma once #include "Leadwerks.h" #include "Node.h" #include "Player.h" App Class
By default the App class contains two functions for structuring a game. App::Start() will be called when the game begins, and App::Loop() will be called continuously until the game ends. Inside App.h we are going to remove the default camera and add in a Player, the resulting file should look as such: #pragma once #include "Leadwerks.h" #include "MyGame.h" using namespace Leadwerks; class App { public: Window* window; Context* context; World* world; Player* player; App(); virtual ~App(); virtual bool Start(); virtual bool Loop(); }; Since we removed the default camera from App.h we will also need to remove the initialization call within the App constructor inside App.cpp: App::App() : window(NULL), context(NULL), world(NULL){} Next we are going to create a new instance of a player in App::Start() as well as call the player's Update function in App::Loop(): //Create the player player = new Player; //Update the player player->Update(); Also inside the App::Start() function, we are going to load an ambient background sound, then have that sound play on a continuous loop. (We'll replace this with something more advanced later on, but this is fine for now): Sound* sound = Sound::Load("Sound/Ambient/cryogenic_room_tone_10.wav"); Source* source = Source::Create(); source->SetSound(sound); source->SetLoopMode(true); source->Play(); By the end of these changes your finished App class should look like the following: #include "App.h" #include "MyGame.h" using namespace Leadwerks; App::App() : window(NULL), context(NULL), world(NULL) {} App::~App() { //delete world; delete window; } bool App::Start() { //Create a window window = Window::Create("MyGame"); //Create a context context = Context::Create(window); //Create a world world = World::Create(); //Create the player player = new Player; std::string mapname = System::GetProperty("map","Maps/start.map"); if (!Map::Load(mapname)) Debug::Error("Failed to load map \""+mapname+"\"."); //Move the mouse to the center of the screen window->HideMouse(); window->SetMousePosition(context->GetWidth()/2,context->GetHeight()/2); Sound* sound = Sound::Load("Sound/Ambient/cryogenic_room_tone_10.wav"); Source* source = Source::Create(); source->SetSound(sound); source->SetLoopMode(true); source->Play(); world->SetAmbientLight(0,0,0,1); return true; } bool App::Loop() { //Close the window to end the program if (window->Closed() || window->KeyDown(Key::Escape)) return false; //Update the game timing Time::Step(); //Update the world world->Update(); //Update the player player->Update(); //Render the world world->Render(); //Sync the context context->Sync(true); return true; } Node Class
Next we are going to create a base class which we will call Node. All classes in our game will be derived from this base class. This is called inheritance, because each class inherits members and functions from the class it's derived from. We can override inherited class functions with new ones, allowing us to create and extend behavior without rewriting all our code each time. The Node class itself will be derived from the Leadwerks Object class, which is the base class for all objects in Leadwerks. This will give us a few useful features right off the bat. Our Node class can use reference counting, and it can also be easily passed to and from Lua. The node header file will get just one member, an Entity object: #pragma once #include "MyGame.h" using namespace Leadwerks; class Node : public Object { public: Entity* entity; Node(); virtual ~Node(); }; In the Node.cpp file, we'll add the code for the Node constructor and destructor: #include "MyGame.h" Node::Node() : entity(NULL) { } Node::~Node() { if (entity) { if (entity->GetUserData()==this) entity->SetUserData(NULL); entity->Release(); entity = NULL; } } Our code foundation has now been laid and it is finally time to move onto developing the player class, which will be the subject of our next lesson.
Related Tutorials
Balancing Game Development and Creative Direction in Indie Production
A practical look at how indie developers can balance creative direction with hands-on game development. This article co…
 huseyin_onur
My Unreal Engine Development Process: From Core Idea to Playable Build
A practical overview of my Unreal Engine development process, covering how I move from a core game idea to a playable b…
huseyin_onur

Introducing LaneGraph: The Ultimate Road Network Solution for Unity
Discover the power of LaneGraph, a lightweight and flexible lane-based navigation system for Unity. LaneGraph makes it…
Retargeting Mixamo Characters with Root Motion In Unreal Engine 5.4.
I have always found Retargeting Mixamo Characters To have Root Motion is a serious lengthy Tast, Recently I stumbled up…

How To Make A SIMPLE Main Menu In Unity
In this tutorial for unity, i go over how to make a simple main menu for unity, it's an unlisted video because i do not…
 FlipThaSwitzh

Guide to Gameplay Balance
A perspective on competitive gameplay balance, from a background of "shooter" sandbox design.
 Tucker933
Discussion
More from Chris Vossen
Building a First-Person Shooter Part 1.2: The Player Class
In this tutorial we will begin to flesh out our player class by adding in a camera and setting up character physics.
Chris Vossen
Building a First-Person Shooter: Part 1.6 Sound
In this tutorial we will finish off this First-Person Shooter Tutorial 1 by adding in sound effects into the game.
ChrisVossen
Building a First-Person Shooter: Part 1.5 Running, Jumping, & Crouching
In this tutorial we will expand our player class by adding in inputs to allow the player to run, jump, and crouch.
Christopher Vossen
Discussion