

Game Development with Win32 and DirectX 11 - Part 01: The Basic Framework
In this second lesson of this tutorial series, we'll start getting our hands dirty by setting up a Visual Studio project and writing our basic framework.
Introduction
Alright, now its time to get our hands dirty in some code. Before we move forward, please make sure you have read the first lesson in this series where we get all our prerequisites in order.Let's Get Our Project Setup
So before we can actually start writing code, we'll need to get a Visual Studio project up and running. I'm expecting that by now, you already have Visual Studio open (if not please do so) and maybe you've already played around with it a bit. If you already understand how to setup a Win32 executable project in Visual Studio, please do so and then scroll down to the Project Settings sub-section.Creating our Project
With Visual Studio open, click on File in the menubar. Then select New, Project.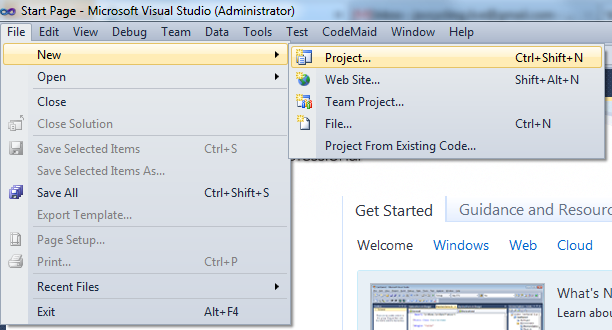 The New Project dialog should now open. Now this dialog can vary slightly, depending on the version of Visual Studio you are using (Express or Pro/Pre/Ult). In any case, you are going to want to find the Visual C++ tree, from the Install Templates sidebar. Under Visual C++, you are going to want to select Win32, Win32 Project. At the bottom of the dialog, select your solution name, and the directory in which you want to store it. Now, when you click Ok, the Win32 Application Wizard will appear. In the wizard, click next to go ahead to the second page. Here is where we will decide what type of project we want to create. Since we want our game to run in a window, without the console showing up, we are going to select "Windows Application". Below that, you are going to want to select "Empty Project". Once all these settings are setup properly, you can go ahead and click Finish to generate your project.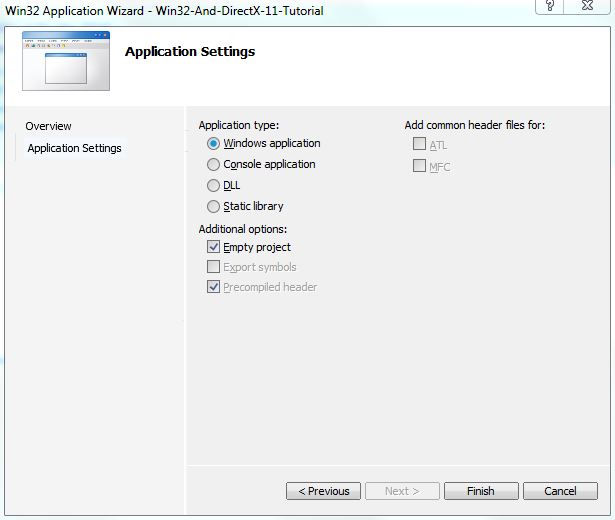
Project Settings
Alright, now we have a working project. Before we go ahead and start coding, lets make some changes to the default settings for this project so that it better suits our needs. Solution Organization Before we get into the nitty-gritty settings, lets just make a small change to the organization of the Solution Explorer. You might notice that there are currently three file filters, Header Files, Resource Files, and Source Files (ignore External Dependencies for now). Different developers have different ways of organizing this project files. I've found that the most easy to use and organized way is to have each module of our game be located in a separate filter structure. So I took the project layout from this: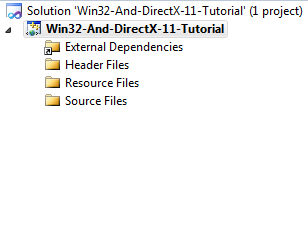 To:
To: 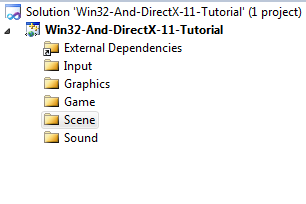 You can delete filters by clicking on the first one and then shift-clicking on the last one then pressing delete (a little dialog will popup, just click Ok). To add new filters, right click on the Project, select Add, then New Filter.
 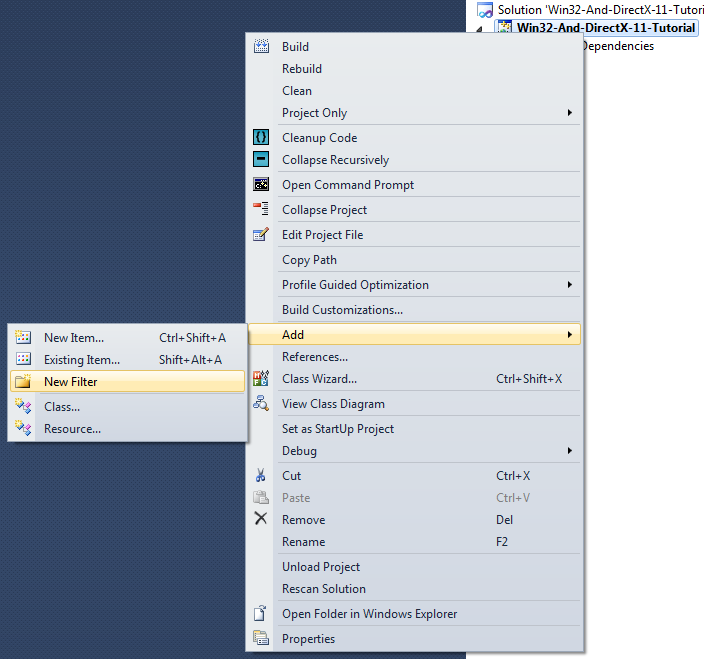 We really don't have to change any real settings just yet. We make some changes later on in this series though.
 Time for Some Coding
Now that you have a properly setup project running, we can start coding. The way we are going to build our game is extremely simple. Now take note that this isn't your standard, single-file tutorial, we will be creating more and more files as the series progresses (that's why it's really important to use an IDE so you can keep everything organized). So with that in mind, let's begin.Framework Design
Alright, so I lied. We aren't going to start coding just yet (but very soon). Before we get coding, I want to make sure you understand how we are going to build our game. Our game is going to consist of multiple modules:- Main: Not really a module, but it loads all the other modules and makes sure they are working properly.
- Input: The input module will handle all keyboard and mouse (and eventually other devices) inputs.
- Graphics: Probably the most interesting one for most of you, this will be a very lightweight wrapper around Direct3D 11.
- Sound: Loads and plays sounds through XAudio2.
- Game: The primary connection between the other modules and the Main module.
- Scene: A simple scene-graph that is designed to be easily expandable.
In order to keep this article reasonably short, the complete source code will not be posted here. Rather, I will provide links to the source files which will be hosted on GitHub. Any source code written in here is to highlight a notable peice of code. Also, comments will not be placed in the embedded code snippets (GitHub contains fully-commented code).
Input
Ok, so first we'll start with the input module. For now, we aren't going to add too much meat to the modules. This is going to be one of the easiest modules to work with. Right now, we are only going to have 3 methods: InputModule(void); bool Initialize(void); void Shutdown(void); Header File Declaration Source File Definition Graphics
Next up is the graphics module. We are going to do the same thing as what we did with the input module. GraphicsModule(void); bool Initialize(void); void Shutdown(void); Header File Declaration Source File Definition Sound
Our sound module is going to follow the same pattern. SoundModule(void); bool Initialize(void); void Shutdown(void); Header File Declaration Source File Definition Scene
Finally, our scene-graph module will be the last to follow the same pattern. SceneModule(void); bool Initialize(void); void Shutdown(void); Header File Declaration Source File Definition Game
Alright, time for some real programming. First, let's include our different modules and the Win32 Api. #define WIN32_LEAN_AND_MEAN #include <Windows.h> #include "InputModule.h" #include "GraphicsModule.h" #include "SoundModule.h" #include "SceneModule.h" Now let's declare and define our methods, but let's do it a little differently this time. GameModule(InputModule input, GraphicsModule graphics, SoundModule sound); void Initialize(HINSTANCE instance); void Shutdown(void); void Show(bool show); bool MainLoop(MSG *msg); Header File Declaration Source File Definition Now, let's add a few private module pointers. InputModule *inputPtr; GraphicsModule *graphicsPtr; SoundModule *soundPtr; SceneModule *scenePtr; HWND window; WNDCLASSEX wndClass; Header File Declaration Lastly, let's make a couple global things: static RECT windowSize = { 0, 0, 1280, 720 }; LRESULT CALLBACK WndProc(HWND wnd, UINT message, WPARAM wParam, LPARAM lParam); Header File Declaration Source File Definition Main
Now comes our final piece of code, the WinMain function. int WINAPI WinMain(HINSTANCE instance, HINSTANCE prevInstance, LPSTR cmdLine, int cmdShow) { MSG msg; InputModule input = InputModule(); GraphicsModule graphics = GraphicsModule(); SoundModule sound = SoundModule(); SceneModule scene = SceneModule(); GameModule game = GameModule(input, graphics, sound, scene); game.Initialize(); game.Show(true); if (!game.MainLoop(&msg)) { game.Show(false); game.Shutdown(); return static_cast<int>(msg.wParam); } return 0; } Source File Definition Compiling
You should now be able to compile your code. And have a result that is similar to the following:
Project Source Code
If you would like to take a look at the complete source code for this lesson, please visit the official source code repository for this tutorial series, hosted on GitHub. I will also upload the source code as an attachment to this article, but it will not be updated with any bug-fixes or post-publication edits.Lesson Tasks
Please perform the following actions to prepare yourself for the next tutorial:- Change the code in GameModule::Initialize() to make one of the error message boxes show up (make sure to change it back once you are done to prepare for the next lesson).
Coming Up...
In the next tutorial, we'll begin adding some meat to our currently empty framework.Post-Publication Changes
Please note that the source repository code has changed slightly after the initial publication of this article. Please see the associated commit for the changes from the intial code.Related Tutorials
Balancing Game Development and Creative Direction in Indie Production
A practical look at how indie developers can balance creative direction with hands-on game development. This article co…
 huseyin_onur
My Unreal Engine Development Process: From Core Idea to Playable Build
A practical overview of my Unreal Engine development process, covering how I move from a core game idea to a playable b…
huseyin_onur

Introducing LaneGraph: The Ultimate Road Network Solution for Unity
Discover the power of LaneGraph, a lightweight and flexible lane-based navigation system for Unity. LaneGraph makes it…
Retargeting Mixamo Characters with Root Motion In Unreal Engine 5.4.
I have always found Retargeting Mixamo Characters To have Root Motion is a serious lengthy Tast, Recently I stumbled up…

How To Make A SIMPLE Main Menu In Unity
In this tutorial for unity, i go over how to make a simple main menu for unity, it's an unlisted video because i do not…
 FlipThaSwitzh

Guide to Gameplay Balance
A perspective on competitive gameplay balance, from a background of "shooter" sandbox design.
 Tucker933
Discussion
More from Josh Vega

Game Development with Win32 and DirectX 11 - Part 00: Setup
In this first lesson of my tutorial series, we'll look into setting up a complete development environment for game deve…

Game Development with Win32 and DirectX 11 - Part 00.5: Concept
In this quick article, I will let you know what to expect in the future of this tutorial series.
Discussion