
Game Programming Genesis Part VII : Developing the Game Structure
Presents an example of how to design a code layout for a Win32 game, covering modules, scripts, and effects.
I know, I know, this was supposed to be about writing a tile engine, but after I finished that last article and started thinking about how best to approach the series from here on, I decided that wasn't a good idea. Let me tell you why.
Several times I have either alluded to or actually talked about the fact that you can't structure your game code the same way in Windows as you would in DOS. Everything has to be more organized because the entire main loop must execute at least once per frame, so you don't lose track of the messages that Windows is sending to your application.
Now, you've seen a little bit of this, in the short demo programs I've provided with the previous articles. But you probably haven't already tried to extend this method of programming to something large, unless you've already been writing Windows games based on the previous articles in the series. So, I came to the conclusion that before starting to introduce you to the workings of all the parts of a game, it would be best to devote an article to examining the structure of a game, to see how all those components will eventually fit together.
This article is a bit different from the others in that we won't be looking at much code, if any. So if you haven't read up on DirectDraw, or if some things are a bit unclear, don't worry, because we're taking a break from it. All you need is a basic knowledge of how a Windows program works, so the first article or two will suffice.
One other thing that I'll mention here: for this article, and most of the subsequent articles, I'm going to be referring to Terran a lot as an example, so you may want to download the demo so you can see the working implementation of what I'm describing. As of the time of this writing, the demo may not run with all video cards, but once Demo 2 comes out, this will hopefully be resolved. All right then. Let's get to it!
[size="5"]Overview
Above all, before you start programming, you should have a detailed design planned out of exactly how the logic in your program is going to operate. There is no bigger mistake you can make than to just sit down and start coding right away. It will all seem clear and organized at first, but soon you'll start to realize how many things you didn't think of, and as you start adding them to your code in whatever place you can find for them, your program will quickly become disorganized and inefficient. Trust me; that's why I started over on Terran.
You should start with the [font="Courier New"][color="#000080"]WinMain()[/color][/font] function, as that's where the program begins. This may seem obvious to you, but a lot of people start off by writing fading routines, or collision detection functions, and all the rest of the specific, detailed stuff, before writing the main functions that bring them all together. This is a little backwards. In an ideal top-down design, you should write the main function, followed by every function called by that main function, and so on. This is a good way to do things for at least two reasons.
First, everything is functional right away. If you start your game project by writing all kinds of technical functions, you can't test and debug them without creating some temporary code that sets up a scenario in which they would be used. On the other hand, if you design your game from the top down, the idea is that you should be able to run it at any time, which is essential because you'll probably be wanting to test your game constantly as you go. At each stage of development, more and more of the details are added, and the game starts to take shape.
Second, the overall structure of the game is apparent from the beginning. When you write the details first, you may find later on that you're making your more general functions messy in order to call the details in the correct way. In essence, the details would be dictating the structure of your program, whereas the structure of your program should be defining how the details should be implemented. So the better approach is to go from general to specific. If you have your general program structure up and running by the time you start developing the details, you have several advantages. You know exactly how that last level of functions needs to be written in order to work with your design, and you don't have to write test cases for your functions, because they're already in place!
What I have done with Terran is to divide the main program into five sections, and then proceeded with a top-down design on each section. Four of the sections are the actual game content: the scrolling engine, the scripting engine, the battle engine, and the menu system. The fifth component encompasses all of the things that need to be done with Windows and DirectX to make things run. This includes initialization, shutdown, and things like changing from fullscreen to windowed mode. Each of the four game components has multiple substates which further break down the roles of each function. What I'm going to do with this article is to cover them all in detail, so you can see how everything is organized. Hopefully it will give you an idea as to what you'd like to do with your game, and make it a bit easier to understand how to implement specific game components when I start going through them in the next article.
[size="5"]Example Implementation: Terran
Before anything else, let me show you a little map of the program flow in Terran, to illustrate what I'm talking about:
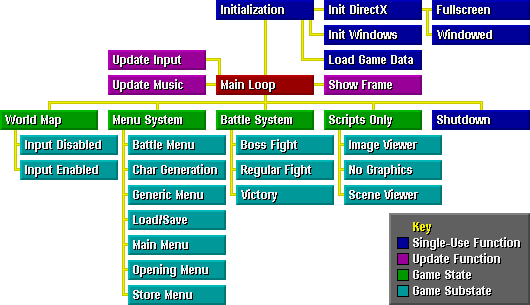
This diagram by no means represents all of the functions in the game, but it shows the basic flow of things. Let's work through the whole thing, one step at a time.
Execution starts at the [font="Courier New"][color="#000080"]Initialization[/color][/font] element of the map, which is basically the first call made from [font="Courier New"][color="#000080"]WinMain()[/color][/font]. It's broken down into many more stages than are shown, but if I showed every function in Terran on this map, it would be impossible to read. You should be pretty familiar with the Windows and DirectX components of this function -- they create a window, and all the required DirectX interfaces. There are a lot of interfaces we haven't covered yet, but that's not important for this article. We'll get to them as we go. The [font="Courier New"][color="#000080"]Load Game Data[/color][/font] element loads all sorts of information from external files. This includes data on the items available in the game, data the scripting engine needs to operate, magic system information, etc.
The last thing done in initialization is to load a script which tells the program where to go from there. Almost every aspect of Terran is driven by the scripting engine, as I'll talk about in detail later. In fact, there will be an article in the future devoted to creating a very basic, albeit very useful scripting engine for your own games.
After initialization is complete, the program enters the main loop, where it stays until the user's had enough and shuts the game down. Each iteration of the main loop takes four basic steps that are shown on the diagram.
First, the input devices are updated. There are two input devices in Terran, the keyboard and the joystick. This function takes the current state from each device and logically [font="Courier New"][color="#000080"]OR[/color][/font]s them together into one master input table which has two columns. Column 1 tells whether or not the button or key is currently up or down, and column 2 tells whether or not the button has been pressed just that instant. Column 1 is used for continuous input, like walking around on the map, whereas column 2 is used for discrete input, like making menu selections.
Step two of the main loop is to update the music state table. Basically all this does is checks through all the game songs to see if any of them are flagged as playing. If they are, the game checks to make sure they're really still going, or if they've stopped since last time the main loop ran. If they've stopped, the function sets their flags to reflect this. Don't worry about the details of this right now -- implementing music is a topic for much later.
The third step is the most important one: the main loop calls one of the game's five states. These are [font="Courier New"][color="#000080"]World Map[/color][/font], [font="Courier New"][color="#000080"]Menu System[/color][/font], [font="Courier New"][color="#000080"]Battle System[/color][/font], [font="Courier New"][color="#000080"]Scripts Only[/color][/font], and [font="Courier New"][color="#000080"]Shutdown[/color][/font]. You get the basic idea of what each one does. Note from the diagram that [font="Courier New"][color="#000080"]Shutdown[/color][/font] is a single-use function; once it gets called, that's it. Everything closes down. The other four require a bit of explanation.
Each of the game's states has a number of substates, which are shown in light blue on the diagram. Each state function (for example, [font="Courier New"][color="#000080"]WorldMapMain()[/color][/font]) performs some tasks that are common to all the instances of that state, and then branches into actions specific to each substate. In some cases this is a simple [font="Courier New"][color="#000080"]if[/color][/font] or [font="Courier New"][color="#000080"]switch[/color][/font] statement, and in some cases it is a whole set of functions.
World Map: The world map state is very simple. First it runs any scripts that are currently loaded. Second, based on the substate, it either interprets the current user input or ignores it. Finally, all onscreen characters are updated, the map is drawn, and any effects currently loaded are performed. (More on implementing effects later.) That's it!
Menu System: The menu system is a bit more complex, because it has to handle everything from loading games to generating characters, from purchasing items to setting equipment. The main function sets the colors for the menu based on which options are active, then branches to the appropriate menu subfunction. This is done using an array of function pointers. The game substate is an integer that serves as an index into this array. The line looks like this:
(*lpfnMenuSubfunctions[substate.current])();Battle System: Battle is a strange one because it's closely linked to the menu system; the battle system is semi-active, a la Final Fantasy, so whenever a menu pops up to control a character, the battle system transfers control over to the menu system. Thus, since both the menu system and the battle system must be able to handle the battle logic, nearly all of the logic is placed in another function, which can be called from either game state. The main battle function, then, is largely a placeholder. It does, however, handle the turn queue, which I'll get to in a second. The function that handles all the logic works something like this:
First, all active characters and enemies are checked to see if their turn has come up. If an enemy's turn comes up, the enemy AI takes over and makes a choice for that enemy. If a character's turn comes up, and the menu system is not currently active, then the menu system is activated and the player receives control of that character. If the menu system is already handling another character, then the character whose turn has come up is placed in a data structure called the turn queue. Once the main battle function is active rather than the menu system, it will check the turn queue. If it's not empty, the function dequeues the character who's been in there the longest and sends control back to the menu system.
In either case, once a character or enemy's action has been decided, the details of that action are placed into a second queue, called the action queue. Each time the battle logic comes up (from either the battle system or the menu system), one of two things happens. If there's an action currently underway, the script controlling that action is run. If there is no action currently happening, the game checks the action queue and sets up the next action, if there is one.
After all that is done, the background is copied, the characters and enemies are drawn, and any active effects are applied, at which point the battle logic is finished.
The difference between the substates for regular and boss fights is simply that you can't escape the fight -- you must finish it. This corresponds to a simple [font="Courier New"][color="#000080"]if[/color][/font] statement. The third substate, [font="Courier New"][color="#000080"]Victory[/color][/font], is a bit different. It reports the gains of the battle. There's no additional logic needed for it, though, because it's all handled by a script, as usual.
Scripts Only: This last of the four main game states is dead simple: it runs any scripts that are loaded. That's it! This state is usually not encountered during play except duing initialization, but it can come up whenever the game isn't displaying anything and is doing some behind-the-scenes work.
Shutdown: This does exactly what you'd expect: it exits the main loop, releases all the DirectX objects that were created, deallocates any memory that's still being used, and shuts the program down.
The final step of the main loop is to display the current frame, which is simply copying the back buffer to the screen, using double-buffering if the game is in windowed mode, or page-flipping if the game is in fullscreen mode. I don't think we've covered page flipping yet, but it'll come up sooner or later.
[size="5"]A Word on Game States
The approach that I have just described, dividing your program up into several states, is a good one because what it does is to allow you to consider your program as a number of smaller programs. Instead of trying to develop the whole thing at once, you can just do one state at a time, which is simpler to write, and simpler to debug. All you have to do is change the game's initial script to set the active game state to whatever it is you're currently working on, and you can test it independently of the other aspects of the game!
My approach to Terran was obviously to write the scripting engine first, since it requires a script to initialize. Mainly I wrote up all the basic logical functions like decision statements, loops, and variables. After the scripting engine was on its feet, I went to the world map state. Once I had that all set up, and had tested it independently of the scripting engine, I wrote the menu system. After it was done, then I tested the game with all three elements integrated. This was not hard to do -- in fact, it required no C code on my part, because the scripting engine makes all the transfers of control. So basically all I did was write a simple script, and then sit back and watch it all happen.
Now I've come to the battle system. I actually haven't started coding it yet, but you wouldn't know that from the level of detail I already know the implementation in. I have all the logic diagrams and such drawn out, so I know exactly how everything will work. The only thing that remains is to actually write it, which takes awhile even if you know exactly what you're going for. But when I start doing this, I'll take out the game's current initialization script that sets up the whole game, and insert one that simply sets up a battle. In this way, I can develop the battle system as though the rest of the game wasn't even there, so I don't have to worry about it. Once the battle system is done, I'll just put the old initialization script back into place, and just like that, the new component is integrated.
My recommendation would definitely be to try setting up something like this for your game when you start it. As you can see, it makes the development process a lot nicer and results in fewer shouting matches between the programmer and Visual C++. Those are tiring, because the compiler always wins. It does against me, anyway.
Related Tutorials
Balancing Game Development and Creative Direction in Indie Production
A practical look at how indie developers can balance creative direction with hands-on game development. This article co…
 huseyin_onur
My Unreal Engine Development Process: From Core Idea to Playable Build
A practical overview of my Unreal Engine development process, covering how I move from a core game idea to a playable b…
huseyin_onur

Introducing LaneGraph: The Ultimate Road Network Solution for Unity
Discover the power of LaneGraph, a lightweight and flexible lane-based navigation system for Unity. LaneGraph makes it…
Retargeting Mixamo Characters with Root Motion In Unreal Engine 5.4.
I have always found Retargeting Mixamo Characters To have Root Motion is a serious lengthy Tast, Recently I stumbled up…

How To Make A SIMPLE Main Menu In Unity
In this tutorial for unity, i go over how to make a simple main menu for unity, it's an unlisted video because i do not…
 FlipThaSwitzh

Guide to Gameplay Balance
A perspective on competitive gameplay balance, from a background of "shooter" sandbox design.
 Tucker933
Discussion
More from Joseph Farrell
Comparing Shadow Mapping Techniques with Shadow Explorer
New Incentives and a Whole New Platform From The Intel AppUp developer program
The final installment in this series on Intel's AppUp program details additional incentives and opportunities for devel…
The Game Maker
This book excerpt contains the first chapter of the book that introduces beginning game developers to the Game Maker pr…
Discussion