
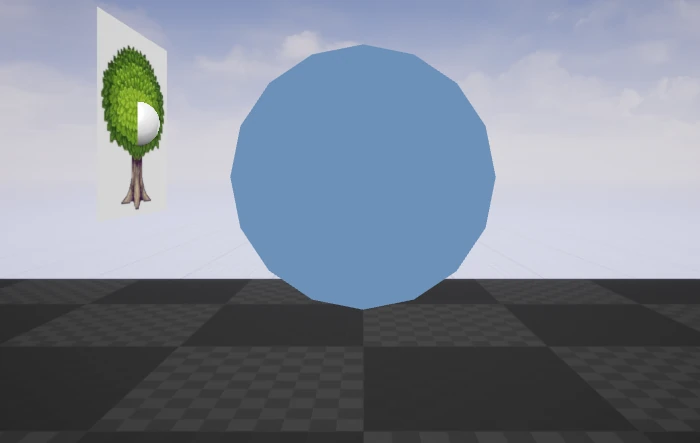
Sprite Utility
A utility for unreal engine users for writing 2d games or sprites in 3d environments
Hey everyone,
I’ve been working on a utility for Unreal Engine,
What is it?
It is a framework for working with sprites or methodology,
The utility is a set of functions pretty much.
The goal was to improve on the 2D `paper2D` system for creating isometric style games
Features –
· SetSpriteDepth() can be used to set a sprite’s depth based on the y position on the screen, classic isometric games use this
· Get3dTo2d(), gets the screen location of an Actor
· ScaleSprite() scales a sprite to some desired size at it’s depth location
· MakeBillboard() makes a sprite face the camera
· MakeBillboard_Editor() makes a sprite face camera at drag and drop time using the editor camera rather than game camera, purpose for making it easier to work with sprites.
· BeginPlay2, This event is called by HUD class so that you can sort of get the size of the viewport on BeginPlay when you launch the game, since you cannot get the viewport size using default settings at launch time on BeginPlay, you can if not launching and just playing in editor for example GetViewportSize will return 0,0 if you call it at BeginPlay time on Launch and will give you the viewport size at BeginPlay when game is run in the editor – took me forever to figure this out!!
· GetSpriteSize() returns the 2d size of a paper2d sprite
· JumpToTextureSize()
How to Use
I will say now that if you Call GetCameraLocation on BeginPlay it will return 0,0,0
So if you want to get the 2d location of an actor at the start of the game, please look at the graphs below
This is the first important step –
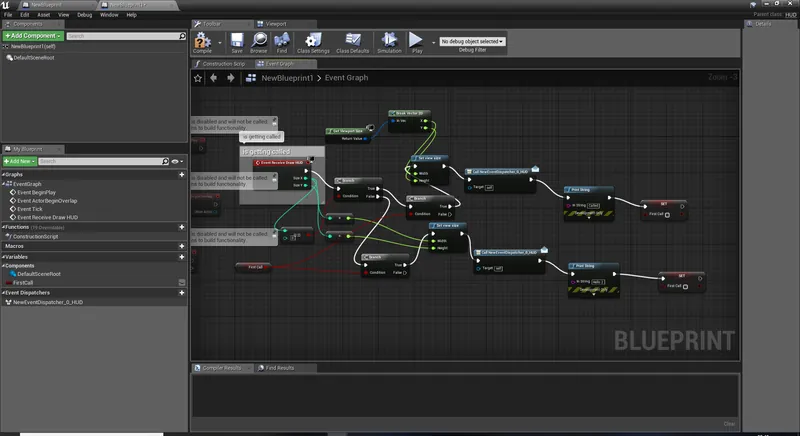
You have to call SetViewSize() correctly, follow the HUD instructions below for a Launch game, if SetViewSize doesn’t appear in the list, compile then close your project and re-open
Create an Actor blueprint, add PaperSpriteComponent to it set the sprite
In the blueprint create a Vector2D variable called ScreenLocation(Screen location of your sprite)
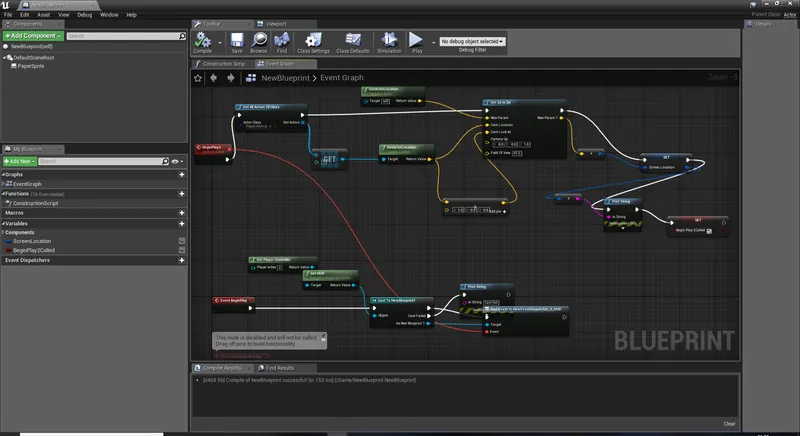
In the Tick event call SetSpriteDepth() passing in the ScreenLocation and then call ScaleSprite() with the desired size of the sprite in 2d coordinates
Set the depth to something like 100
Call MakeBillboard during the Tick event
Call GetSpriteSize() to get the size of a sprite
Installation
https://sourceforge.net/projects/sprite-utility/files/SpriteUtility.zip/download
First you have to create a blank project
In your project settings change Translucent sort policy to Sort by Distance, and sort axis to 0,-1,0(I think you can ignore the sort axis still use util with any camera orientation)
Create a new C++ actor so you can Compile the project,
You may have to adjust the Configuration settings
Download the zip
Extract files to some folder
Copy SpriteUtility.h and SpriteUtility.cpp to your project’s Source folder
Open up SpriteUtility.h and rename BLANKPROJECT_API to your project name _API
Copy SpriteUtilityFunctionLibrary.uasset to your project’s Content folder(Works with version 4.22, may be problems with other Unreal Engine versions)
Now you need to modify PaperSprite.h
Do a search for PaperSprite.h in Windows or Mac on the C: drive, open up PaperSprite.h,
Cut and paste the following lines(cut from the papersprite.h file)
FVector2D GetSourceSize() const { return SourceDimension; }
and
UTexture2D* GetSourceTexture() const { return SourceTexture; }
paste after these three lines
// ISlateTextureAtlasInterface interface
virtual FSlateAtlasData GetSlateAtlasData() const override;
// End of ISlateTextureAtlasInterface interface
So you should have something like:
// ISlateTextureAtlasInterface interface
virtual FSlateAtlasData GetSlateAtlasData() const override;
// End of ISlateTextureAtlasInterface interface
FVector2D GetSourceSize() const { return SourceDimension; }
UTexture2D* GetSourceTexture() const { return SourceTexture; }
Open up Projectname.Build.cs and make sure the following module names appear in the list that is visible:
“InputCore”, “Paper2d”
So it should look something like this:
PublicDependencyModuleNames.AddRange(new string[] { "Core", "CoreUObject", "Engine", "InputCore", "Paper2d" });
To use the editor functions you have to complete this final step, Open up Projectname.Build.cs and paste the following lines of code after PublicDependencyModuleNames.AddRange(…)
if (Target.bBuildEditor)
{
PublicDependencyModuleNames.AddRange(new string[] { "UnrealEd" });
}
Compile the project
Close the project then open it
Creating the hud class
-Right click in the Content Browser, select Blueprint class, search for HUD and select HUD;
Rename the new HUD to something.
Open up the class you just created
On the left add a new event dispatcher by clicking on the plus sign button
Call it NewEventDispatcher_0_HUD
Compile the HUD
Now open up your level blueprint by selecting Blueprints->Level Blueprint at the top of the editor
Create a custom event here in the level blueprint called BeginPlay2,
Now,
Right click somewhere in the Level blueprint and type bind event to in the search box, uncheck context sensitive so you can select bind to NewEventDispatcher_0_HUD from the list
drag off the red box on BeginPlay2 and attach the red line to the event red box of the node that was created
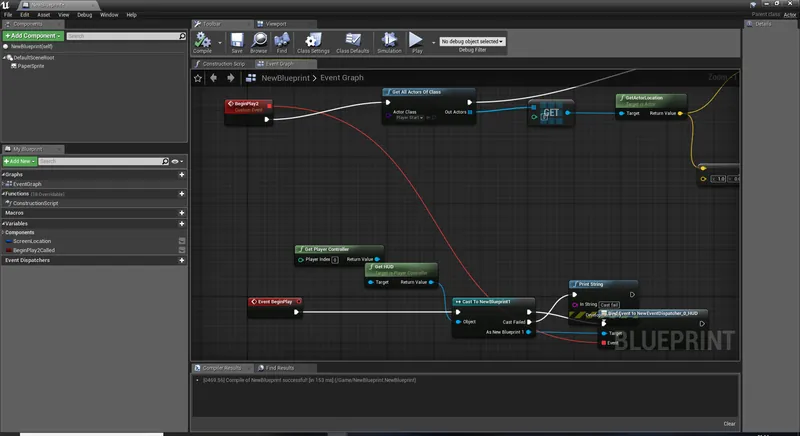
Call GetHUD and cast it to your HUD class that you created in the previous step, link this to the target of the bind function
Call the bind to node on the begin play event and of course the cast
Finally create the following 2 graphs in the HUD blueprint and in your sprite blueprints
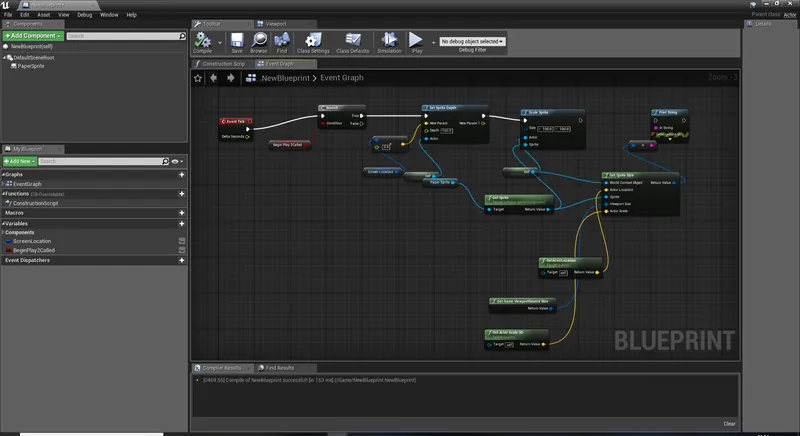
One thing I forgot !
You have to Create a game mode and assign the HUD to it
Set this as your game mode in Maps and modes
Recommended resources
3D Art

3D Environment Design with Blender 5
Amazon · Book
Based on Blender 5, this updated second edition simplifies the complexities by guiding you through clear, practical workflows to overcome those challenges. You’ll start by addressing common modeling and proportion mistakes, then move on to realistic texturing and unwrapping to create stunning scenes based on actual references.
GameDev.net may earn a commission if you purchase through these links. This helps fund the site at no extra cost to you.

Low Poly 3D Modeling in Blender
Amazon · Book
Step into the world of low poly 3D art with Low Poly 3D Modeling in Blender—your entry point into Blender and mastering the fundamentals of 3D art. This beginner-friendly guide ensures that you’re fully prepared for the creative adventure that follows. Through a step-by-step learning process starting with the principles of low poly art, this book gradually immerses you in the intricacies of modeling. As you progress, you’ll gain hands-on experience creating diverse projects ranging from designing a simple 3D crate to rendering complete low poly scenes. The book covers a wide spectrum of topics as you navigate Blender's interface, mastering essential modeling tools and exploring both basic and advanced modeling techniques. Advancing to the final chapters, you’ll find ways to breathe life into your models with material creation and gain practical insights into modeling a variety of low poly objects. From end-to-end scene construction to configuring Blender for rendering high-quality images, you’ll be equipped with the foundational skills to propel your career in 3D modeling and explore the boundless creative possibilities that Blender offers. By the end of this book, you'll have a solid understanding of Blender, 3D modeling, low poly methodologies, material design, 3D rendering techniques, and the broader world of 3D art.
GameDev.net may earn a commission if you purchase through these links. This helps fund the site at no extra cost to you.
Related Tutorials
Balancing Game Development and Creative Direction in Indie Production
A practical look at how indie developers can balance creative direction with hands-on game development. This article co…
 huseyin_onur
My Unreal Engine Development Process: From Core Idea to Playable Build
A practical overview of my Unreal Engine development process, covering how I move from a core game idea to a playable b…
huseyin_onur

Introducing LaneGraph: The Ultimate Road Network Solution for Unity
Discover the power of LaneGraph, a lightweight and flexible lane-based navigation system for Unity. LaneGraph makes it…
Retargeting Mixamo Characters with Root Motion In Unreal Engine 5.4.
I have always found Retargeting Mixamo Characters To have Root Motion is a serious lengthy Tast, Recently I stumbled up…

How To Make A SIMPLE Main Menu In Unity
In this tutorial for unity, i go over how to make a simple main menu for unity, it's an unlisted video because i do not…
 FlipThaSwitzh

Guide to Gameplay Balance
A perspective on competitive gameplay balance, from a background of "shooter" sandbox design.
 Tucker933
Discussion