Hello everyone! As this is the first post of this devlog, I believe some presentations are necessary. My name is Quentin and I am a freelance full-stack developer and a hobbyist game developer. I'm from France but live in Norway, near Oslo. I've been making small games to teach coding to teenagers for the past 4 years using JavaScript and the p5.js library. In 2020, I went to the Glam Game Jam (GGJ) and met a cool bunch of people, 2 of which would then become my teammates. During that event, we created what would become the prototype of our current game being developed: Lost Dreams. The idea was to make a chill puzzle game based on music and colors and in a 3D world. As we really liked our idea, we decided to make it a real game and no just a buggy prototype made in less than 72 hours. The team is the same, composed by a 3D artist, an Audio Artist, and a Programmer (me). I will do a presentation of the team in a future post as it needs more than just a few sentences to present them.
Now that the introduction has been made, it is time to dive into the development process of Lost Dreams!
Game Description:
- Title (as for now): Lost Dreams
- Genre: Puzzle, Exploration
- Platform (as for now): Andoird, iOS
- Engine: Unity 2019.3
- Graphics/View: 3D in an isometric view
- Mode: Single-player
- Intent: Casual player
- In-game purchase: there is no discussion about having it for now
- Price: not decided yet
- Synopsis: You will need to wait to get a full synopsis as it is still being written. What I can tell you is that it is a game centered around a protagonist (the player) trying to help Sandman to restore the world of dreams destroyed by the Boogeyman.
Game Development:
Alright! Let's get started with that incredible and probably definitely chaotic journey. As you probably read, this is my first real game, with a team, with Unity. All the games I've made so far were made in JavaScript using the HTML canvas and the p5.js library. This allowed me to understand how to make my own engine and I would recommend anyone who wants to make a game to at least try to make an engine (physics, graphics, sound, doesn't matter). It will give you a fairly good understanding of how things work.
For this project, we (the team) have decided to focus on our skills to be able to use the game as a showcase of what we can do. The 3D artist is in charge of creating the 3D elements, the animations, and everything related to the visuals. The Audio artist is in charge of the music (a particular one based on events), the sound effects, and everything related to the audio. Finally, the programmer (me), is in charge of the game logic, the code that makes it work, and any other things that are linked to programming and workflow.
As you probably understood, there is not a dedicated person that will be doing the game design: we are all doing it. This allows us to create different puzzles with different logic to avoid having the same kind of puzzle during the whole game. But, this also means that everyone needs to be able to create the worlds, puzzles, events that are linked to the game itself. I am not expecting my teammates to learn to use Unity like I do nor having them to learn to use it as it is not their main tool. Because of that, I need to create a tool that allows them to place the elements in the world as simply as possible and that's where I've started my development journey. Lucky enough, the game is made as a 3D game but with an isometric camera. The world is composed of cubes with different shapes and colors and any elements that are not cube shapes are parts of a cube. This makes the creation of tools way easier as everything is in a fixed grid. I've decided to create a tool (and not just a window) that will have multiple GUI elements directly in the scene view.
I will only talk about the tools I'm doing and basic code, not how I've organized my folders and files or what is my code. If you want to know about it it, let me know! Just for information for later, my hierarchy is composed of multiple fix GameObjects :
- ===== Management =====
- Used for global scripts
- ===== GUI =====
- Used for the GUI elements
- ===== Cameras =====
- Used for the different cameras
- ===== Lights =====
- Used for the different lights
- ===== World =====
- Used for the different elements of the world (character, blocs, props, …)
Unity EditorTool:
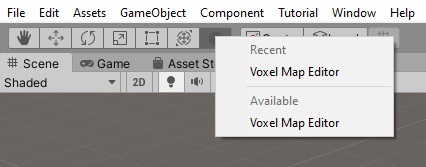
The EditorTool element is quite unique as it has almost no documentation nor tutorial on how to use it. I first started using EditorWindow to make my bloc placement tool but switched to the EditorTool as it is way more efficient to show things in the SceneView and in interacting/updating elements on the SceneView. Also, the EditorTool allows you to have your custom tool in the toolbar which is way faster to access than making it a window. The code to create a basic tool structure is right after.
using System;
using UnityEditor;
using UnityEditor.EditorTools;
using UnityEngine;
[EditorTool("Name of the tool")]
public partial class YourCustomEditorTool : EditorTool
{
private void Awake()
{
// Things to do on awake
m_IconContent.image = EditorGUIUtility.IconContent("PreMatCube").image;
// Use a premade icon from Unity
m_IconContent.text = "Some text";
m_IconContent.tooltip = "A tooltip!";
}
private void OnEnable()
{
// Things to do on enable
}
private void OnDisable()
{
// Things to do on disable
}
private void OnDestroy()
{
// Things to do on destroy
}
public override GUIContent toolbarIcon
{
get { return m_IconContent; }
}
public override void OnToolGUI(EditorWindow window)
{
// Things your tool can do
}
// ... You can add custom functions as always
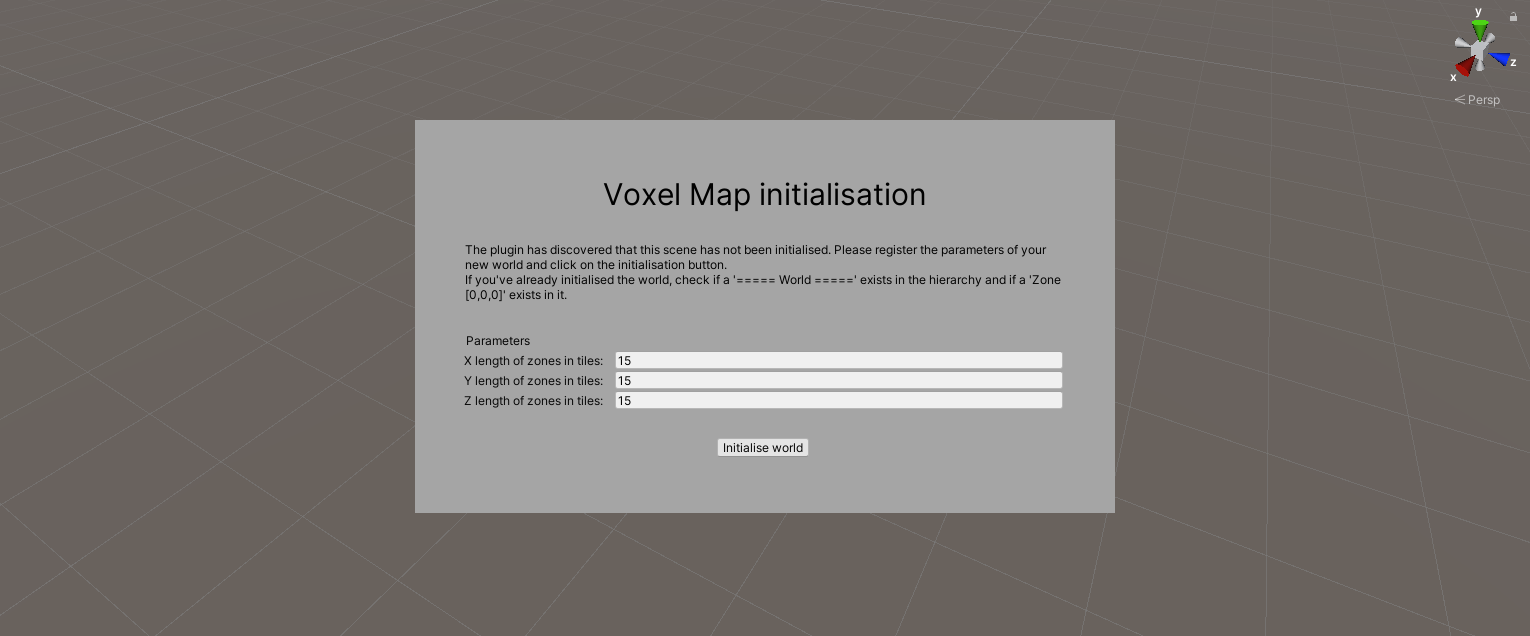
}Now that I am able to create a basic tool class, it is time to think about what needs to be shown on screen and the capabilities of the tool. It first needs to recognize if the unity scene has been initialized properly and that all the main elements are there. I haven't had the time to think properly through it so I made a simple window that appears only if 1 of the GameObject with a specific name is there (World). This will definitely need an update to make it so it recognize every required GameObject (just in case something gets deleted.
To make a simple window just add some handles and GUILayout element in the OnToolGUI function of the EditorTool. This code will create a rectangle on the top left corner.
public override void OnToolGUI(EditorWindow window)
{
	// ...
	Handles.BeginGUI();
    {
        GUILayout.BeginArea(new Rect(0, 0, 100, 100), new GUIStyle("box"))
        {
        	// Your GUILayout here
        }
        GUILayout.EndArea();
    }
    Handles.EndGUI();
    // ...
}
Now that the initialization is done, I can start coding the mapping element. On the left is the cube selection area that allows the user to select a cube that is part of a library and then place it on the zone shown on the SceneView. On the bottom right is the action selection. You have the choice between placing a bloc, moving a bloc (not implemented yet), and deleting a bloc. Each action has a different interaction with the objects on the scene and has different graphic elements on the SceneView. Also, missing on the screenshot is the future bloc preview and rotation that will be placed on top of the action selection. It will allow the user to rotate the cube around the Y axes and change some parameters (colors, sound, type, …). The wired cube you see are Gizmos with different parameters and are used to give visual information about which zone is being built and where the cube is being placed/moved/deleted.


Here is the cube selection zone. It is automatically looking for prefabs that are in a specific folder that is selected with the filtering options. For now, the filtering options are hardcoded so it is not possible for the user to modify the selection list (add, edit, delete).
Just for you to know how to get files from a folder and show them in a window, here is the code:
private int paletteIndex;
private List<GameObject> palette = new List<GameObject>();

// ... portion of code that get the files and populate the array with them
palette.Clear();
path = "path_to_the_folder_with_the_prefab";

string[] prefabFiles = System.IO.Directory.GetFiles(path, "*.prefab");
foreach (string prefabFile in prefabFiles)
{
	palette.Add(AssetDatabase.LoadAssetAtPath(prefabFile, typeof(GameObject)) as GameObject);
}

// ... portion of code that show the files with small preview
List<GUIContent> paletteIcons = new List<GUIContent>();
foreach (GameObject prefab in palette)
{
	// Get a preview for the prefab
	Texture2D texture = AssetPreview.GetAssetPreview(prefab);
	paletteIcons.Add(new GUIContent(texture));
}

if (palette.Count == 0)
{
	GUILayout.Label("No object available in this section.");
}

// Display the grid
paletteIndex = GUILayout.SelectionGrid(paletteIndex, paletteIcons.ToArray(), 2);
You can see that there is a “Create Bloc” button in the bloc selection area. This button opens an EditorWindow that allows the user to import “fbx” files and create a prefab with some predefined parameters. Each “fbx” file can be used to create multiple prefabs, there is no limit.
Unity EditorWindow:
As for now, there are only 2 EditorWindow linked to the tool: the bloc creation window and the settings window. The last one is just an empty window as there are no settings to modify for now (but there will be, it's part of the master plan!). The bloc creation window looks very simple (and it is) as there are not that many parameters to make.
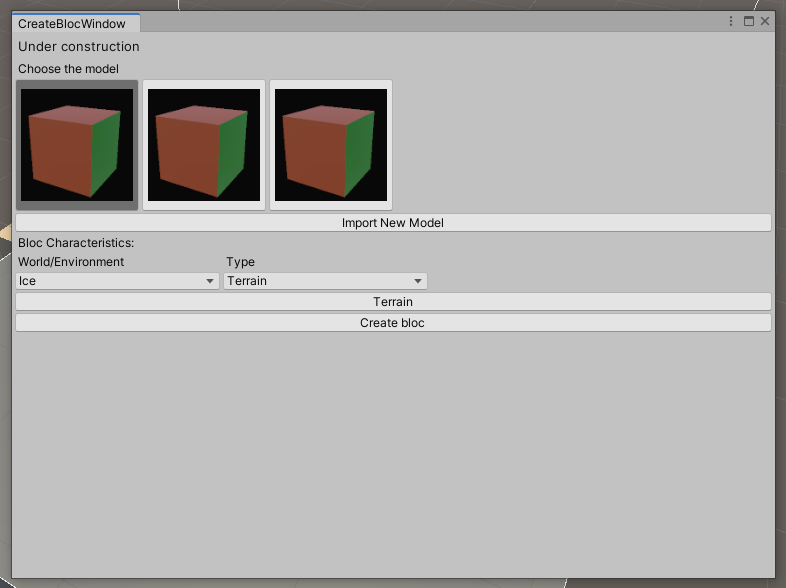
It's a bit difficult to say anything about it as there is really nothing to say about it. The most difficult part was to get the path of the “fbx” file, copy it to a folder, then use it as a template for a prefab for then creating the prefab. Once you say it like that it seems very easy but finding the functions to do so was… tricky. For the rest, it is just a GUILayout with some GUI elements and some variables.
What's next?
Well, for now, that's it for what has been made. But thanks to this devlog, it is going to be easier for me to keep track of what I'm doing and it will give me the motivation to code more and more efficiently. The plan for the next devlog is to be done with:
- fixes in the initialization process
- add more parameters in the cube creation process
- add pathfinding in a grid. This one will be tricky, need to set up walking tags on each face of each cube. I will explain this in detail once it's done.
- add the move option
- add the possibility to add more zones. Yeah, for now, you're just stuck with the initialized zone.
I think think this is a good list of things to do for the upcoming week.
Until then, hope you enjoyed reading this post and if you have any questions or want some tutorial on things I did, don't hesitate to tell me!