
Banshee Engine Architecture - Introduction
Learn about the vision, architecture and design decisions behind Banshee Engine. This is an introductory article that is a part of a larger series.
What is Banshee?
It is a free & modern multi-platform game development toolkit. It aims to provide simple yet powerful environment for creating games and other graphical applications. A wide range of features are available, ranging from a math and utility library, to DirectX 11 and OpenGL render systems all the way to asset processing, fully featured editor and C# scripting. At the time of writing this project is in active development, but its core systems are considered feature complete and a fully working version of the engine is available online. In its current state it can be compared to libraries like SDL or XNA but with a wider scope. Work is progressing on various high level systems as described by the list of features below.Currently available features
- Design
- Built using C++11 and modern design principles
- Clean layered design
- Fully documented
- Modular & plugin based
- Multiplatform ready
- Renderer
- DX9, DX11 and OpenGL 4.3 render systems
- Multi-threaded rendering
- Flexible material system
- Easy to control and set up
- Shader parsing for HLSL9, HLSL11 and GLSL
- Asset pipeline
- Easy to use
- Asynchronous resource loading
- Extensible importer system
- Available importer plugins for:
- FXB,OBJ, DAE meshes
- PNG, PSD, BMP, JPG, ... images
- OTF, TTF fonts
- HLSL9, HLSL11, GLSL shaders
- Powerful GUI system
- Unicode text rendering and input
- Easy to use layout based system
- Many common GUI controls
- Fully skinnable
- Automatch batching
- Support for texture atlases
- Localization
- Other
- CPU & GPU profiler
- Virtual input
- Advanced RTTI system
- Automatic object serialization/deserialization
- Debug drawing
- Utility library
- Math, file system, events, thread pool, task scheduler, logging, memory allocators and more
Features coming soon (2015 & 2016)
- WYSIWYG editor
- All in one editor
- Scene, asset and project management
- Play-in-editor
- Integration with scripting system
- Fully customizable for custom workflows
- One click multi-platform building
- C# scripting
- Multiplatform via Mono
- Full access to .NET library
- High level engine wrapper
- High quality renderer
- Fully deferred
- Physically based shading
- Global illumination
- Gamma correct and HDR rendering
- High quality post processing effects
- 3rd party physics, audio, video, network and AI system integration
- FMOD
- Physx
- Ogg Vorbis
- Ogg Theora
- Raknet
- Recast/Detour
Download
You might want to retrieve the project source code to better follow the articles to come - in each article I will reference source code files that you may view for exact implementation details. I will be touching onto features currently available and will update the articles as new features are released. You may download Banshee from its GitHub page: https://github.com/BearishSun/BansheeEngineVision
The ultimate goal for Banshee is to be a fully featured toolkit that is easy to use, powerful, well designed and extensible so it may rival AAA engine quality. I'll try to touch upon each of those factors and let you know how exactly it attempts to accomplish that. Ease of use Banshee interface (both code and UI wise) was created to be as simple as possible without sacrificing customizability. Banshee is designed in layers, with the lowest layers providing most general purpose functionality, while higher layers reference lower layers and provide more specialized functionality. Most people will be happy with the simpler more specialized functionality, but lower level functionality is there if they need it and it wasn't designed as an afterthought either. Highest level is imagined as a multi-purpose editor that deals with scene editing, asset import and processing, animation, particles, terrain and similar. Entire editor is designed to be extensible without deep knowledge of the engine - a special scripting interface is provided only for the editor. Each game requires its own custom workflow and set of tools which is reflected in the editor design. On a layer below lies the C# scripting system. C# allows you to write high level functionality of your project more easily and safely. It provides access to the large .NET library and most importantly has extremely fast iteration times so you may test your changes within seconds of making them. All compilation is done in editor and you may jump into the game immediately after it is done - this even applies if you are modifying the editor itself. Power Below the C# scripting layer lie two separate speedy C++ layers that allow you to access the engine core, renderer and rendering APIs directly. Not everyone's performance requirements can be satisfied on the high level and that's why even the low level interfaces had a lot of thought put into them. Banshee is a fully multithreaded engine designed with performance in mind. Renderer thread runs completely separate from the rest of your code giving you maximum CPU resources for best graphical fidelity. Resources are loaded asynchronously therefore avoiding stalls, and internal buffers and systems are designed to avoid CPU-GPU synchronization points. Additionally Banshee comes with built-in CPU and GPU profilers that monitor speed, memory allocations and resource usage for squeezing the most out of your code. Power doesn't only mean speed, but also features. Banshee isn't just a library, but aims to be a fully featured development toolkit. This includes an all-purpose editor, a scripting system, integration with 3rd party physics, audio, video, networking and AI solutions, high fidelity renderer, and with the help of the community hopefully much more. Extensibility A major part of Banshee is the extensible all-purpose editor. Games need custom tools that make development easier and allow your artists and designers to do more. This can range from simple data input for game NPC stats to complex 3D editing tools for your in-game cinematics. The GUI system was designed to make it as easy as possible to design your own input interfaces, and a special scripting interface has been provided that exposes the majority of editor functionality for variety of other uses. Aside from being a big part of the editor, extensibility is also something that is prevalent throughout the lower layers of the engine. Anything not considered core is built as a plugin that inherits a common abstract interface. This means you can build your own plugins for various engine systems without touching the rest of engine. For example, DX9, DX11 and OpenGL render system APIs are all built as plugins and you may switch between them with a single line of code. Quality design A great deal of effort has been spent to design Banshee the right way, with no shortcuts. The entire toolkit, from the low level file system library to GUI system and the editor has been designed and developed from scratch following modern design principles and using modern technologies, solely for the purposes of Banshee. It has been made modular and decoupled as much as possible to allow people to easily replace or update engine systems. Plugin-based architecture keeps all the specialized code outside of the engine core, which makes it easier to tailor it to your own needs by extending it with new plugins. It also makes it easier to learn as you have clearly defined boundaries between systems, which is further supported by the layered architecture that reduces class coupling and makes the direction of dependencies even clearer. Additionally every non trivial method, from lowest to highest layer, is fully documented. From its inception it has been designed to be a multi-platform and a multi-threaded engine. Platform-specific functionality is kept to a minimum and is cleanly encapsulated in order to make porting to other platforms as easy as possible. This is further supported by its render API interface which already supports multiple popular APIs, including OpenGL. Its multithreaded design makes communication between the main and render thread clear and allows you to perform rendering operations from both, depending on developer preference. Resource initialization between the two threads is handled automatically which further allows operations like asynchronous resource loading. Async operation objects provide functionality similar to C++ future/promise and C# async/await concepts. Additionally you are supplied with tools like the task scheduler that allow you to quickly set up parallel operations yourself.Architecture
Now that you have an idea of what Banshee is trying to acomplish I will describe the general architecture in a bit more detail. Starting with the top level design which is the four primary layers shown on the image below.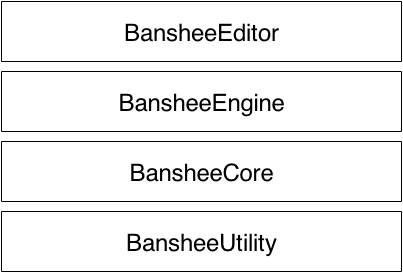
- To give developers a chance to pick the level of functionality they need. Some people will want just core and utility and start working on their own engine while others might be just interested in game development and will stick with the editor layer.
- To decouple code. Lower layers do not know about higher levels and low level code never caters to specialized high level code. This makes the design cleaner and forces a certain direction for dependencies.
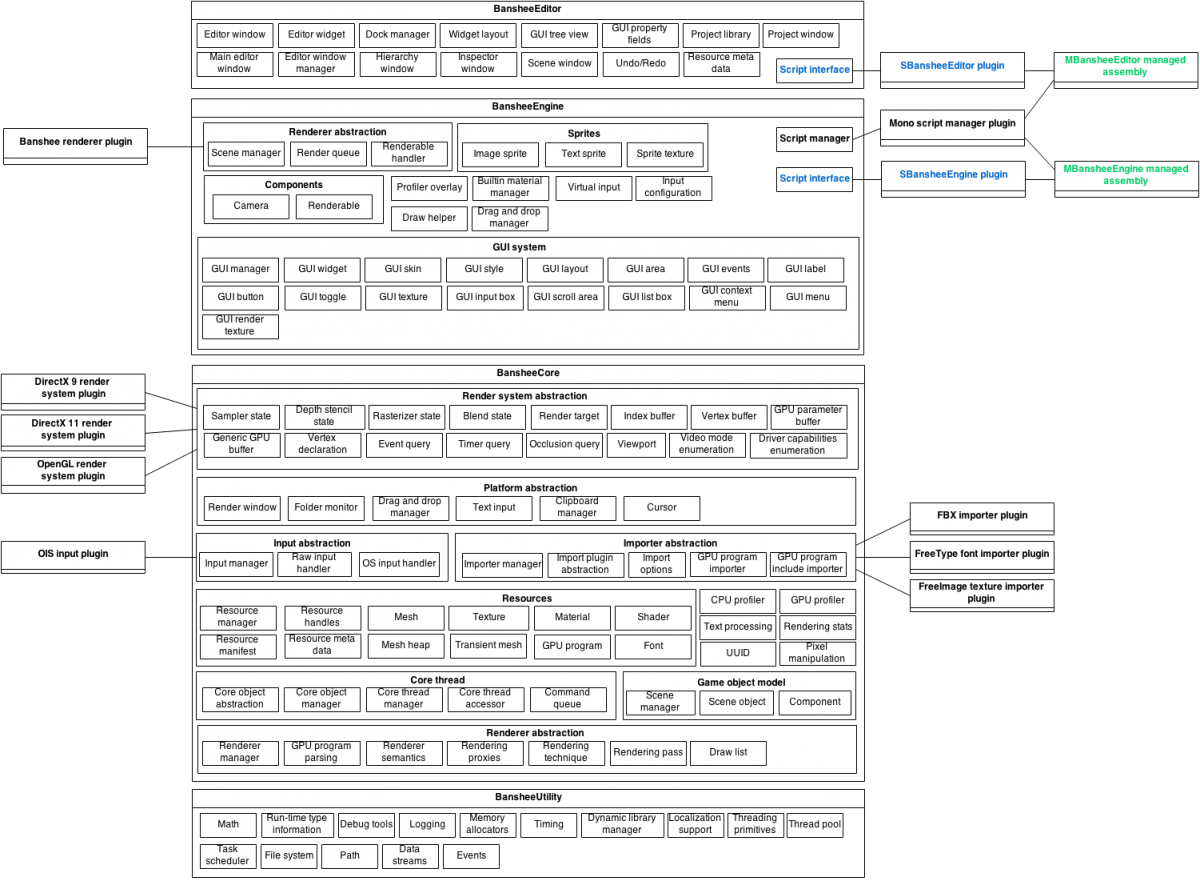
Example application
This section is intended to show you how to create a minimal application in Banshee. The example will primarily be using BansheeEngine layer, which is a high level C++ interface. Otherwise inclined users may use the lower level C++ interface and access the rendering API directly, or use the higher level C# scripting interface. We will delve into those interfaces into more detail in later chapters. One important thing to mention is that I will not give instructions on how to set up the Banshee environment and will also omit some less relevant code. This chapter is intended just to give some perspective but the interested reader can head to the project website and check out the example project or the provided tutorial.Startup
Each Banshee program starts with a call to the Application class. It is the primary entry point into Banshee, handles startup, shutdown and the primary game loop. A minimal application that just creates an empty window looks something like this: RENDER_WINDOW_DESC renderWindowDesc; renderWindowDesc.videoMode = VideoMode(1280, 720); renderWindowDesc.title = "My App"; renderWindowDesc.fullscreen = false; Application::startUp(renderWindowDesc, RenderSystemPlugin::DX11); Application::instance().runMainLoop(); Application::shutDown(); When starting up the application you are required to provide a structure describing the primary render window and a render system plugin to use. When startup completes your render window will show up and then you can run your game code by calling runMainLoop. In this example we haven't set up any game code so your loop will just be running the internal engine systems. When the user is done with the application the main loop returns and shutdown is performed. All objects are cleaned up and plugins unloaded. Resources
Since our main loop isn't currently doing much we will want to add some game code to perform certain actions. However in order for any of those actions to be visible we need some resources to display on the screen. We will need at least a 3D model and a texture. To get resources into Banshee you can either load a preprocessed resource using the Resources class, or you may import a resource from a third-party format using the Importer class. We'll import a 3D model using an FBX file format, and a texture using the PSD file format. HMesh dragonModel = Importer::instance().import<Mesh>("C:\Dragon.fbx"); HTexture dragonTexture = Importer::instance().import<Texture>("C:\Dragon.psd"); Game code
Now that we have some resources we can add some game code to display them on the screen. Every bit of game code in Banshee is created in the form of Components. Components are attached to SceneObjects, which can be positioned and oriented around the scene. You will often create your own components but for this example we only need two built-in component types: Camera and Renderable. Camera allows us to set up a viewport into the scene and outputs what it sees into the target surface (our window in this example) and renderable allows us to render a 3D model with a specific material. HSceneObject sceneCameraSO = SceneObject::create("SceneCamera"); HCamera sceneCamera = sceneCameraSO->addComponent<Camera>(window); sceneCameraSO->setPosition(Vector3(40.0f, 30.0f, 230.0f)); sceneCameraSO->lookAt(Vector3(0, 0, 0)); HSceneObject dragonSO = SceneObject::create("Dragon"); HRenderable renderable = dragonSO->addComponent<Renderable>(); renderable->setMesh(dragonModel); renderable->setMaterial(dragonMaterial); I have skipped material creation as it will be covered in a later chapter but it is enough to say that it involves importing a couple of GPU programs (e.g. shaders), using them to create a material and then attaching the previously loaded texture, among a few other minor things. You can check out the source code and the ExampleProject for a more comprehensive introduction, as I didn't want to turn this article in a tutorial when there already is one. Conclusion
This concludes the introduction. I hope you enjoyed this article and I'll see you next time when I'll be talking about implementing a run-time type information system in C++ as well as a flexible serialization system that handles everything from saving simple config files, entire resources and even entire level hierarchies.Related Tutorials
Ai image to 3D Game ready model and animation in 3 minutes
No 3D modeling or animation skills? No problem! In this video, a professional 3D artist, demonstrates how to create a f…
 alex_cgw

Unreal Engine: Creation of Parallax Occlusion Mapping (POM) in details
Parallax Occlusion Mapping (POM) is a complex texture-based approach to add more details for meshes. With POM we get mo…

Generating a SoulerCoaster in Unity
Learn to create a basic SoulerCoaster effect in Unity.
Creating Promo Art: The Process | Hyperclass Ark
Our artist, Philip Bell, discussed the stages involved in creating promotional artwork for the project.
 hyperclassark
Lessons, Stages of drawing Digital illustration "Fairytale house in the forest"
At the beginning of this illustration, I did the rough sketch, then drawing the outline, then painting in color, applyi…
 Nadia_Meldova
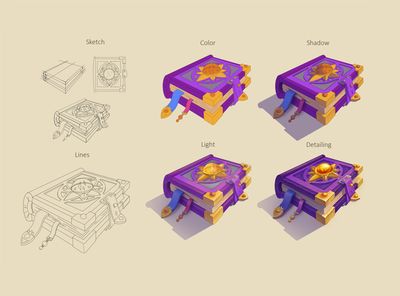
Lessons, Stages of drawing "Magic book"
At the beginning of this illustration, I did the rough sketch, then drawing the outline, then painting in color, applyi…
Nadia_Meldova
Discussion