
Building a First-Person Shooter Part 1.0: Creating a Room
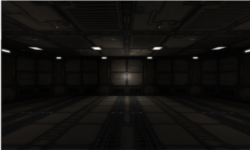
In this lesson we make use of the Leadwerks engine and learn to use brushes, materials, UV manipulations, and lights as we build a room for our first-person shooter game.

Getting Started
We're going to write this game in the programming language C++. C++ compiles to native code, which gives us the fastest possible performance on mobile devices. The object-oriented nature of C++ makes it great for games. We begin by creating a new C++ project. To open the project manager, select the File > Project Manager menu item. When it appears, press the Import button and select the zip file posted at the top of this lesson. (In older versions of Leadwerks, you will need to create a new project called "FPSGame" and then manually extract the zip file into this project's folder.)If you do not have a copy of the Leadwerks engine, a free 30-day trial can be downloaded to use with this tutorial

Using Brushes to Sketch Out a Room
Since this tutorial is focused on the player class we are only going to sketch out a simple rectangular room for our player to run around in. Select the box primitive brush from either the Objects tab or the shortcut box brush icon located on the left toolbar. In the X/Z viewport sketch out a box that has a width and length of 16 and height of about 0.25. This will be the floor of our level. Create four more boxes to form the walls, and finally top it off with a ceiling.
Room Materials
At this point our room should look like a very bland box, luckily it's time to spice things up and bring our room to life with materials. Left click on the asset browser and expand then select the Materials->Spaceship folder. Inside should be a group of textures and materials. Next drag and drop the "scificeilingb" material to the ceiling box in the 3D viewport, the changes should immediately appear. Scroll down in the asset browser to the "scififloorb" material and drag and drop it onto the floor box. Finally select the "scifiwall_basea2" material and drag it onto all four walls.


UV Manipulations
When you take some time to look around the room, the first thing that jumps out at you is that the material pattern is repeating itself very often thus drawing too much attention to itself. To remedy this we are going to scale the materials texture. Start off by opening the objects tab on the right toolbar. Next we are going to change to selection mode to "Select Surface" Edit->Select Surface or alternatively click the "Select Surface" shortcut icon located second from the top on the left toolbar. In the 3D viewport left click on the floor of the room, then under the Texture Mapping section of the objects tab change both scale values to 4.0. After repeating the texture scaling on all four walls and the ceiling it will be time to move onto lights.
Lights
Now that we have our room's materials set it is time to add some lights to the room. For this tutorial we are going to add in four point lights, these lights emit light in a radius similar to that of a traditional light bulb. On the left toolbar there is an icon showing a light bulb, this is the point light shortcut, left click on the icon. With the light bulb icon selected, left click anywhere in a 2D view port and press the Enter key and a point light will be added into the map. Create four of these to illuminate your room. Now it's time to adjust the light ranges. Left click on the map tab and select the four point lights in the Scene Browser. Next left click on the "Light" tab and set the range value to 9.0. This will increase the radius of the light.
 Our final step is to create the map's lightmap, so that our lights take effect on static objects. In the top toolbar navigate to Tools->Calculate Lighting (or press ctrl+L), a Calculate Lighting window should pop up. Click Render and after the lighting is calculated close both windows and we are done adding lights.

 The level is now complete, now it's time to create a player to run around in our room. Before moving on don't forget to save the map. Select the File > Save menu item and save the map as "start.map".
  The next lesson will cover setting up Visual Studio so we can code some functionality into the level.
Related Tutorials
Balancing Game Development and Creative Direction in Indie Production
A practical look at how indie developers can balance creative direction with hands-on game development. This article co…
 huseyin_onur
My Unreal Engine Development Process: From Core Idea to Playable Build
A practical overview of my Unreal Engine development process, covering how I move from a core game idea to a playable b…
huseyin_onur

Introducing LaneGraph: The Ultimate Road Network Solution for Unity
Discover the power of LaneGraph, a lightweight and flexible lane-based navigation system for Unity. LaneGraph makes it…
Retargeting Mixamo Characters with Root Motion In Unreal Engine 5.4.
I have always found Retargeting Mixamo Characters To have Root Motion is a serious lengthy Tast, Recently I stumbled up…

How To Make A SIMPLE Main Menu In Unity
In this tutorial for unity, i go over how to make a simple main menu for unity, it's an unlisted video because i do not…
 FlipThaSwitzh

Guide to Gameplay Balance
A perspective on competitive gameplay balance, from a background of "shooter" sandbox design.
 Tucker933
Discussion
More from Chris Vossen
Building a First-Person Shooter Part 1.2: The Player Class
In this tutorial we will begin to flesh out our player class by adding in a camera and setting up character physics.
Chris Vossen
Building a First-Person Shooter Part 1.1: Visual Studio Setup
This is the second lesson in a set of tutorials that demonstrate how to build a complete first-person shooter game, fro…
Chris Vossen
Building a First-Person Shooter: Part 1.6 Sound
In this tutorial we will finish off this First-Person Shooter Tutorial 1 by adding in sound effects into the game.
ChrisVossen
Discussion