
Making 2.5D Game in Unity – Part 3
Create a shader with Shader Graph that will allow us to blend 3D objects into our 2.5D environment in a harmonious way.

In the third part of the tutorial, we will make a shader with Shader Graph that will allow us to blend 3D objects into our 2.5D environment in a harmonious way.
Let’s have a look at the final result of this shader:

On the left, we have a regular object, and on the right, an object with our shader. Do you notice how the unmodified object sticks out, while the modified object blends in?
To better understand the difference, let’s look at how the shader effect primitive objects – the right object of each primitive is the modified one.
It may look a bit weird when we isolate a 3D object, but as a whole, when it surrounded by 2D sprites, it feels much more unified and ties the whole game together.
Base Shader
This quick-fix is useful if you have a static game object that doesn’t need rotation. Even if you need a more advanced movement, this part explains the approach we are taking and is the base for a more advanced shader we will create later in this article.
What we are trying to achieve is skewing the 3D models in the same angle as the 2D sprites.

From a side view, it looks like this. The left line represents a 2D sprite, and the right box represents a 3D cube. What the shader does is skewing the Cube to match the 45 degrees rotation of the 2D sprite.
The way the shader works is by translating the Z position of each vertex with the same amount of its Y position.
OK, let’s start working! In the Project Window, add a new Shader by selecting the Unlit Graph. Name it Simple 3D Skew.
Create the following graph:
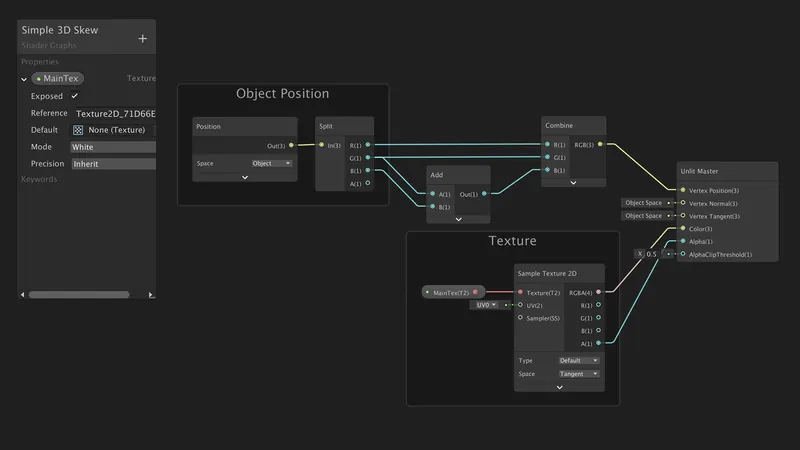
Create a new material by right-clicking the shader we have created and select Create > Material. Name it Simple 3D Skew, and add a texture to its MainTex property.
Assign the material to an object.
Our objects are now skewed as intended – matching the rotation of the sprites.
When we select an object, notice how the outline is still rendering without the shaders skew. This is because the shader only affects the rendering, and not, let’s say physics colliders. Recall from the first part that this is actually good for us as we treat physics colliders as they are full 3D objects without rotating them.
The shader now works, but we have an issue. Take a look at what happens if we rotate an object. The skewing is always applied to the object relative to its origin transformation. But don’t worry, we are going to handle it now...
Advanced Shader
We can now take our shader to the next level by allowing transforming the objects. We can do it by applying the skewing effect in the World Space instead of the Object Space.
In the Project Window, add a new Shader by selecting the Unlit Graph. Name it “Advanced 3D Skew” and create the following graph:
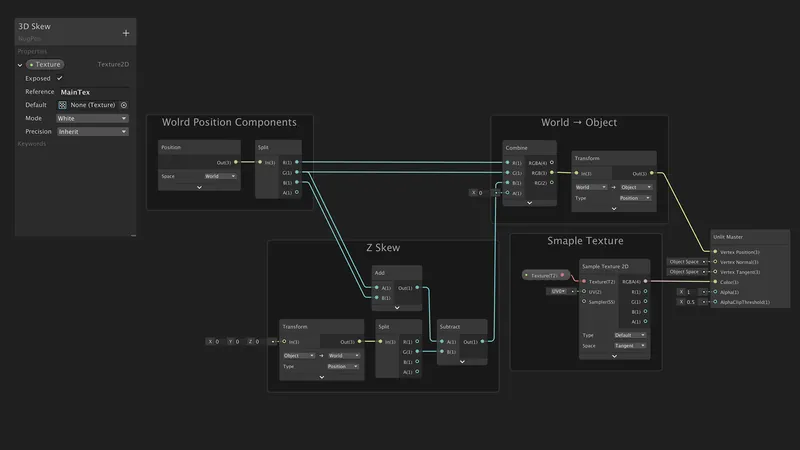
Create a material by right-clicking the shader and selecting Create > Material; we will name it Advanced 3D Skew. Set the texture property with a texture of your choice. We can now assign the material to the object in the scene instead of the basic shader material.
Notice the Z Skew nodes group in the bottom right, without when we move to objects upwards – instead of just pushing the object up, it also pushes it back.

The issue happens because we add the Y position of a vertex in the World Space – if the object is high in the scene, it will push the Z position beyond our intentions.
What we do to solve it is to take the Y position of the object’s origin point, and reduce it from our skew. This will ensure we only skew Z relative to our object position.
***
You may encounter a glitch while transforming an object or moving the camera; this happens because of the render pipeline’s batching. While we can go to the render pipelines setting and turn off batching, it is better to modify shader’s materials – select the material Advanced 3D Skew and select Enable GPU Instancing.
***
If you want to download the shaders we have created, you can download the Unity project from GitHub: Download Unity Project
Recommended resources
Game Engines

Unreal Engine 5 Best Practices
Amazon · Book
Written by multi-award-winning Unreal generalist Tyson J. Butler-Boschma, Founder and Creative Director of Toybox Games Studios, this book addresses common challenges you face when advancing your expertise in lighting, environment design, and cinematic storytelling.
GameDev.net may earn a commission if you purchase through these links. This helps fund the site at no extra cost to you.
Related Tutorials

Procedural Generation of 2D Tile Maps in Games
The article explains how to build a procedural 2D cave map generator using cellular automata. It covers map representat…

Localizing A Game Into French — Which Variant Should You Choose?
So, you’re making an awesome indie game, and now you’re thinking about localizing it into French? Great idea! There ar…
 Level Up Translation

How Long Does It Take To Localize An Indie Game?
So you’re planning on localizing your indie game, but you’re not sure how much time to schedule in. While the timing o…
Level Up Translation

Creating game videos: best practices and pitfalls to avoid
Game video production: practical tips on how to create a game trailer or teaser that you can be proud of. Give your aud…
 Alconost

Adopting CI/CD: How Midwinter Entertainment iterates at speed with the help of IMS
Game development was once like one long sprint: a huge effort until you reached the finish line — at which point you co…
 GameDev.net

5 Things to Consider When Making a Video to Promote Your App or Game
How can you show an app or game in your video in a way that attracts new users? Let’s take a look at what to go by when…
Alconost
Discussion
More from Nirlah
Spine 8 Direction Character | Part 4 – Sword Attack
We will equip our character with a sword and add spine attack animation.
Nirlah
Spine 8 Direction Character | Part 3 – Walk Cycle
In–depth look into the process of Spine 2D walk cycle animation.
Nirlah
Spine 8 Direction Character | Part 2 – Rigging
Rigging our character in Spine, add mashes to create squishy movement, and organize all the different directions to sim…
Nirlah
Discussion